Lab 5.3: Fuzzing with Burp
VMs Needed
- Windows
- Ubuntu
Lab Video
Objectives
- Use a fuzzer to test for injection vulnerabilities in a web application.
- Perform valid user enumeration with a fuzzer.
- Brute-force user authentication using a fuzzer.
Lab Preparation
Boot the VMs required for the lab (see the "VMs Needed" section above) and log on to the Windows VM using the username student and the password student.
Part 1: Fuzzing for Injection Flaws
Background: Fuzzing an application by trying multiple inputs using an automated tool can be a quick way to identify potential vulnerabilities. In this section of the lab, you will use Burp's fuzzer, called Intruder, to test a REST API endpoint for SQL injection. You will practice exploiting SQL injection in another lab, so in this lab, you will examine the responses to various inputs to see if they indicate that the application behaves differently with input designed to inject code into a database query.
Juice Shop has a REST API endpoint for conducting product searches. From interviewing the developers (or even just analyzing the HTTP history), you have learned that the URL for the API endpoint is http://juiceshop.lab.local/rest/products/search. Search strings are passed using GET requests and a parameter named q. The front-end JavaScript running in the browser sends search strings to the API and receives JSON results for any products that match the search. You'll interact manually with the API, then use Intruder to send multiple automated requests and finally, analyze the results.
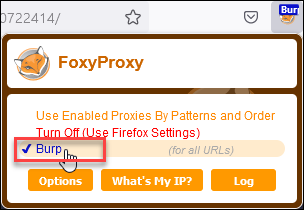
Instructions: Open Firefox in the Windows VM if it is not already open and ensure that Burp is running and set as the default proxy for Firefox. Click on the FoxyProxy icon in Firefox and select the Burp option.
Browse to the REST endpoint for the search function. Include a search string in the q parameter to make it easier to modify the request later in Intruder.
http://juiceshop.lab.local/rest/products/search?q=apple
http://juiceshop.lab.local/rest/products/search?q=apple
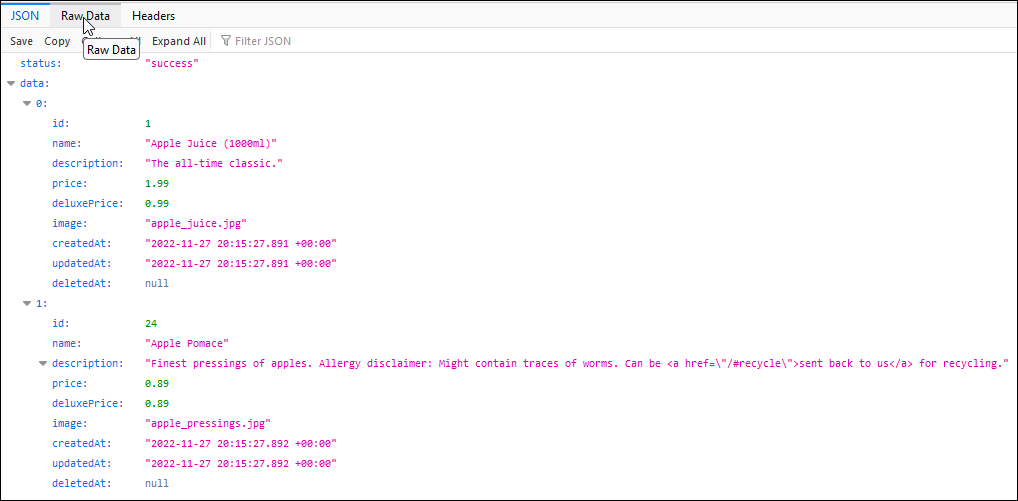
Notice that the API returns two results as JSON data. Firefox will parse the JSON and print the results in the browser window in a readable format. If you would like to see the raw JSON data, simply click the Raw Data button at the top of the content window.

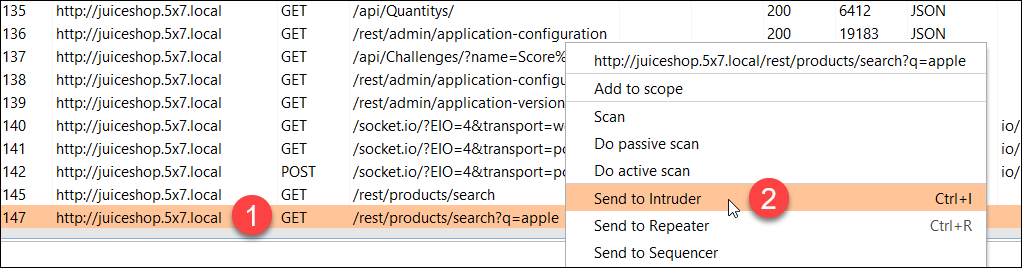
Switch to Burp and click the request you just made in the Proxy | HTTP History tab. It will be a GET request to /rest/products/search?q=apple. You can examine the request and JSON response at the bottom of the Burp window.
Right-click the request and choose Send to Intruder in the context menu.
The Intruder tab will briefly be highlighted to signal that Intruder has received the request. Click on the Intruder tab to begin setting up the fuzzing test.
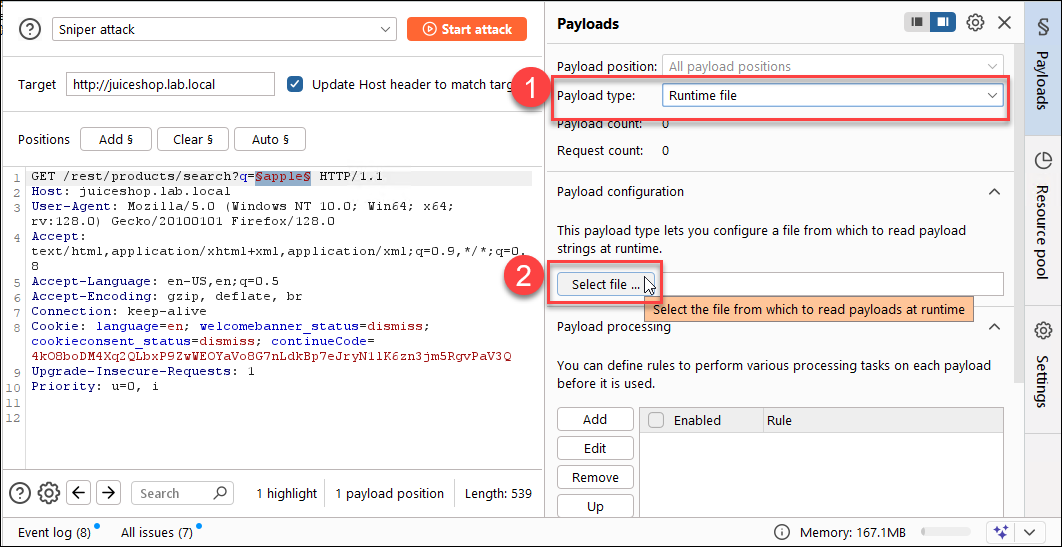
Highlight the word "apple" in the query string and add a position marker to it using the Add § button. This will allow Intruder to replace the query parameter with the strings you tell it to use in a later step.
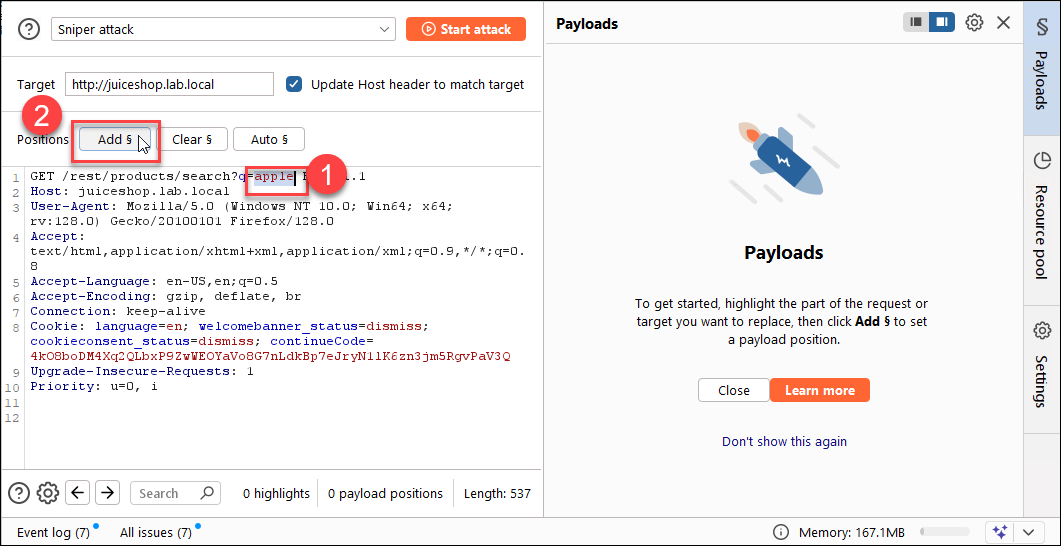
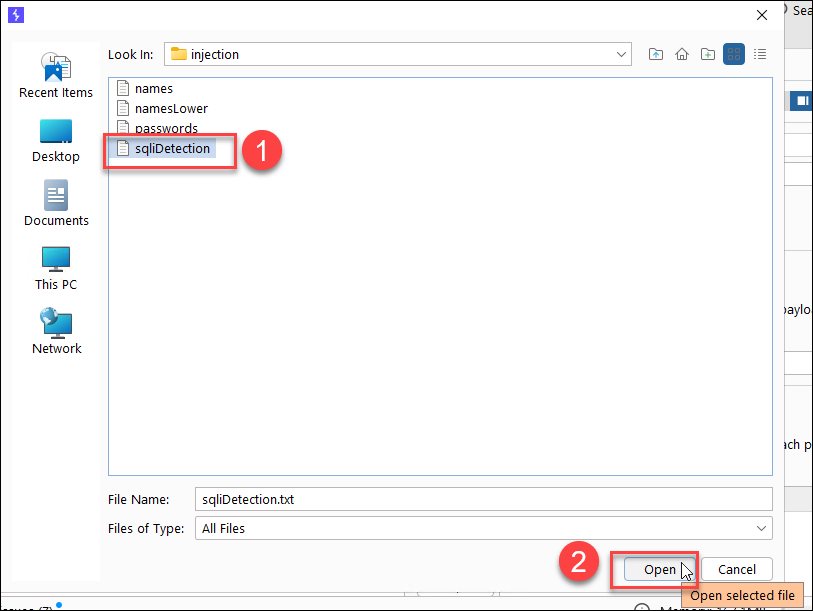
The query parameter should now be surrounded by the position-marking character.In the Payload area, choose the Runtime file as the payload type. Then, click the Select file... button and browse to the C:\LabFiles\injection directory. Choose the sqliDetection text file and click the Open button in the dialog box. This file contains a list of strings for finding SQL injection flaws, taken from a GitHub repository named "FuzzDB," with a few additions made over the years, as we have found useful test strings. Intruder will send each string as the payload in a separate request and store the results for you to analyze later.
For this lab, you do not need to create a special resource pool, but it can sometimes be a good idea to create a pool that uses fewer simultaneous requests in order to avoid overloading a server with traffic. If you were testing an API or application using the POST method with data formatted as JSON, you would want to uncheck the option to URL-encode characters in the request, as that may change the results.
Click the Start attack button to begin the Intruder tests of the API. Intruder will display the results for each request in the attack window. Notice that you can sort the responses by clicking on the heading of any column in the window. In our audits, we find it useful to analyze the return codes and the length of the response.
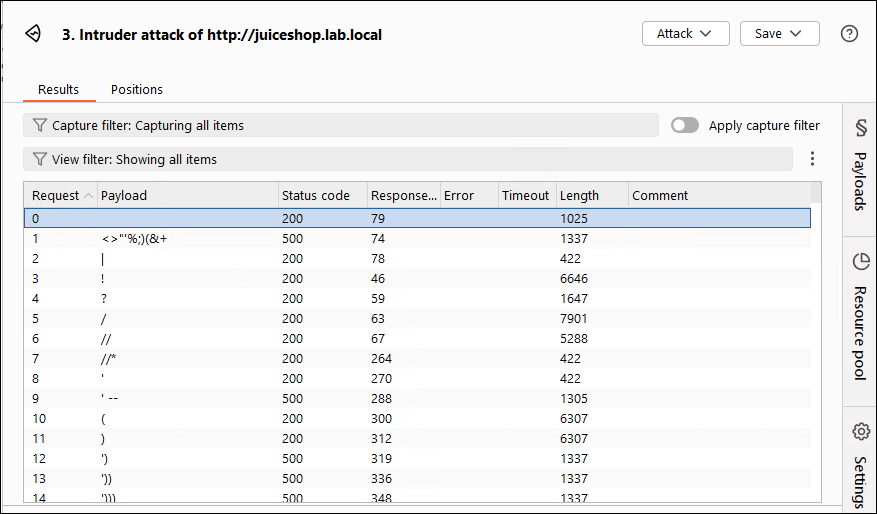
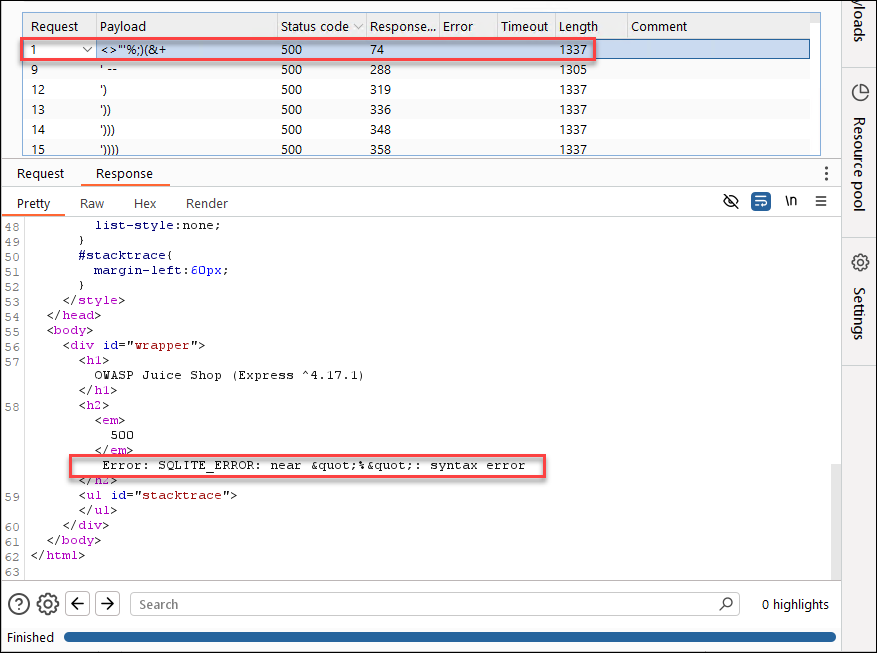
Click on the column headings for Status code twice: the first time will cause it to sort in ascending order; the second will change to descending. You should notice a large number of HTTP 500 response codes have been sorted to the top. These server-side errors are a good indicator that the API may be vulnerable to injection.
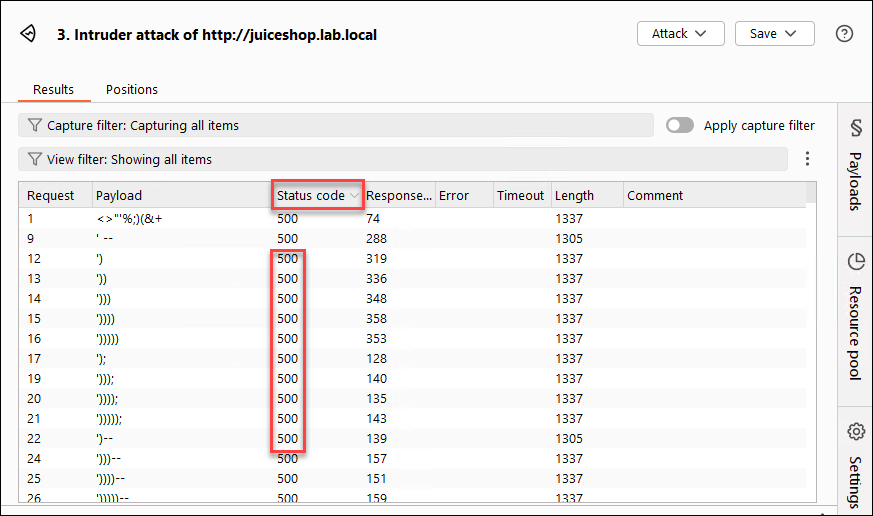
Click on the request with an ID of 1 and then click on the response tab at the bottom of the attack window. If you scroll down, you will see on line 58 that the API has returned a SQL error as part of its response. This is a very good indicator that the API is vulnerable to a SQL injection attack.
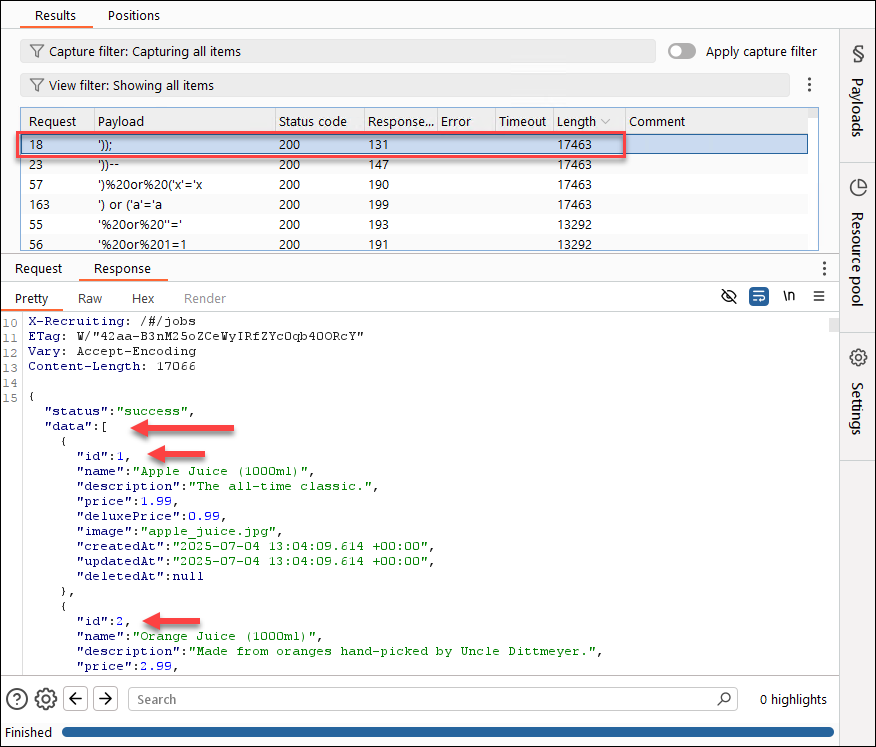
Next, try clicking the header for the Length column until it is sorting in descending order. If you click on request #18 and review the response tab, you will see that it returned what seems to be every record in the database! In fact, a few of the requests result in the same response length. For your audit, you would want to make note of the fact that payload strings beginning with a single quote seem to be useful against this API. The string ')) seems to be quite effective. You'll make use of this information in another lab.
Fuzzing results like this can save you a lot of time compared to doing manual testing against an application! Close the Intruder Attack window when you have finished looking at results. Click the Discard button if you are asked whether to save the attack.
Part 2: Fuzzing for Enumerating Usernames
Background: Attackers will frequently attempt to enumerate a list of valid users for a web application. A list of "good" users can be used as the basis of brute force authentication attempts or could be used for phishing attacks against the users if there is a correlation between usernames and email addresses. In this section of the lab, you will use Intruder to try to identify legitimate email addresses for registered users of the Juice Shop application.
Through open-source intelligence gathering or interaction with the company, an attacker can determine that Juice Shop uses firstname@juice-sh.op for their email addresses. The Juice Shop web application has a password reset feature based on correctly answering a security question. When the user enters a correctly formatted email address, the front-end code sends the email address to a REST API, which checks to see if that email is registered and returns the password reset question if it is. You'll leverage this API in your testing.
Instructions: Make sure that Firefox is running on the Windows VM and that Burp is selected as the default proxy.
Browse to the Juice Shop forgot password form http://juiceshop.lab.local/#/forgot-password.
http://juiceshop.lab.local/#/forgot-password
You'll need to enter a properly formatted email address in the Email textbox to get your browser to make the API call. Enter this address in the textbox:
EMAIL@juice-sh.op
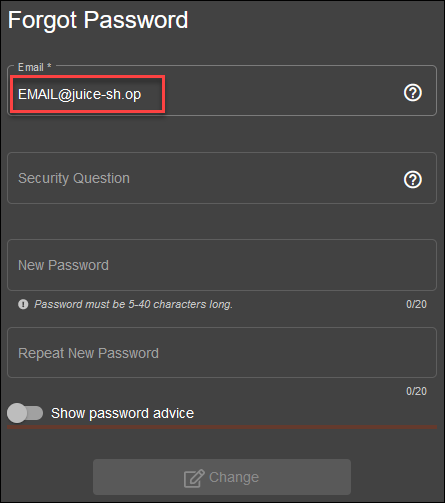
Since that address is not registered with the application, the input form will not change, but the browser HAS made an API call that will show up in the HTTP history in Burp. Switch to Burp and view the Proxy | HTTP history tab and click on the last GET request to the /rest/user/security-question URL. Notice in the response that an empty JSON object is returned because there is no security question registered for that invalid user. If we had passed a registered email address, we could assume that it would have returned a password reset question. We'll test this theory with Intruder.
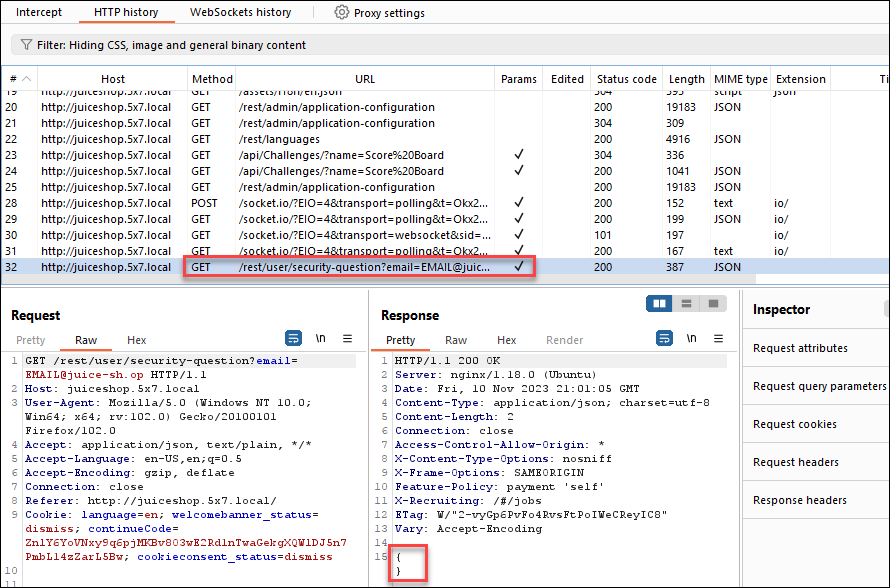
Right-click on the request you identified above and click Send to Intruder in the context menu. The Intruder tab will flash to notify you that it has received the request.
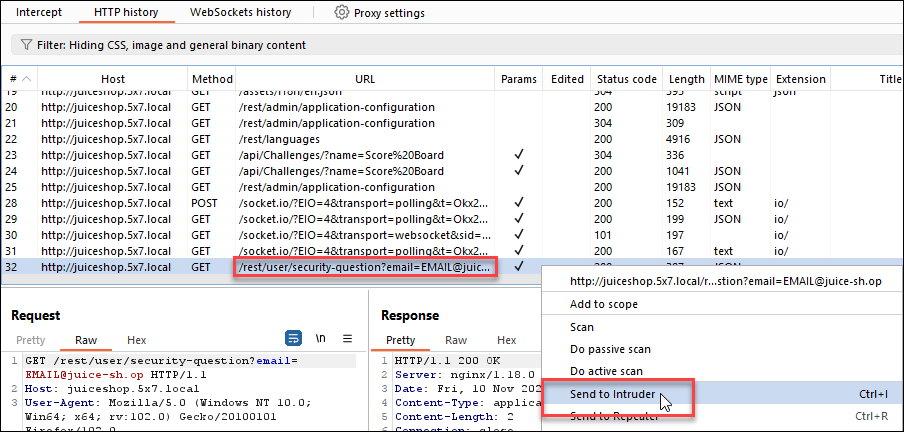
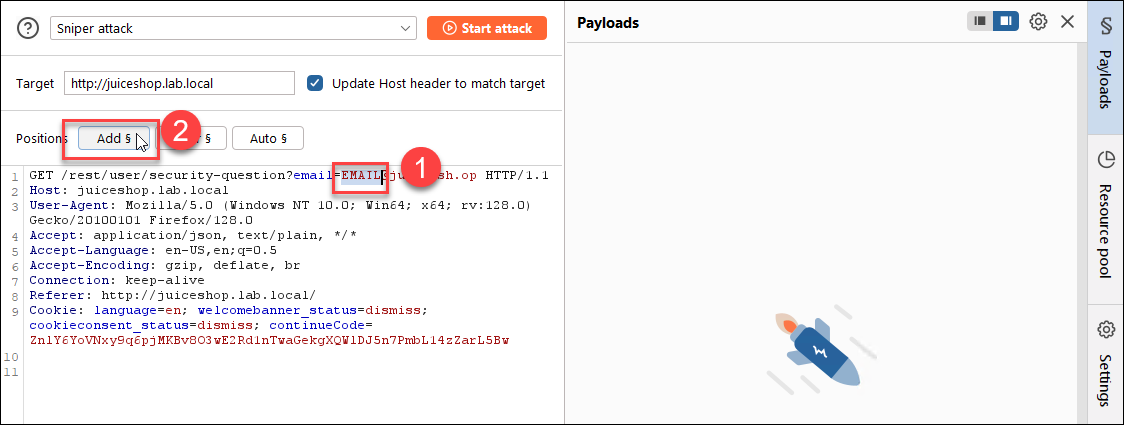
Click on the Intruder tab to set up the test. Then highlight the EMAIL text in the URL and click the Add § button. When you have finished, your screen should look like this:
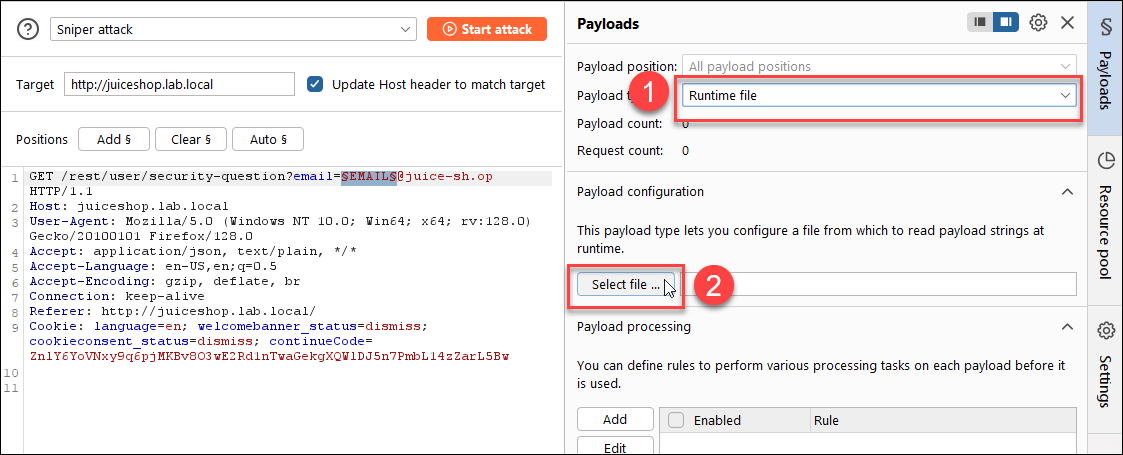
We have provided a file with over 7,000 common first names that you will use to see if you can enumerate valid users for the application. In the Payloads area, set the Payload type to Runtime file and click on the Select file... button.
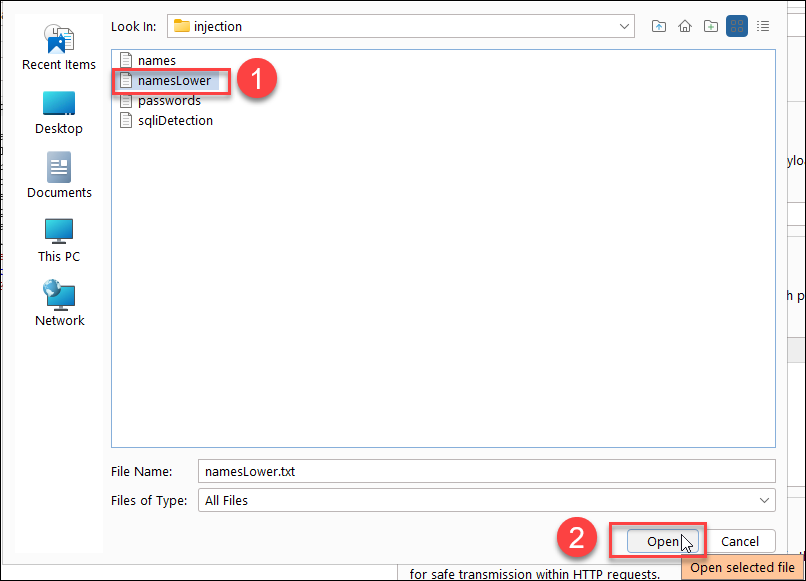
Browse to the C:\LabFiles\injection folder, choose the namesLower test file, and click on the Open button.
Click the Start attack button to begin the test. As before, you will watch the response codes and length of responses to see if you can determine which addresses are valid registered users on the application. The attack may take a few minutes to run since it is generating thousands of requests to the API.
When the attack finishes, sort the results by length, descending. You should notice that nearly all of the results have a length of 392 bytes. If you click on one of those requests and click the Response tab, you will see the same empty JSON object. These are invalid user accounts.
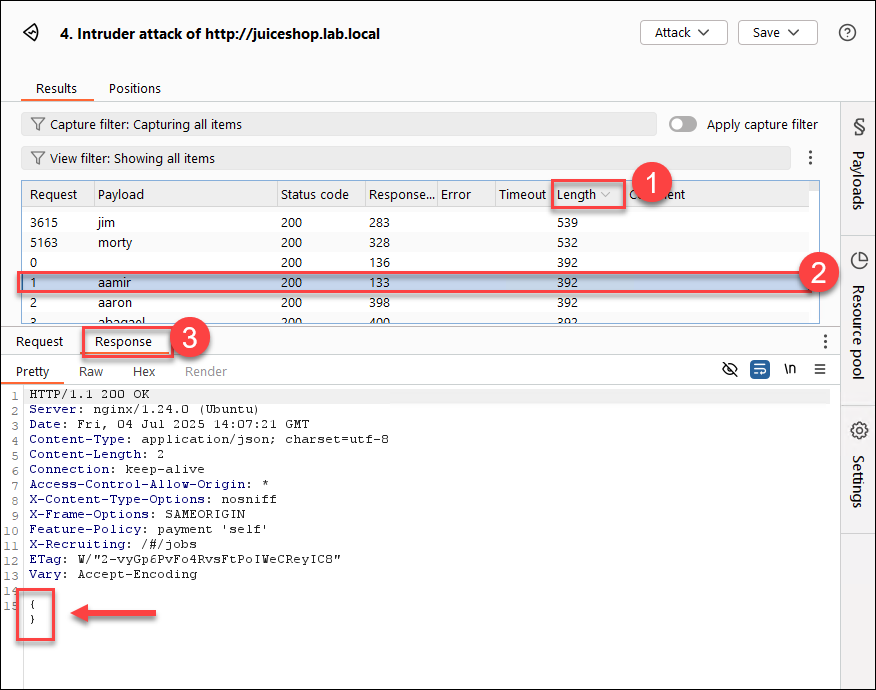
However, if you click on the requests that have a response LONGER than 392 bytes, you will notice that the response includes the password reset question, indicating that this is a VALID user!
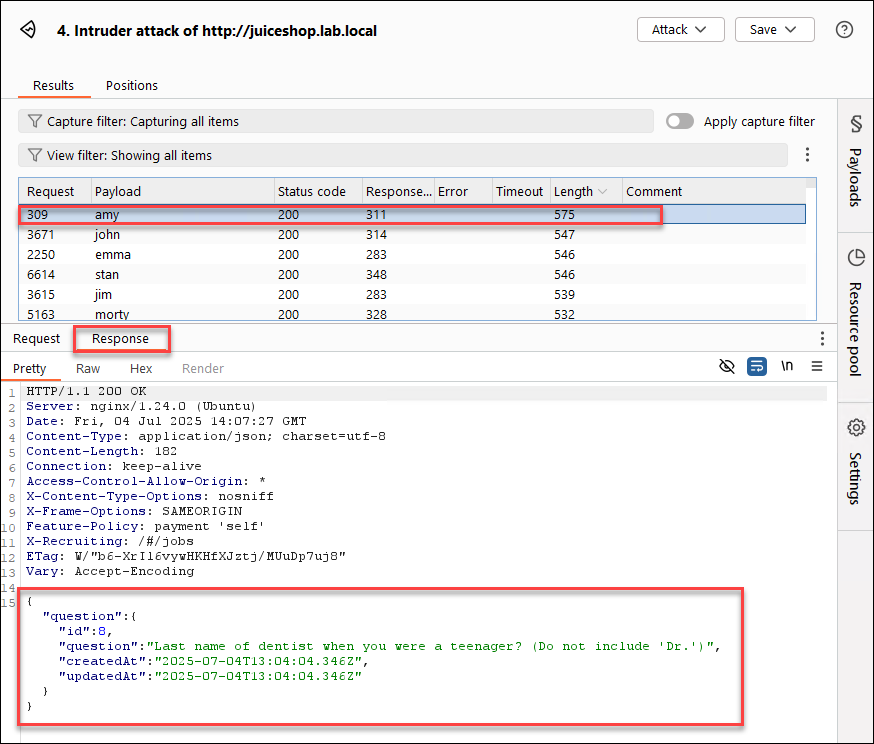
Your fuzzing test has revealed 6 valid users. You will use them in the next section of the lab.
Close the Intruder attack window. Click the Discard button when prompted. Return to the HTTP history by clicking on the Proxy | HTTP History tab.
Part 3: Brute Forcing Authentication
Background: Fuzzers can also be used to perform brute force authentication attacks against web applications. While brute forcing is not really an audit function, we will often simulate a brute force attack against a small set of users to ensure that there are appropriate controls (like account lockouts) in place. In this section of the lab, you will use Intruder to attempt to authenticate each of the users you identified in the previous section.
Instructions: Ensure that Firefox and Burp are running and that Firefox is configured to use Burp as a proxy. In Firefox, browse to the Juice Shop login page at http://juiceshop.lab.local/#/login
http://juiceshop.lab.local/#/login
Enter easy-to-identify text in the Email and Password textboxes. This will make it easier to identify the user input to be manipulated when you set up Intruder. Click the Log in button when you have entered text in both boxes.
Email:
EMAIL
Password:
PASSWORD
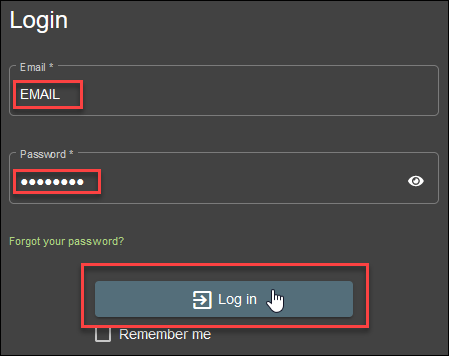
Switch to Burp. Locate and click on the POST request to the /rest/user/login API endpoint. Notice that the data is being sent in a JSON object and that the server returned an HTTP 401 response code, indicating that you passed invalid credentials.
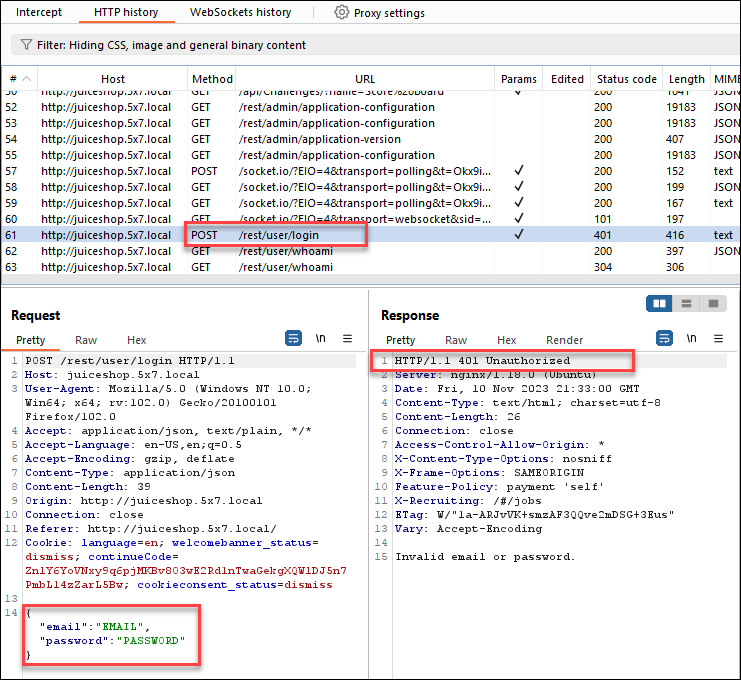
You'll use this request as the baseline for Intruder, so right-click it and choose the Send to Intruder item in the context menu.
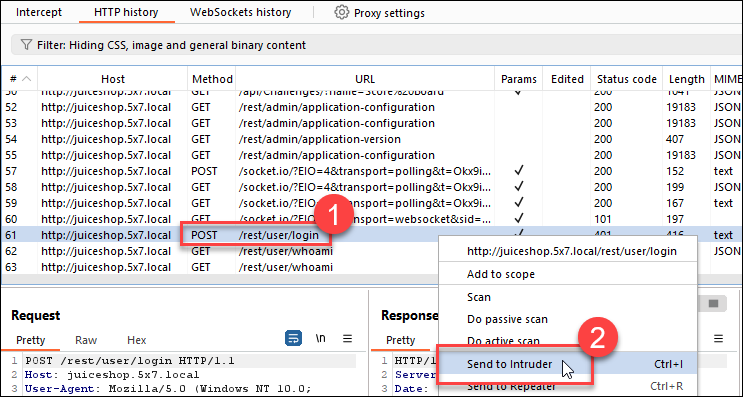
Click on the Intruder tab in Burp to set up the test.
On the Positions tab, highlight the EMAIL text (don't include the quotation marks!) in the request body and click the Add § button. Do the same for the PASSWORD text in the request. Next, change the attack type to Cluster bomb attack, which will allow you to select different payload sources for the email and password fields in the request.
When you have finished, your screen should look like this:
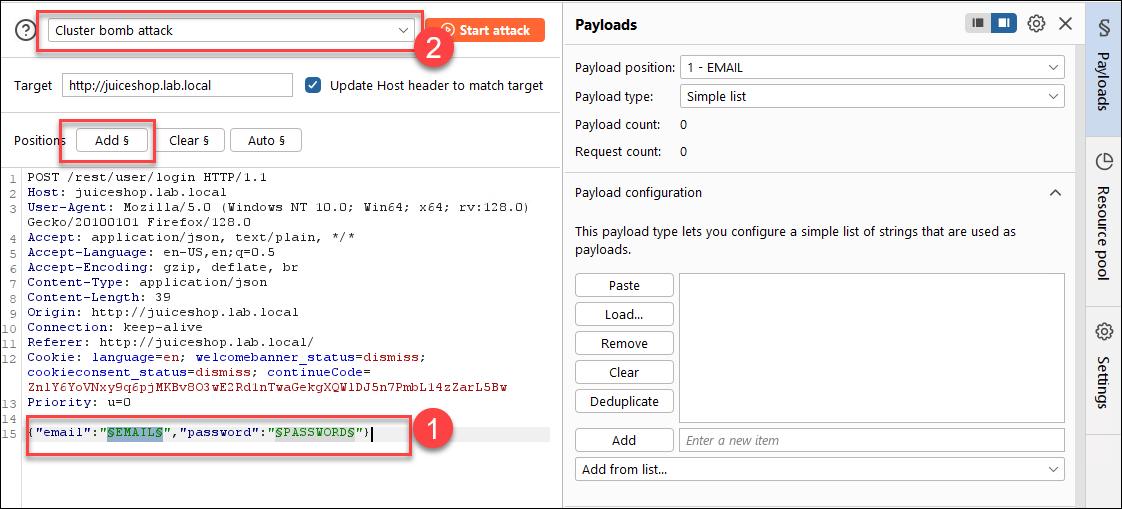
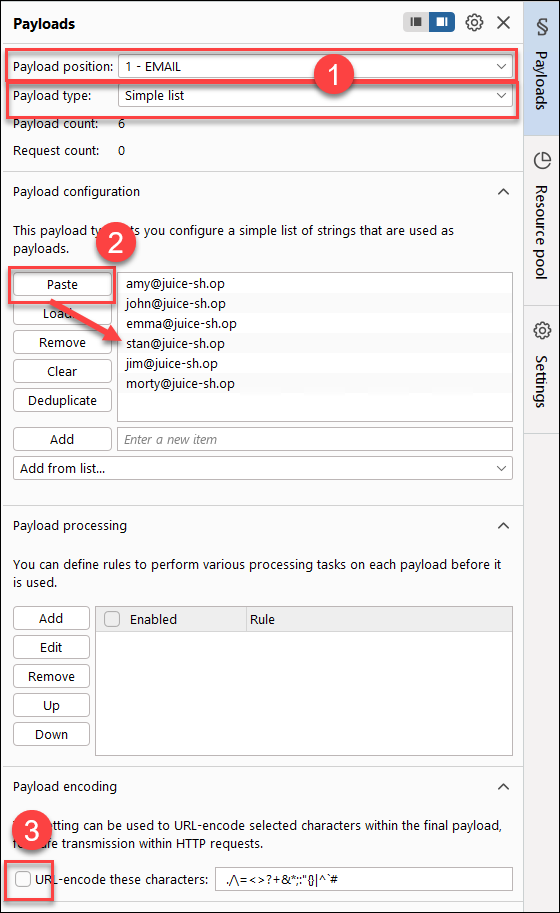
In the Payloads area, set up the data sources for the email and password. Payload set 1 is the email address (because it comes first in the request). You'll use the list of valid users you developed above for the email parameter. Set the Payload type to `Simple list'. Copy the list of email addresses below.
amy@juice-sh.op
john@juice-sh.op
emma@juice-sh.op
stan@juice-sh.op
jim@juice-sh.op
morty@juice-sh.op
Paste the email addresses into the Payload Options text box using the Paste button (CTRL-V will not work!). Since your data is being passed as JSON in the request body, you will also need to uncheck the Url-encoding setting. You should be left with a screen that looks like this:
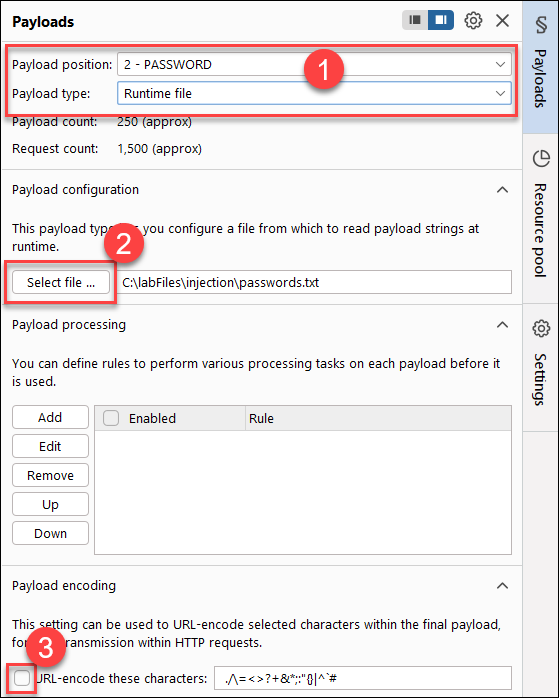
Next, you will set up the data source for the password field. Change the Payload set drop-down to have a value of 2, which represents the password field in the JSON object. Set the payload type to Runtime file. Click the Select file... button and browse to the C:\LabFiles\injection directory. Choose the passwords text file and click the Open button in the dialog box. This file contains a list of commonly used passwords from website breaches. Once again, uncheck the Url-encoding checkbox. Your screen should now look like this:
Once the settings are correct, click the Start attack button. This attack will take some time to run since it's trying every password for every email address.
When the attack has finished, sort on the status code and length columns and see if you can determine whether any passwords were correctly guessed. You should find that one user account has been successfully cracked. The user named jim@juice-sh.op apparently has a password of ncc-1701! Feel free to try to log on as that user on your own.
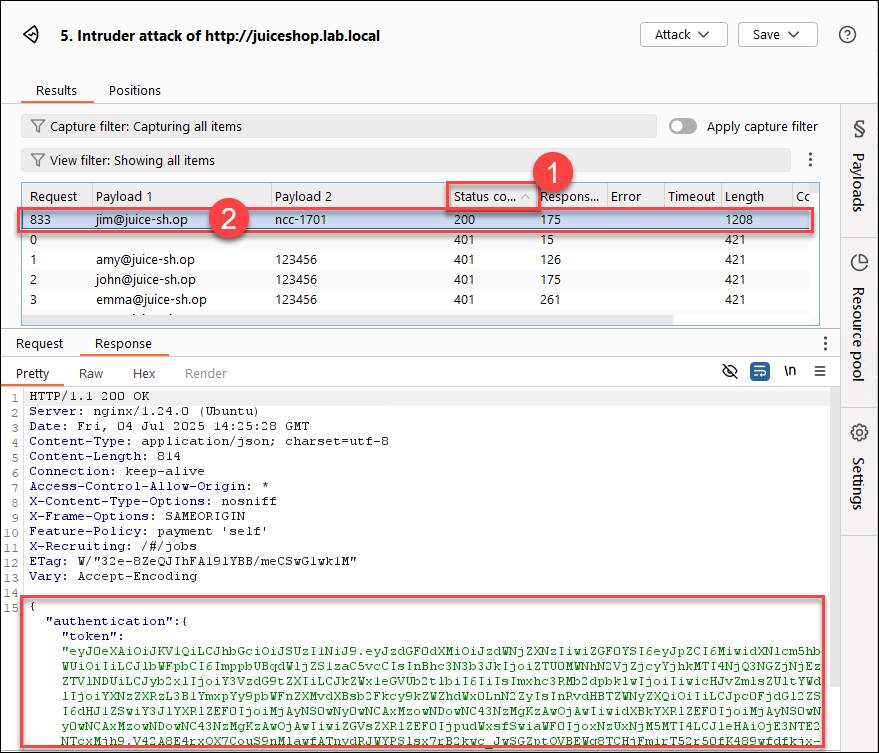
While this is an interesting result and would be appropriate for a penetration test, it also gives us a valid audit finding. The Intruder attack had attempted over 100 logons for Jim's account before it succeeded. This means that there is not an effective control against brute force! You may want to recommend a control like account lockouts to prevent this sort of attack in the application.
Close the Intruder attack window. Click the Discard button if prompted. Return to the HTTP history by clicking on the Proxy | HTTP History tab.
Leave Burp and Firefox running for the next lab.