Lab 2.1: Intro to PowerShell
VMs Needed
- Windows
- Ubuntu
Lab Video
Objectives
- Learn to navigate the PowerShell environment.
- Practice using commands to sort and filter PowerShell command results.
- Explore the use of PowerShell objects.
Lab Preparation
From the Windows VM, open a Windows Terminal by clicking its icon in the taskbar.

Part 1: Navigating PowerShell
Environment Check
Before proceeding, ensure that you are working in Windows Terminal in PowerShell Core.

Background: Throughout the AUD507 course, you will use PowerShell for much of your audit evidence gathering. In this lab, you will explore the basics of PowerShell and learn how to use it as an auditor. This is one of the few labs in the course where the goal is simply familiarization with the tool rather than doing audit fieldwork.
Instructions: Remember from the lecture that there are two versions of PowerShell available for Windows: Windows PowerShell is stuck at version 5.1 and no longer being actively developed. PowerShell Core, which launches by default in Windows Terminal, has a long-term-support version of 7.4, installed on the Windows VM, and also newer 7.5+ versions without long-term support.
Command availability and implementation can vary by PowerShell version, so it's good to know which version you are using during your evidence gathering. You can determine your PowerShell version by viewing the contents of the $PSVersionTable built-in variable. "Invoke" the variable by entering its name at the PowerShell prompt.
$PSVersionTable
If you've used Unix-based operating systems before, you know that Unix treats everything as a file. PowerShell has some similar features. Many of the file handling commands will also work on things like registry keys. This is related to the fact that PowerShell uses a number of virtual disk drives to represent parts of the operating system and operating environment.
You can list the available PowerShell drives using this command:
Get-PSDrive
Sample Results
PS > Get-PSDrive

Name           Used (GB)     Free (GB) Provider      Root
----           ---------     --------- --------      ----
A                                      FileSystem    A:\
Alias                                  Alias
C                  24.39        102.12 FileSystem
Cert                                   Certificate   \
D                                      FileSystem    D:\
Env                                    Environment
Function                               Function
HKCU                                   Registry      HKEY_CURRENT_USER
HKLM                                   Registry      HKEY_LOCAL_MACHINE
Temp               24.39        102.12 FileSystem    C:\Users\student\AppData\Local\Tem…
Variable                               Variable
WSMan                                  WSMan
Live Data in Use!
Remember that your data may differ from these results!
Note that your physical filesystems (like C: and D:) are listed there, but so are the current user and local machine registry hives (HKCU: and HKLM:). PowerShell aliases, functions (discussed elsewhere), and even local variables are also saved in virtual drives.
To change the current working location in PowerShell, you will use the Set-Location cmdlet. Use this command to switch to the root of the c: drive:
Set-Location C:\
To list the contents of a directory (or registry key, etc.), you will use the Get-ChildItem cmdlet:
Get-ChildItem
Sample Results
PS > Set-Location C:\
PS > Get-ChildItem

    Directory: C:\

Mode                 LastWriteTime         Length Name
----                 -------------         ------ ----
d----           6/27/2025  7:48 PM                buildScripts
d----            6/7/2025  3:37 PM                inetpub
d----           6/27/2025  8:22 PM                labFiles
d----           6/27/2025  8:24 PM                Packages
d----           6/27/2025  8:20 PM                packer
d----            4/1/2024  7:02 AM                PerfLogs
d----           6/27/2025  7:48 PM                pester
d-r--           6/27/2025  8:19 PM                Program Files
d-r--           6/27/2025  8:14 PM                Program Files (x86)
d----           6/27/2025  8:17 PM                Python313
d----            6/7/2025  4:27 PM                Temp
d----           6/27/2025  8:20 PM                tools
d-r--           6/30/2025  3:01 PM                Users
d-r--           6/30/2025  2:47 PM                Windows
d----           6/30/2025  2:47 PM                WindowsAzure
-a---           6/27/2025  8:22 PM            715 VMSetup.lnk
To better accommodate users who have experience with other shells, and to speed up the use of common commands, PowerShell makes use of command aliases. An alias is a command that "points" to the real PowerShell command. Some examples are below. Run each, and you will get the same results as you did with Get-ChildItem.
dir
ls
gci
You can view the definition for an alias using the Get-Alias command.
Get-Alias -Name gci
Sample Results
PS > Get-Alias -Name gci

CommandType     Name                                               Version    Source
-----------     ----                                               -------    ------
Alias           gci -> Get-ChildItem
Note that PowerShell is case-insensitive in most cases, so how you capitalize the command does not matter. Also, note that many PowerShell commands have "positional" parameters, meaning that the parameter name can be safely omitted when the command is run. The -Name parameter of the Get-Alias command is positional. This command is functionally equivalent to the one you just ran:
get-alias gci
Sample Results
PS > get-alias gci

CommandType     Name                                               Version    Source
-----------     ----                                               -------    ------
Alias           gci -> Get-ChildItem
PowerShell has the Get-Command cmdlet, which will allow you to search for commands that meet your specified criteria. Get-Command also has a positional Name parameter. If you knew that you needed to query local users for an audit, but could not remember the command, you could search for commands starting with "get" and ending with "user." Note the use of the wildcard character in the search string:
Get-Command get*user
Sample Results
PS > Get-Command get*user

CommandType     Name                                               Version    Source
-----------     ----                                               -------    ------
Alias           Get-PIUser                                         13.1.0.21… VMware.VimAutomation.Cloud
Function        Get-AzADUser                                       6.12.0     Az.Resources
Function        Get-AzStaticWebAppUser                             3.1.2      Az.Websites
Cmdlet          Get-ADUser                                         1.0.1.0    ActiveDirectory
Cmdlet          Get-APSUser                                        4.1.454    AWSPowerShell.NetCore
Cmdlet          Get-AzApiManagementUser                            4.0.2      Az.ApiManagement
Cmdlet          Get-AzDataBoxEdgeUser                              1.1.0      Az.DataBoxEdge
Cmdlet          Get-AzStorageLocalUser                             6.0.0      Az.Storage
Cmdlet          Get-LocalUser                                      1.0.0.0    Microsoft.PowerShell.LocalAccounts
Cmdlet          Get-CGIPUser                                       4.1.454    AWSPowerShell.NetCore
Cmdlet          Get-CHMAppInstanceUser                             4.1.454    AWSPowerShell.NetCore
Cmdlet          Get-CHMChannelMembershipForAppInstanceUser         4.1.454    AWSPowerShell.NetCore
Cmdlet          Get-CHMChannelModeratedByAppInstanceUser           4.1.454    AWSPowerShell.NetCore
Cmdlet          Get-CHMIDAppInstanceUser                           4.1.454    AWSPowerShell.NetCore
Cmdlet          Get-CHMMGChannelMembershipForAppInstanceUser       4.1.454    AWSPowerShell.NetCore
...
[Results Truncated]
For this audit requirement, you would probably want to use the Get-LocalUser cmdlet returned in the results. If you need help on how to use the command, you can use the Get-Help cmdlet. It is similar to the Unix man command (in fact, PowerShell has a man alias!) and will give information about the command, its input and output, and any parameters it supports.
Start by ensuring that the help files are current on your Windows VM. Note that this command may take some time to run, as it is updating a large number of help files. Also, note that you may see errors in the command output regarding missing help files on the Microsoft websites. These will not affect your labs.
Update-Help
Sample Results
PS > Update-Help
Updating Help for module Microsoft.PowerShell.Utility [Locating Help Content...
With the files updated, you can view the help file for the Get-LocalUser cmdlet:
Get-Help Get-LocalUser
Sample Results
PS > Get-Help Get-LocalUser

NAME
    Get-LocalUser

SYNOPSIS
    Gets local user accounts.


SYNTAX
    Get-LocalUser [[-Name] <System.String[]>] [<CommonParameters>]

    Get-LocalUser [[-SID] <System.Security.Principal.SecurityIdentifier[]>] [<CommonParameters>]


DESCRIPTION
    The `Get-LocalUser` cmdlet gets local user accounts. This cmdlet gets default built-in user accounts, local
    user accounts that you created, and local accounts that you connected to Microsoft accounts.
...
[Results Truncated]
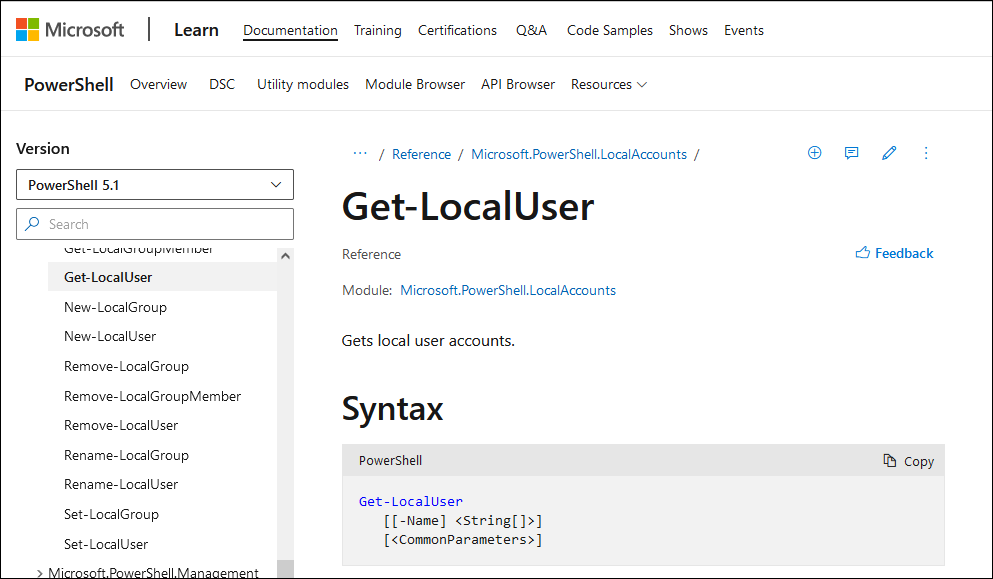
To always see the latest help for a command, you can use the -Online parameter to Get-Help to load the current help website content in your default browser.
Get-Help Get-LocalUser -Online
Previous screenshot output truncated
Close your browser after you have reviewed the command's help page.
Like most shells, PowerShell allows you to save data, or even the results of a command, into variables so that you can use them later. Variables in PowerShell always start with a $ character (just like the PSVersionTable variable you accessed earlier). You can save the results of the Get-LocalUser cmdlet into a variable like this:
$users = Get-LocalUser
To see the contents of the variable represented in the shell, simply "invoke" the variable by name in PowerShell:
$users
Sample Results
PS > $users = Get-LocalUser
PS > $users

Name               Enabled Description
----               ------- -----------
DefaultAccount     False   A user account managed by the system.
Guest              False   Built-in account for guest access to the computer/domain
rciadmin           True
student            True    Built-in account for administering the computer/domain
WDAGUtilityAccount False   A user account managed and used by the system for Windows Defender Application Guard sc...
The command results saved in the variable are full-fledged PowerShell objects, with all the capabilities of objects. For instance, you can obtain the count of users by invoking the Count property of the variable. Capture and view the count using these commands:
$userCount = $users.Count
$userCount
Sample Results
PS > $userCount = $users.Count
S > $userCount
5
Variables can be expanded inside strings, but only when the string is enclosed in double quotation marks. Compare the results of these two commands:
"There are $userCount local users on the host."
'There are $userCount local users on the host.'
Sample Results
PS > "There are $userCount local users on the host."
There are 5 local users on the host.
PS > 'There are $userCount local users on the host.'
There are $userCount local users on the host.
The command using single quotation marks treats $userCount as a literal string. The command with double quotes "expands" the variable's value into the string.
Part 2: PowerShell Objects
Environment Check
Before proceeding, ensure that you are working in Windows Terminal in PowerShell Core.
Background: The command you used earlier to get a list of local users actually returned a list (or array) of LocalUser objects. Remember from the lecture that objects have "properties," or data, and "methods," or functions that they can perform. In this section of the lab, you will explore the use of objects in PowerShell.
Instructions: You can view the properties and methods of the LocalUser object returned by Get-LocalUser by using the Get-Member cmdlet. Note that the methods and properties for the object are all listed in the output.
Get-LocalUser | Get-Member
Sample Results
PS > Get-LocalUser | Get-Member

   TypeName: Microsoft.PowerShell.Commands.LocalUser

Name                   MemberType Definition
----                   ---------- ----------
Clone                  Method     Microsoft.PowerShell.Commands.LocalUser Clone()
Equals                 Method     bool Equals(System.Object obj)
GetHashCode            Method     int GetHashCode()
GetType                Method     type GetType()
ToString               Method     string ToString()
AccountExpires         Property   System.Nullable[datetime] AccountExpires {get;set;}
Description            Property   string Description {get;set;}
...
[Results Truncated]
You can view only the methods associated with the object by setting the Type parameter to Method.
Get-LocalUser | Get-Member -Type Method
Sample Results
PS > Get-LocalUser | Get-Member -Type Method

   TypeName: Microsoft.PowerShell.Commands.LocalUser

Name        MemberType Definition
----        ---------- ----------
Clone       Method     Microsoft.PowerShell.Commands.LocalUser Clone()
Equals      Method     bool Equals(System.Object obj)
GetHashCode Method     int GetHashCode()
GetType     Method     type GetType()
ToString    Method     string ToString()
Of course, to show only properties, you can change the Type parameter that you pass:
Get-LocalUser | Get-Member -Type Property
Sample Results
PS > Get-LocalUser | Get-Member -Type Property

   TypeName: Microsoft.PowerShell.Commands.LocalUser

Name                   MemberType Definition
----                   ---------- ----------
AccountExpires         Property   System.Nullable[datetime] AccountExpires {get;set;}
Description            Property   string Description {get;set;}
Enabled                Property   bool Enabled {get;set;}
FullName               Property   string FullName {get;set;}
LastLogon              Property   System.Nullable[datetime] LastLogon {get;set;}
Name                   Property   string Name {get;set;}
ObjectClass            Property   string ObjectClass {get;set;}
PasswordChangeableDate Property   System.Nullable[datetime] PasswordChangeableDate {get;set;}
PasswordExpires        Property   System.Nullable[datetime] PasswordExpires {get;set;}
PasswordLastSet        Property   System.Nullable[datetime] PasswordLastSet {get;set;}
PasswordRequired       Property   bool PasswordRequired {get;set;}
PrincipalSource        Property   System.Nullable[Microsoft.PowerShell.Commands.PrincipalSource] PrincipalSource {…
SID                    Property   System.Security.Principal.SecurityIdentifier SID {get;set;}
UserMayChangePassword  Property   bool UserMayChangePassword {get;set;}
Once you know which properties are available from an object, you can begin to query for only the ones that are useful for your audit. The Select-Object cmdlet allows you to either limit the properties returned from a command, or to limit the number of Objects being returned.
If you were interested in gathering information about user accounts and their passwords, you might build a command like this to choose only the properties you want:
Get-LocalUser | Select-Object -Property Name, Enabled, PasswordLastSet, PasswordExpires
Sample Results
PS > Get-LocalUser | Select-Object -Property Name, Enabled, PasswordLastSet, PasswordExpires

Name               Enabled PasswordLastSet      PasswordExpires
----               ------- ---------------      ---------------
DefaultAccount       False
Guest                False
rciadmin              True 6/27/2025 7:43:22 PM
student               True 6/30/2025 2:45:41 PM 8/11/2025 2:45:41 PM
WDAGUtilityAccount   False 6/7/2025 4:01:29 PM  7/19/2025 4:01:29 PM
Live Data in Use!
Remember that your data may differ from these results!
Normally, you will omit the name of the positional Property parameter and simply run the command like this and receive the same results:
Get-LocalUser | Select-Object Name, Enabled, PasswordLastSet, PasswordExpires
EVERYTHING you work with in PowerShell is an object and will have properties and methods. This can make it very convenient to obtain data in the format you need.
Try viewing the current date and time using this command:
Get-Date
Sample Results
PS > Get-Date

Wednesday, March 20, 20## 12:11:01 AM
Live Data in Use!
Remember that your data may differ from these results!
The string you see is the default representation of the object, but there is a full object available to you. Take a look at the methods that the DateTime object provides.
Get-Date | Get-Member -Type Method
Sample Results
PS > Get-Date | Get-Member -Type Method

   TypeName: System.DateTime

Name                 MemberType Definition
----                 ---------- ----------
Add                  Method     datetime Add(timespan value)
AddDays              Method     datetime AddDays(double value)
AddHours             Method     datetime AddHours(double value)
AddMilliseconds      Method     datetime AddMilliseconds(double value)
AddMinutes           Method     datetime AddMinutes(double value)
AddMonths            Method     datetime AddMonths(int months)
AddSeconds           Method     datetime AddSeconds(double value)
AddTicks             Method     datetime AddTicks(long value)
AddYears             Method     datetime AddYears(int value)
...
[Results Truncated]
The object provides an AddDays function that does exactly what it seems it would. Get the date for five days from now using this command:
(Get-Date).AddDays(5)
Sample Results
PS > (Get-Date).AddDays(5)

Monday, March 25, 20## 12:12:02 AM
Live Data in Use!
Remember that your data may differ from these results!
Subtracting days is not as easy! There is no "subtract days" command. We could accomplish the task of getting the date from five days ago in one of two ways. The first is to create a new TimeSpan object with a value of 5 days and then use the Subtract method to get the correct date:
(Get-Date).Subtract( (New-TimeSpan -Days 5))
The alternative is to use some basic mathematics and simply add -5 days:
(Get-Date).AddDays(-5)
Sample Results
PS > (Get-Date).Subtract( (New-TimeSpan -Days 5))

Friday, March 15, 20## 12:12:24 AM

PS > (Get-Date).AddDays(-5)

Friday, March 15, 20## 12:12:36 AM
Live Data in Use!
Remember that your data may differ from these results!
When you use the pipeline (|) in PowerShell, you are not just passing text from one command to the next, as in many shells. Instead, you are passing objects. This makes PowerShell's pipeline extremely useful for administrators and audits alike.
Start a couple of Notepad processes running on your Windows VM. Simply minimize each instance of the program when it launches. You will work with a Process object representing the running Notepad instances in the commands that follow.
notepad; notepad
You can view the Process objects for your Notepad instances using Get-Process. Note that each object has all the methods and properties associated with Process objects. The objects can also be piped into another command that takes process objects as input. use this command to:
Get-Process -Name 'notepad'
Sample Results
PS > notepad; notepad
PS > Get-Process -Name 'notepad'

 NPM(K)    PM(M)      WS(M)     CPU(s)      Id  SI ProcessName
 ------    -----      -----     ------      --  -- -----------
     14     3.04      17.03       0.08    7252   1 notepad
     14     3.05      17.09       0.02    9436   1 notepad
Live Data in Use!
Remember that your data may differ from these results!
The objects can also be piped into another command that takes process objects as input. Use this command to pass the Process objects to the Stop-Process command, which will (not surprisingly) stop the running processes.
Get-Process -Name 'notepad' | Stop-Process
You should notice that the Notepad instances went away when you ran the command. We'll make great use of the PowerShell pipeline in our audit evidence gathering.
Part 3: Selecting and Sorting
Environment Check
Before proceeding, ensure that you are working in Windows Terminal in PowerShell Core.
Background: As you perform audit fieldwork, you will sometimes need to "drill down" to find only the objects and properties that are of interest. In this section of the lab, you will use common PowerShell cmdlets for selecting, sorting, and measuring objects and properties.
Instructions:
Where-Object
Frequently during your audits, you will need to limit the results returned by a command. We find this process to be similar to writing SELECT statements in the SQL database query language. In this section of the lab, you will use PowerShell cmdlets to control which objects and properties are returned by your commands.
The Where-Object (aliased to "Where" and "?") cmdlet works similarly to the WHERE clause in SQL. It allows you to decide which objects are returned by a command by testing each object and passing only those which match your criteria.
To run a query for only local user accounts that are disabled, you can search for those where the Enabled property is false. Note in the following commands that we use the built-in $false variable for the comparison.
There are two formats for using the Where-Object cmdlet. The newer syntax allows you to directly compare a property to the desired value:
Get-LocalUser | Where-Object Enabled -eq $false
The older format is called a "script block" because the comparison is a mini-PowerShell script, surrounded by curly braces. It uses the "default variable" in PowerShell ($_) as the basis for the comparison. This command is equivalent to the one above:
Get-LocalUser | Where-Object { $_.Enabled -eq $false }
Sample Results
PS > Get-LocalUser | Where-Object Enabled -eq $false

Name               Enabled Description
----               ------- -----------
DefaultAccount     False   A user account managed by the system.
Guest              False   Built-in account for guest access to the computer/domain
WDAGUtilityAccount False   A user account managed and used by the system for Windows Defender Application Guard sc...

PS > Get-LocalUser | Where-Object { $_.Enabled -eq $false }

Name               Enabled Description
----               ------- -----------
DefaultAccount     False   A user account managed by the system.
Guest              False   Built-in account for guest access to the computer/domain
WDAGUtilityAccount False   A user account managed and used by the system for Windows Defender Application Guard sc...
Select-Object
The Select-Object cmdlet allows you to either limit the properties returned for an object (similar to the SQL SELECT keyword) or to limit the number of properties returned.
To limit the number of objects returned, you can use the First and/or Last parameters, as in this example, which yields the default properties for local users but returns only the first object:
Get-LocalUser | Where-Object { $_.Enabled -eq $false } | Select-Object -First 1
Sample Results
PS > Get-LocalUser | Where-Object { $_.Enabled -eq $false } | Select-Object -First 1

Name           Enabled Description
----           ------- -----------
DefaultAccount False   A user account managed by the system.
To select only the properties you want, you will use Select-Object with a list of desired properties. Use this command to see the name and working memory allocated to all processes on the Windows VM.
Get-Process | Select-Object name, workingset64
Sample Results
PS > Get-Process | Select-Object name, workingset64

Name                            WorkingSet64
----                            ------------
agent_ovpnconnect_1675786017207      9191424
AggregatorHost                       4636672
ApplicationFrameHost                26300416
conhost                              1634304
csrss                                5316608
csrss                                5341184
ctfmon                              14913536
dllhost                             12759040
...
[Results Truncated]
Live Data in Use!
Remember that your data may differ from these results!
Sort-Object
Sorting your results (as you would in SQL using the ORDER BY clause) can be accomplished with the Sort-Object cmdlet. It sorts in ascending alphabetical or numeric order by default. To see processes sorted by the amount of allocated memory, use this command:
Get-Process |
  Select-Object name, workingset64 |
  Sort-Object WorkingSet64
Sample Results
PS > Get-Process |
>>   Select-Object name, workingset64 |
>>   Sort-Object WorkingSet64

Name                            WorkingSet64
----                            ------------
Idle                                    8192
smss                                 1081344
WinStore.App                         1216512
SystemSettings                       1351680
Live Data in Use!
Remember that your data may differ from these results!
You can change the sort order with the Descending switch parameter. Use this command to see what 10 processes are allocated the most memory on the system:
Get-Process |
  Select-Object name, workingset64 |
  Sort-Object WorkingSet64 -Descending |
  Select-Object -First 10
Sample Results
PS > Get-Process |
>>   Select-Object name, workingset64 |
>>   Sort-Object WorkingSet64 -Descending |
>>   Select-Object -First 10

Name                    WorkingSet64
----                    ------------
pwsh                      1161211904
MsMpEng                    259563520
explorer                   120733696
Memory Compression         101421056
WindowsTerminal             73035776
Registry                    72474624
dwm                         70193152
SearchApp                   56213504
msedge                      52961280
StartMenuExperienceHost     52043776
Live Data in Use!
Remember that your data may differ from these results!
Another cmdlet we find useful for audits is Measure_Object, which provides mathematical calculations on object properties. The following command will perform the calculations on the WorkingSet64 property:
Get-Process |
  Select-Object name, workingset64 |
  Sort-Object WorkingSet64 -Descending |
  Measure-Object WorkingSet64 -Minimum -Maximum -Average -StandardDeviation
Sample Results
PS > Get-Process |
>>   Select-Object name, workingset64 |
>>   Sort-Object WorkingSet64 -Descending |
>>   Measure-Object WorkingSet64 -Minimum -Maximum -Average -StandardDeviation

Count             : 128
Average           : 27116896
Sum               :
Maximum           : 1161216000
Minimum           : 8192
StandardDeviation : 104849738.647392
Property          : WorkingSet64
Live Data in Use!
Remember that your data may differ from these results!
Part 4: Output Formatting
Environment Check
Before proceeding, ensure that you are working in Windows Terminal in PowerShell Core.
Background: During your audit data gathering, you will often need to format output either for easier reading or to allow for further processing using other software. In this section of the lab, you will explore some of the formatting options available in PowerShell.
Instructions:
Tables and Lists
In the shell, PowerShell will return results in either a table format, with one property per column, or in a list format, with one property per line. The default output format usually depends on the number of columns being returned. When four or fewer properties are returned, you will normally see a table, like with this command:
Get-LocalUser |
  Select-Object Name, FullName, LastLogon, PasswordExpires
Sample Results: Table Format
PS > Get-LocalUser |
>>   Select-Object Name, FullName, LastLogon, PasswordExpires

Name               FullName LastLogon            PasswordExpires
----               -------- ---------            ---------------
DefaultAccount
Guest
rciadmin                    6/27/2025 8:21:50 PM
student                     7/1/2025 12:26:26 PM 8/11/2025 2:45:41 PM
WDAGUtilityAccount                               7/19/2025 4:01:29 PM
When more properties are returned, PowerShell will default to a list format, like with this command:
Get-LocalUser |
  Select-Object Name, FullName, LastLogon, PasswordExpires, PasswordLastSet
Sample Results: List Format
PS > Get-LocalUser |
>>   Select-Object Name, FullName, LastLogon, PasswordExpires, PasswordLastSet

Name            : DefaultAccount
FullName        :
LastLogon       :
PasswordExpires :
PasswordLastSet :

Name            : Guest
FullName        :
LastLogon       :
PasswordExpires :
PasswordLastSet :

Name            : student
FullName        :
LastLogon       : 7/1/2025 12:26:26 PM
PasswordExpires : 8/11/2025 2:45:41 PM
PasswordLastSet : 6/30/2025 2:45:41 PM
...
[Results Truncated]
You can choose the output format when you build your pipeline. To force PowerShell to use a table or list, simply pipe the results into one of the Format-* cmdlets:
Get-LocalUser |
  Select-Object Name, FullName, LastLogon, PasswordExpires, PasswordLastSet |
  Format-Table
Sample Results:
PS > Get-LocalUser |
>>   Select-Object Name, FullName, LastLogon, PasswordExpires, PasswordLastSet |
>>   Format-Table

Name               FullName LastLogon            PasswordExpires      PasswordLastSet
----               -------- ---------            ---------------      ---------------
DefaultAccount
Guest
rciadmin                    6/27/2025 8:21:50 PM                      6/27/2025 7:43:22 PM
student                     7/1/2025 12:26:26 PM 8/11/2025 2:45:41 PM 6/30/2025 2:45:41 PM
WDAGUtilityAccount                               7/19/2025 4:01:29 PM 6/7/2025 4:01:29 PM
Get-LocalUser |
  Select-Object Name, FullName, LastLogon, PasswordExpires, PasswordLastSet |
  Format-List
Sample Results
PS > Get-LocalUser |
>>   Select-Object Name, FullName, LastLogon, PasswordExpires, PasswordLastSet |
>>   Format-List

Name            : DefaultAccount
FullName        :
LastLogon       :
PasswordExpires :
PasswordLastSet :

Name            : student
FullName        :
LastLogon       : 7/1/2025 12:26:26 PM
PasswordExpires : 8/11/2025 2:45:41 PM
PasswordLastSet : 6/30/2025 2:45:41 PM
...
[Results Truncated]
When we are gathering data for audits, we often want to see ALL properties for the returned objects. The following two commands are equivalent ways to do that:
Get-LocalUser | Format-List *
Get-LocalUser | Select-Object *
Sample Results
PS > Get-LocalUser | Select-Object *

AccountExpires         :
Description            : A user account managed by the system.
Enabled                : False
FullName               :
PasswordChangeableDate :
PasswordExpires        :
UserMayChangePassword  : True
PasswordRequired       : False
PasswordLastSet        :
LastLogon              :
Name                   : DefaultAccount
SID                    : S-1-5-21-2004933468-3878088321-2328311241-503
PrincipalSource        : Local
ObjectClass            : User

AccountExpires         :
Description            : Built-in account for guest access to the computer/domain
Enabled                : False
FullName               :
PasswordChangeableDate :
PasswordExpires        :
UserMayChangePassword  : False
PasswordRequired       : False
PasswordLastSet        :
LastLogon              :
Name                   : Guest
SID                    : S-1-5-21-2004933468-3878088321-2328311241-501
PrincipalSource        : Local
ObjectClass            : User
...
[Results Truncated]
Structured Data Output
PowerShell can convert objects into structured data, which is useful for processing with other software. In the author's compliance practice, we often work with JavaScript object notation (JSON) data when using web APIs. To convert an abject or array of objects to JSON, simply use the ConvertTo-Json cmdlet. The Depth parameter tells the cmdlet how many layers of embedded property objects it should include. The default is 2.
This command uses the pipeline to gather the three processes allocated the most memory and then output the objects as JSON.
Get-Process |
  Select-Object Name, WorkingSet64 |
  Sort-Object WorkingSet64 -Descending |
  Select-Object -First 3 |
  ConvertTo-Json -Depth 5
Sample Results
PS > Get-Process |
>>   Select-Object Name, WorkingSet64 |
>>   Sort-Object WorkingSet64 -Descending |
>>   Select-Object -First 3 |
>>   ConvertTo-Json -Depth 5
[
  {
    "Name": "pwsh",
    "WorkingSet64": 1160888320
  },
  {
    "Name": "MsMpEng",
    "WorkingSet64": 260059136
  },
  {
    "Name": "explorer",
    "WorkingSet64": 120107008
  }
]
Live Data in Use!
Remember that your data may differ from these results!
The Compress parameter causes the JSON output to be on a single line, which saves bandwidth and storage space when using the JSON string but makes it harder to read!
Get-Process |
  Select-Object Name, WorkingSet64 |
  Sort-Object WorkingSet64 -Descending |
  Select-Object -First 3 |
  ConvertTo-Json -Depth 5 -Compress
Sample Results
PS > Get-Process |
>>   Select-Object Name, WorkingSet64 |
>>   Sort-Object WorkingSet64 -Descending |
>>   Select-Object -First 3 |
>>   ConvertTo-Json -Depth 5 -Compress
[{"Name":"pwsh","WorkingSet64":1160916992},{"Name":"MsMpEng","WorkingSet64":260141056},{"Name":"explorer","WorkingSet64":120004608}]
Live Data in Use!
Remember that your data may differ from these results!
There is a similar cmdlet to convert objects to CSV format. The CSV format does not allow for nested objects, so it has no depth setting.
Get-Process | Select-Object Name, WorkingSet64 | Sort-Object WorkingSet64 -Descending | ConvertTo-Csv
Sample Results
PS > Get-Process | Select-Object Name, WorkingSet64 | Sort-Object WorkingSet64 -Descending | ConvertTo-Csv
"Name","WorkingSet64"
"pwsh","1115172864"
"MsMpEng","258465792"
"explorer","120242176"
"Memory Compression","115195904"
"Registry","72359936"
"WindowsTerminal","71823360"
"dwm","70512640"
...
[Results Truncated]
Live Data in Use!
Remember that your data may differ from these results!
On your audits, you will often want to save the CSV results to a file, either for you to process later or to share with the audit client. This could be accomplished by piping the CSV-formatted data into the Out-File cmdlet to save the file, but PowerShell offers a shortcut cmdlet to convert and save the data. Create a CSV output file using this command:
Get-Process  |
  Sort-Object WorkingSet64 -Descending |
  Export-Csv -Path 'C:\Users\student\Documents\processes.csv'
Then, you can have PowerShell open the new CSV file using the Invoke-Item cmdlet:
Invoke-Item C:\Users\student\Documents\processes.csv
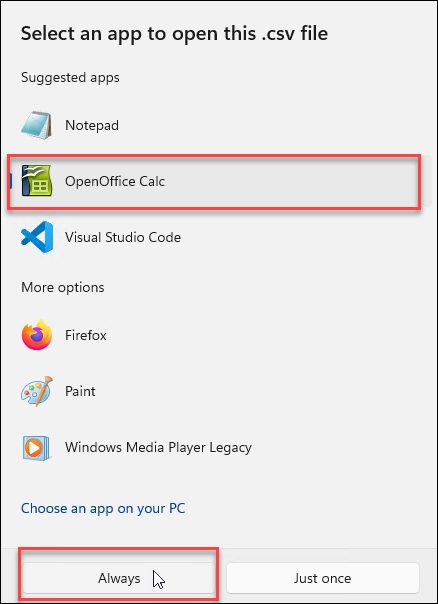
When prompted, choose OpenOffice Calc to open the file, then click the Always button to open the file.
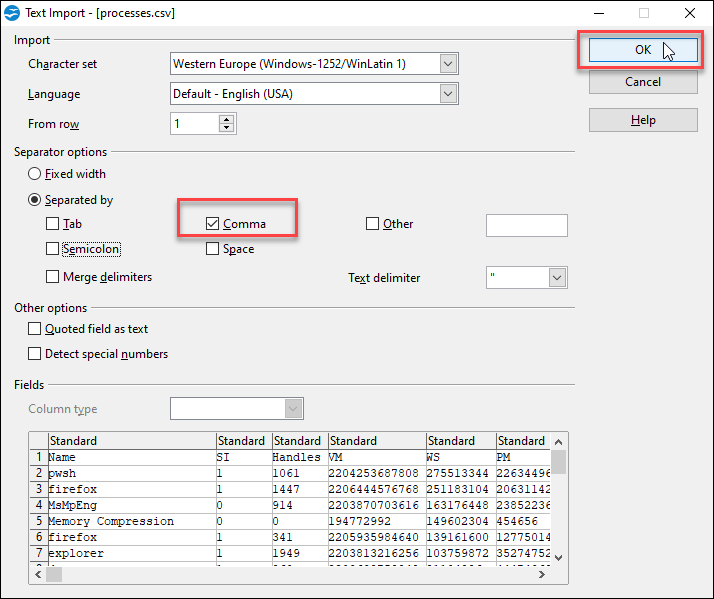
In the Text Import screen, unselect all of the separator types except for Comma and then click the OK button to view the contents of the CSV.
Close OpenOffice after reviewing the CSV file.
You can import from CSV into a PowerShell object using either ConvertFrom-Csv on the pipeline or Import-Csv to read from a file. Reimport the data from your CSV file into PowerShell using this command:
Import-Csv -Path 'C:\Users\student\Documents\processes.csv' |
  Select-Object -First 1
Sample Results
PS > Import-Csv -Path 'C:\Users\student\Documents\processes.csv' |
>>   Select-Object -First 1

Name                       : pwsh
SI                         : 1
Handles                    : 1186
VM                         : 2205274877952
WS                         : 1115181056
PM                         : 1075924992
NPM                        : 308408
...
[Results Truncated]
Live Data in Use!
Remember that your data may differ from these results!
You will use a lot more PowerShell as you work through the class. For most new topics, we will use "on-the-job" training to allow you to learn them as part of the audit process. For now, you can explore PowerShell all you want and then close Windows Terminal when you have finished.