Lab 4.3: Cloud Infrastructure
VMs Needed
- Windows
- Ubuntu
Lab Video
Objectives
- Use AWS Trusted Advisor for quick compliance wins.
- Use Custodian for automated ingress/egress rule checks in AWS.
- Use Prowler for automated network rule checks in AWS.
- Perform static analysis of Terraform infrastructure-as-code
Lab Preparation
Boot the VMs required for the lab (see the "VMs Needed" section above) and log on to the Windows VM using the username student and the password student.
Launch Firefox or open a new tab if it is already running.

Part 1: AWS Trusted Advisor
Cloud Resource Names Will Vary!
The cloud-based labs for this class are auto-provisioned using infrastructure as code (IaC) technologies. To ensure unique names across every running course, we have added random strings to some of the resource names. This will cause small variances between the screenshots and the tool output you will see.
For example, you may see a screenshot where a username is shown as TSmith-a1b2c, while your testing reveals a user named TSmith-z3x4q. This is expected behavior, and you may see it occur for ANY resource, including VM instances, networks, users, and groups. In many cases, we have blurred these parts of the results in our screenshots to let you focus on the important information.
Background: AWS describes Trusted Advisor this way:
Quote
AWS Trusted Advisor provides recommendations that help you follow AWS best practices. Trusted Advisor evaluates your account by using checks. These checks identify ways to optimize your AWS infrastructure, improve security and performance, reduce costs, and monitor service quotas. You can then follow the recommendations to optimize your services and resources.
While Trusted Advisor is a premium service, it does make a few checks available to all customers for free. In this section of the lab, you will check Trusted Advisor to see if it has any findings related to your infrastructure setup.
Instructions: In Firefox on the Windows VM, browse to Trusted Advisor in the AWS console https://us-east-2.console.aws.amazon.com/trustedadvisor/home?region=us-east-2#/dashboard. Log in to the console if you are not already logged in. Remember that your AWS account number and credentials were provided by your instructor earlier in the class. Take some time to review the findings on the front page. If it's your first time viewing Trusted Advisor, you may have to dismiss several pop-up informational boxes before you move on.
Note that your console will likely not match our screenshot exactly, due to differences in AWS timing of running checks and changes to the checks being run. You can view our screenshots as examples and review the results that you receive.
https://us-east-2.console.aws.amazon.com/trustedadvisor/home?region=us-east-2#/dashboard
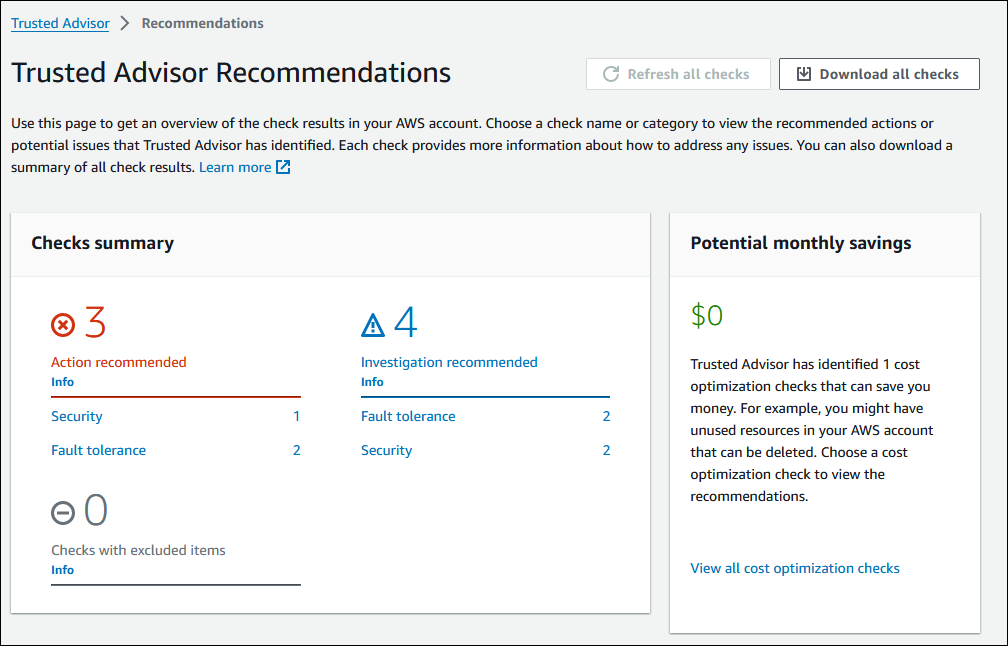
If your lab environment has been running long enough to complete the Trusted Advisor initial checks (remember that SANS uses automation to provision labs), then you may see one or more security findings in the Checks Summary area under Action recommended and/or Investigation recommended. Clicking on the link will take you to a details page for those findings. In the screenshots below, we have clicked one of these links and reviewed the results.
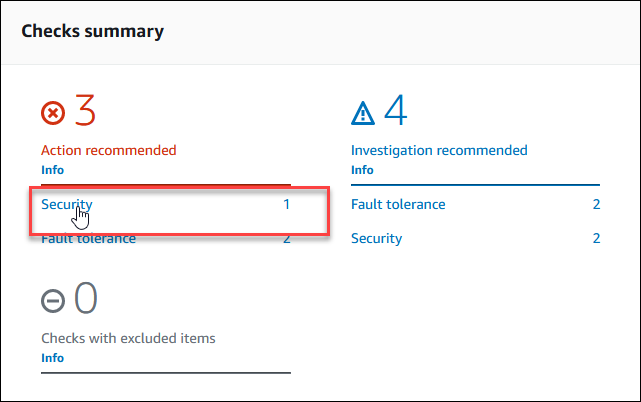
On the overview tab, we see more details for the security finding. In the screenshot below, there are multiple security group rules which allow access to ports other than web or email protocols.
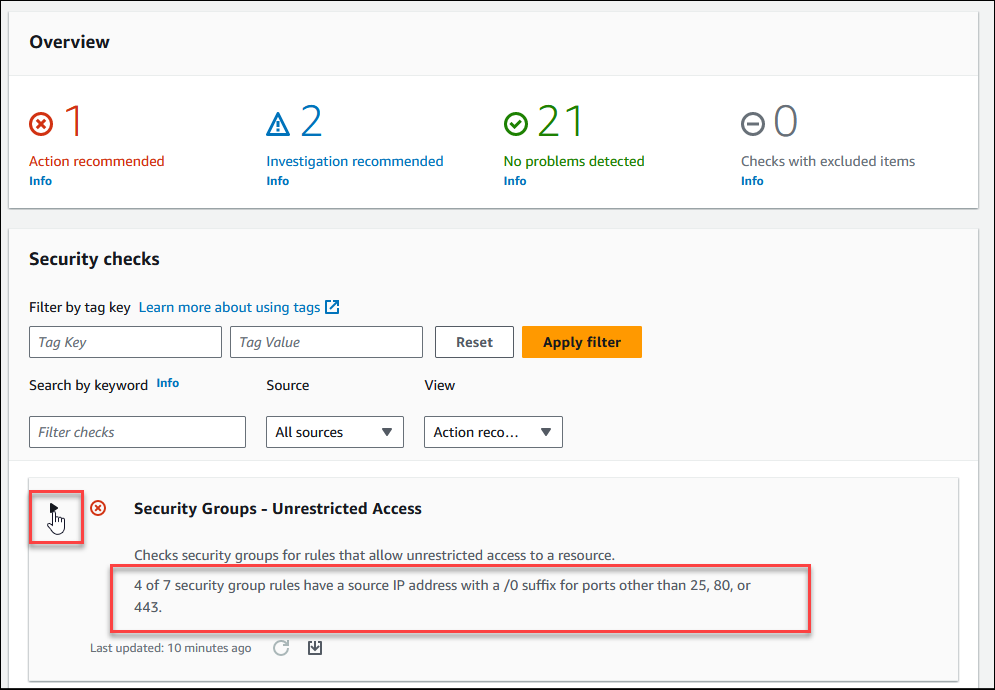
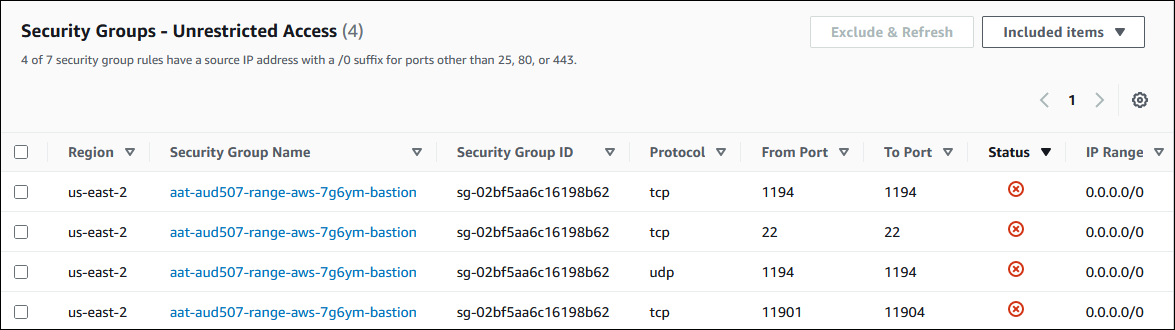
If we were to click the black arrow to the left of the finding, we would get even more detail on the security groups with failing rules.
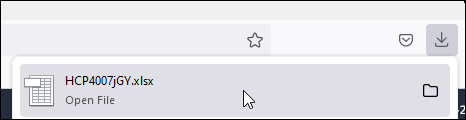
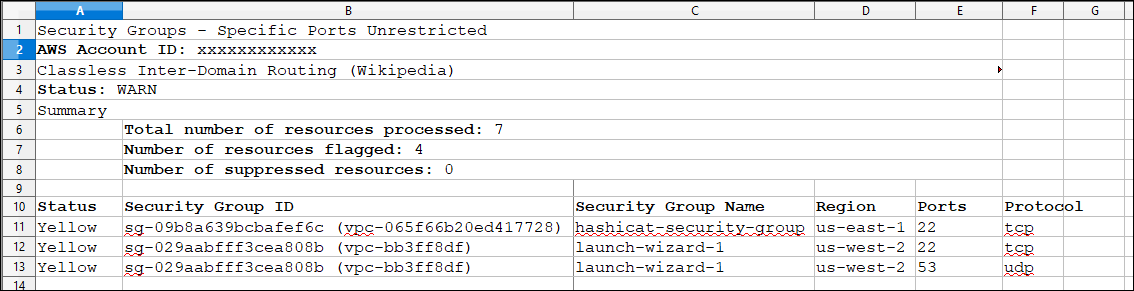
You may also notice a download icon below each finding. If you click on that icon (feel free to if you have one), you will download an Excel spreadsheet with details of the resources that triggered the finding.

If you choose to download the file, simply click on it after the download completes to view the spreadsheet in OpenOffice.
Close your Firefox browser and OpenOffice when you have finished looking at findings.
Part 2: Testing AWS Ingress with Custodian
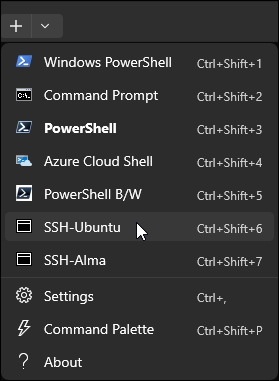
Preparation: Open an SSH connection to the Ubuntu VM in Windows Terminal. Click the down arrow icon and select SSH-Ubuntu from the drop-down menu.
Environment Check
Before proceeding, ensure that you are working in Windows Terminal in a SSH session to the Ubuntu VM.

Background: Remember from previous labs that Cloud Custodian (Custodian, or c7n) is useful for scanning resources and looking for settings that are out of compliance. In this section of the lab, you will use Custodian to locate AWS security group ingress rules that allow access to administrative protocols from the internet. One of the big advantages of a tool like Custodian is that it can parse the rules and understand whether the port to be examined is part of a range. Note that Custodian needs separate rules for IPv4 and IPv6 rule analysis.
Instructions:
Set your location to the working directory for the lab.
cd /home/student/labFiles/custodian
Ensure that the latest copies of the policies are available in the directory:
git pull
Your engineers have written a c7n policy to examine security group rules that allow ingress access to TCP port 22 (SSH) or TCP port 3389 (Microsoft Remote Desktop protocol, or RDP). View the contents of the policy file using the Linux cat command. Note the or operator to flag any resource that meets any of the following rules, and note that there are separate filters for IPv4 and IPv6.
cat aws_ingress.yaml
Sample Results
student@ubuntu:$cat aws_ingress.yaml
policies:
 - name: aws-ingress-admin-ports-allowed
   resource: aws.security-group
   filters:
     - or:
        - type: ingress
          Ports: [22,3389]
          Cidr:
            value: "0.0.0.0/0"
        - type: ingress
          Ports: [22,3389]
          CidrV6:
            value: "::0"
Follow the process you have used previously for c7n policies. First, validate the policy file to be sure there are no errors:
~/custodian/bin/custodian validate aws_ingress.yaml
Sample Results
student@ubuntu:$ ~/custodian/bin/custodian validate aws_ingress.yaml
20##-04-26 19:53:18,980: custodian.commands:INFO Configuration valid: aws_ingress.yaml
Then, run the policy using your default AWS profile, setting the output directory to aws_ingress.
~/custodian/bin/custodian run --output-dir ./aws_ingress aws_ingress.yaml
Sample Results
student@ubuntu:$~/custodian/bin/custodian run --output-dir ./aws_ingress aws_ingress.yaml
20##-04-26 19:53:39,988: custodian.policy:INFO policy:aws-ingress-admin-ports-allowed resource:aws.security-group region:us-east-2 count:1 time:0.62
List the contents of your working directory. Note that a new directory was created by Custodian, containing the results of each policy in the aws_ingress.yaml file.
ls -l
Sample Results
student@ubuntu:$ls -l
total 28
drwxrwxr-x 4 student student 4096 Apr 26 19:25 aws_iam
-rw-rw-r-- 1 student student  235 Dec  6 21:57 aws_iam.yaml
drwxrwxr-x 3 student student 4096 Apr 26 19:53 aws_ingress
-rw-rw-r-- 1 student student  302 Dec  6 21:57 aws_ingress.yaml
-rw-rw-r-- 1 student student 2837 Dec  6 21:57 aws_tag.yaml
-rw-rw-r-- 1 student student  271 Dec  6 21:57 azure_ingress.yaml
-rw-rw-r-- 1 student student  321 Dec  6 21:57 azure_tag.yaml
If you list the contents of this directory recursively, you will notice that there's a subdirectory for each policy and that each subdirectory contains a run log and JSON files containing metadata about the test and a list of resources that triggered the policy.
ls -lR aws_ingress/
Sample Results
student@ubuntu:$ls -lR aws_ingress/
aws_ingress/:
total 4
drwxrwxr-x 2 student student 4096 Apr 26 19:53 aws-ingress-admin-ports-allowed

aws_ingress/aws-ingress-admin-ports-allowed:
total 12
-rw-rw-r-- 1 student student  154 Apr 26 19:53 custodian-run.log
-rw-rw-r-- 1 student student 2083 Apr 26 19:53 metadata.json
-rw-rw-r-- 1 student student 3513 Apr 26 19:53 resources.json
View the resources.json file to see which ingress rules violated the policy in the Custodian configuration:
cat aws_ingress/aws-ingress-admin-ports-allowed/resources.json
Sample Results
student@ubuntu:$cat aws_ingress/aws-ingress-admin-ports-allowed/resources.json
[
  {
    "GroupId": "sg-0aa9cbfae38e43b21",
    "IpPermissionsEgress": [
      {
        "IpProtocol": "-1",
        "UserIdGroupPairs": [],
        "IpRanges": [
          {
            "CidrIp": "0.0.0.0/0"
          }
        ],
        "Ipv6Ranges": [],
        "PrefixListIds": []
      }
    ],
    "Tags": [
      {
        "Key": "Attributes",
...
[Results Truncated]
Imagine that instead of full details, you want a simple count of how many noncompliant ingress rules were found. View the contents of the metadata.json file for the policy to find out how many ingress rules were tagged as noncompliant. Notice the metrics property, which contains a property with a MetricName of ResourceCount. The value of that property is the number of noncompliant ingress rules that were found by Custodian.
cat aws_ingress/aws-ingress-admin-ports-allowed/metadata.json
Sample Results
student@ubuntu:$cat aws_ingress/aws-ingress-admin-ports-allowed/metadata.json
{
  "policy": {
    "name": "aws-ingress-admin-ports-allowed",
    "resource": "aws.security-group",
    "filters": [
      {
        "or": [
          {
            "type": "ingress",
            "Ports": [
              22,
              3389
            ],
            "Cidr": {
              "value": "0.0.0.0/0",
              "key": "CidrIp"
            }
          },
          {
            "type": "ingress",
...
[Results Truncated]
Extract the Metrics array using jq:
cat aws_ingress/aws-ingress-admin-ports-allowed/metadata.json | jq '.metrics[]'
Sample Results
student@ubuntu:$cat aws_ingress/aws-ingress-admin-ports-allowed/metadata.json  | jq '.metrics[]'
{
  "MetricName": "ResourceCount",
  "Timestamp": "20##-04-26T19:53:39.989112",
  "Value": 1,
  "Unit": "Count"
}
{
  "MetricName": "ResourceTime",
  "Timestamp": "20##-04-26T19:53:39.989119",
  "Value": 0.6178188323974609,
  "Unit": "Seconds"
}
{
  "MetricName": "ActionTime",
  "Timestamp": "20##-04-26T19:53:39.989403",
  "Value": 2.1457672119140625e-06,
  "Unit": "Seconds"
}
NOTE: You could use jq to extract just the relevant bit of the metadata file to tell you what the number of findings was:
cat aws_ingress/aws-ingress-admin-ports-allowed/metadata.json | jq '.metrics[] | select(.MetricName == "ResourceCount")'
Sample Results
student@ubuntu:$cat aws_ingress/aws-ingress-admin-ports-allowed/metadata.json  | jq '.metrics[] | select(.MetricName == "ResourceCount")'
{
  "MetricName": "ResourceCount",
  "Timestamp": "20##-04-26T19:53:39.989112",
  "Value": 1,
  "Unit": "Count"
}
Part 3: Testing AWS Ingress with Prowler
Environment Check
Before proceeding, ensure that you are working in Windows Terminal in a SSH session to the Ubuntu VM.
Background: Remember that Prowler is an AWS-specific compliance tool that includes the checks for the CIS AWS Foundations benchmark and many other compliance standards. In this section of the lab, you will use Prowler to test your AWS network infrastructure for inappropriate ingress and egress security rules. The EC2 (elastic compute cloud) and VPC (virtual private cloud) services both have settings which affect the security of your cloud network infrastructure, so you will examine the Prowler tests available for both services. fec2.
Instructions: In your Ubuntu SSH session, set your working directory to the Prowler lab folder and make sure you have the most recent version of the lab files.
cd /home/student/labFiles/prowler
git pull
Remember that Prowler has checks for many different AWS services. To view the checks for the EC2 and VPC services, run this command:
prowler aws --services ec2 vpc --list-checks
Sample Results
student@ubuntu:$prowler aws --services ec2 vpc --list-checks
                         _
 _ __  _ __ _____      _| | ___ _ __
| '_ \| '__/ _ \ \ /\ / / |/ _ \ '__|
| |_) | | | (_) \ V  V /| |  __/ |
| .__/|_|  \___/ \_/\_/ |_|\___|_|v5.4.3
|_| the handy cloud security tool

Date: 20##-04-26 19:59:41

[ec2_ami_public] Ensure there are no EC2 AMIs set as Public. - ec2 [critical]
[ec2_ebs_default_encryption] Check if EBS Default Encryption is activated. - ec2 [medium]
[ec2_ebs_public_snapshot] Ensure there are no EBS Snapshots set as Public. - ec2 [critical]
[ec2_ebs_snapshots_encrypted] Check if EBS snapshots are encrypted. - ec2 [medium]
[ec2_ebs_volume_encryption] Ensure there are no EBS Volumes unencrypted. - ec2 [medium]
[ec2_elastic_ip_shodan] Check if any of the Elastic or Public IP are in Shodan (requires Shodan API KEY). - ec2 [high]
[ec2_elastic_ip_unassigned] Check if there is any unassigned Elastic IP. - ec2 [low]
...
[Results Truncated]
Full Command Output
 _ __  _ __ _____      _| | ___ _ __
| '_ \| '__/ _ \ \ /\ / / |/ _ \ '__|
| |_) | | | (_) \ V  V /| |  __/ |
| .__/|_|  \___/ \_/\_/ |_|\___|_|v5.4.3
|_| the handy cloud security tool

Date: XXXXXXXX

[ec2_ami_public] Ensure there are no EC2 AMIs set as Public. - ec2 [critical]
[ec2_client_vpn_endpoint_connection_logging_enabled] EC2 Client VPN endpoints should have client connection logging enabled. - ec2 [low]
[ec2_ebs_default_encryption] Check if EBS Default Encryption is activated. - ec2 [medium]
[ec2_ebs_public_snapshot] Ensure there are no EBS Snapshots set as Public. - ec2 [critical]
[ec2_ebs_snapshot_account_block_public_access] Ensure that public access to EBS snapshots is disabled - ec2 [high]
[ec2_ebs_snapshots_encrypted] Check if EBS snapshots are encrypted. - ec2 [medium]
[ec2_ebs_volume_encryption] Ensure there are no EBS Volumes unencrypted. - ec2 [medium]
[ec2_ebs_volume_protected_by_backup_plan] Amazon EBS volumes should be protected by a backup plan. - ec2 [low]
[ec2_ebs_volume_snapshots_exists] Check if EBS snapshots exists. - ec2 [medium]
[ec2_elastic_ip_shodan] Check if any of the Elastic or Public IP are in Shodan (requires Shodan API KEY). - ec2 [high]
[ec2_elastic_ip_unassigned] Check if there is any unassigned Elastic IP. - ec2 [low]
[ec2_instance_account_imdsv2_enabled] Ensure Instance Metadata Service Version 2 (IMDSv2) is enforced for EC2 instances at the account level to protect against SSRF vulnerabilities. - ec2 [high]
[ec2_instance_detailed_monitoring_enabled] Check if EC2 instances have detailed monitoring enabled. - ec2 [low]
[ec2_instance_imdsv2_enabled] Check if EC2 Instance Metadata Service Version 2 (IMDSv2) is Enabled and Required. - ec2 [high]
[ec2_instance_internet_facing_with_instance_profile] Check for internet facing EC2 instances with Instance Profiles attached. - ec2 [medium]
[ec2_instance_managed_by_ssm] Check if EC2 instances are managed by Systems Manager. - ec2 [medium]
[ec2_instance_older_than_specific_days] Check EC2 Instances older than specific days. - ec2 [medium]
[ec2_instance_paravirtual_type] Amazon EC2 paravirtual virtualization type should not be used. - ec2 [medium]
[ec2_instance_port_cassandra_exposed_to_internet] Ensure no EC2 instances allow ingress from the internet to Cassandra ports (TCP 7000, 7001, 7199, 9042, 9160). - ec2 [critical]
[ec2_instance_port_cifs_exposed_to_internet] Ensure no EC2 instances allow ingress from the internet to TCP port 139 or 445 (CIFS). - ec2 [critical]
[ec2_instance_port_elasticsearch_kibana_exposed_to_internet] Ensure no EC2 instances allow ingress from the internet to Elasticsearch and Kibana ports (TCP 9200, 9300, 5601). - ec2 [critical]
[ec2_instance_port_ftp_exposed_to_internet] Ensure no EC2 instances allow ingress from the internet to TCP port 20 or 21 (FTP) - ec2 [critical]
[ec2_instance_port_kafka_exposed_to_internet] Ensure no EC2 instances allow ingress from the internet to TCP port 9092 (Kafka). - ec2 [critical]
[ec2_instance_port_kerberos_exposed_to_internet] Ensure no EC2 instances allow ingress from the internet to TCP port 88, 464, 749 or 750 (Kerberos). - ec2 [critical]
[ec2_instance_port_ldap_exposed_to_internet] Ensure no EC2 instances allow ingress from the internet to TCP port 389 or 636 (LDAP). - ec2 [critical]
[ec2_instance_port_memcached_exposed_to_internet] Ensure no EC2 instances allow ingress from the internet to TCP port 11211 (Memcached). - ec2 [critical]
[ec2_instance_port_mongodb_exposed_to_internet] Ensure no EC2 instances allow ingress from the internet to TCP port 27017 or 27018 (MongoDB) - ec2 [critical]
[ec2_instance_port_mysql_exposed_to_internet] Ensure no EC2 instances allow ingress from the internet to TCP port 3306 (MySQL). - ec2 [critical]
[ec2_instance_port_oracle_exposed_to_internet] Ensure no EC2 instances allow ingress from the internet to TCP port 1521, 2483 or 2484 (Oracle). - ec2 [critical]
[ec2_instance_port_postgresql_exposed_to_internet] Ensure no EC2 instances allow ingress from the internet to TCP port 5432 (PostgreSQL) - ec2 [critical]
[ec2_instance_port_rdp_exposed_to_internet] Ensure no EC2 instances allow ingress from the internet to TCP port 3389 (RDP) - ec2 [critical]
[ec2_instance_port_redis_exposed_to_internet] Ensure no EC2 instances allow ingress from the internet to TCP port 6379 (Redis). - ec2 [critical]
[ec2_instance_port_sqlserver_exposed_to_internet] Ensure no EC2 instances allow ingress from the internet to TCP port 1433 or 1434 (SQL Server). - ec2 [critical]
[ec2_instance_port_ssh_exposed_to_internet] Ensure no EC2 instances allow ingress from the internet to TCP port 22 (SSH) - ec2 [critical]
[ec2_instance_port_telnet_exposed_to_internet] Ensure no EC2 instances allow ingress from the internet to TCP port 23 (Telnet). - ec2 [critical]
[ec2_instance_profile_attached] Ensure IAM instance roles are used for AWS resource access from instances - ec2 [medium]
[ec2_instance_public_ip] Check for EC2 Instances with Public IP. - ec2 [medium]
[ec2_instance_secrets_user_data] Find secrets in EC2 User Data. - ec2 [critical]
[ec2_instance_uses_single_eni] Amazon EC2 instances should not use multiple ENIs - ec2 [low]
[ec2_launch_template_imdsv2_required] Amazon EC2 launch templates should have IMDSv2 enabled and required. - ec2 [high]
[ec2_launch_template_no_public_ip] Amazon EC2 launch templates should not assign public IPs to network interfaces. - ec2 [high]
[ec2_launch_template_no_secrets] Find secrets in EC2 Launch Template - ec2 [critical]
[ec2_networkacl_allow_ingress_any_port] Ensure no Network ACLs allow ingress from 0.0.0.0/0 to any port. - ec2 [medium]
[ec2_networkacl_allow_ingress_tcp_port_22] Ensure no Network ACLs allow ingress from 0.0.0.0/0 to SSH port 22 - ec2 [medium]
[ec2_networkacl_allow_ingress_tcp_port_3389] Ensure no Network ACLs allow ingress from 0.0.0.0/0 to Microsoft RDP port 3389 - ec2 [medium]
[ec2_networkacl_unused] Unused Network Access Control Lists should be removed. - ec2 [low]
[ec2_securitygroup_allow_ingress_from_internet_to_all_ports] Ensure no security groups allow ingress from 0.0.0.0/0 or ::/0 to all ports. - ec2 [high]
[ec2_securitygroup_allow_ingress_from_internet_to_any_port] Ensure no security groups allow ingress from 0.0.0.0/0 or ::/0 to any port. - ec2 [high]
[ec2_securitygroup_allow_ingress_from_internet_to_high_risk_tcp_ports] Ensure no security groups allow ingress from 0.0.0.0/0 or ::/0 to high risk ports. - ec2 [critical]
[ec2_securitygroup_allow_ingress_from_internet_to_port_mongodb_27017_27018] Ensure no security groups allow ingress from 0.0.0.0/0 or ::/0 to MongoDB ports 27017 and 27018. - ec2 [high]
[ec2_securitygroup_allow_ingress_from_internet_to_tcp_ftp_port_20_21] Ensure no security groups allow ingress from 0.0.0.0/0 or ::/0 to FTP ports 20 or 21. - ec2 [high]
[ec2_securitygroup_allow_ingress_from_internet_to_tcp_port_22] Ensure no security groups allow ingress from 0.0.0.0/0 or ::/0 to SSH port 22. - ec2 [high]
[ec2_securitygroup_allow_ingress_from_internet_to_tcp_port_3389] Ensure no security groups allow ingress from 0.0.0.0/0 or ::/0 to port 3389. - ec2 [high]
[ec2_securitygroup_allow_ingress_from_internet_to_tcp_port_cassandra_7199_9160_8888] Ensure no security groups allow ingress from 0.0.0.0/0 or ::/0 to Cassandra ports 7199 or 9160 or 8888. - ec2 [high]
[ec2_securitygroup_allow_ingress_from_internet_to_tcp_port_elasticsearch_kibana_9200_9300_5601] Ensure no security groups allow ingress from 0.0.0.0/0 or ::/0 to Elasticsearch/Kibana ports. - ec2 [high]
[ec2_securitygroup_allow_ingress_from_internet_to_tcp_port_kafka_9092] Ensure no security groups allow ingress from 0.0.0.0/0 or ::/0 to Kafka port 9092. - ec2 [high]
[ec2_securitygroup_allow_ingress_from_internet_to_tcp_port_memcached_11211] Ensure no security groups allow ingress from 0.0.0.0/0 or ::/0 to Memcached port 11211. - ec2 [high]
[ec2_securitygroup_allow_ingress_from_internet_to_tcp_port_mysql_3306] Ensure no security groups allow ingress from 0.0.0.0/0 or ::/0 to MySQL port 3306. - ec2 [high]
[ec2_securitygroup_allow_ingress_from_internet_to_tcp_port_oracle_1521_2483] Ensure no security groups allow ingress from 0.0.0.0/0 or ::/0 to Oracle ports 1521 or 2483. - ec2 [high]
[ec2_securitygroup_allow_ingress_from_internet_to_tcp_port_postgres_5432] Ensure no security groups allow ingress from 0.0.0.0/0 or ::/0 to Postgres port 5432. - ec2 [high]
[ec2_securitygroup_allow_ingress_from_internet_to_tcp_port_redis_6379] Ensure no security groups allow ingress from 0.0.0.0/0 or ::/0 to Redis port 6379. - ec2 [high]
[ec2_securitygroup_allow_ingress_from_internet_to_tcp_port_sql_server_1433_1434] Ensure no security groups allow ingress from 0.0.0.0/0 or ::/0 to Windows SQL Server ports 1433 or 1434. - ec2 [high]
[ec2_securitygroup_allow_ingress_from_internet_to_tcp_port_telnet_23] Ensure no security groups allow ingress from 0.0.0.0/0 or ::/0 to Telnet port 23. - ec2 [high]
[ec2_securitygroup_allow_wide_open_public_ipv4] Ensure no security groups allow ingress and egress from wide-open IP address with a mask between 0 and 24. - ec2 [high]
[ec2_securitygroup_default_restrict_traffic] Ensure the default security group of every VPC restricts all traffic. - ec2 [high]
[ec2_securitygroup_from_launch_wizard] Security Groups created by EC2 Launch Wizard. - ec2 [medium]
[ec2_securitygroup_not_used] Ensure there are no Security Groups not being used. - ec2 [low]
[ec2_securitygroup_with_many_ingress_egress_rules] Find security groups with more than 50 ingress or egress rules. - ec2 [high]
[ec2_transitgateway_auto_accept_vpc_attachments] Amazon EC2 Transit Gateways should not automatically accept VPC attachment requests - ec2 [high]
[vpc_different_regions] Ensure there are VPCs in more than one region - vpc [medium]
[vpc_endpoint_connections_trust_boundaries] Find trust boundaries in VPC endpoint connections. - vpc [medium]
[vpc_endpoint_for_ec2_enabled] Amazon EC2 should be configured to use VPC endpoints that are created for the Amazon EC2 service. - ec2 [medium]
[vpc_endpoint_multi_az_enabled] Amazon VPC Interface Endpoints should have ENIs in more than one subnet. - vpc [medium]
[vpc_endpoint_services_allowed_principals_trust_boundaries] Find trust boundaries in VPC endpoint services allowlisted principles. - vpc [medium]
[vpc_flow_logs_enabled] Ensure VPC Flow Logging is Enabled in all VPCs. - vpc [medium]
[vpc_peering_routing_tables_with_least_privilege] Ensure routing tables for VPC peering are least access. - vpc [medium]
[vpc_subnet_different_az] Ensure all VPC has subnets in more than one availability zone - vpc [medium]
[vpc_subnet_no_public_ip_by_default] Ensure VPC subnets do not assign public IP by default - vpc [medium]
[vpc_subnet_separate_private_public] Ensure all VPC has public and private subnets defined - vpc [medium]
[vpc_vpn_connection_tunnels_up] Both VPN tunnels for an AWS Site-to-Site VPN connection should be up - vpc [medium]

There are 80 available checks.
While it might make sense to simply run all the checks for both services, this would result in tests which don't directly apply to network ingress or egress rules being included. To get just the tests we want, we've developed a JSON file with a list of checks to be run. By creating a file like this, you can exercise fine-grained control over which tests are run by Prowler.
We've chosen a subset of EC2 tests which do a good job of covering ingress to sensitive ports, like telnet, SSH, remote desktop and many database systems. You can view the chosen tests and the format of the configuration file using the Linux cat command. The check names are long and descriptions are detailed enough that you should be able to understand what most of them do.
cat -n /home/student/labFiles/prowler/ec2checks.json
Sample Results
student@ubuntu:$cat -n /home/student/labFiles/prowler/ec2checks.json
     1  {
     2    "aws":
     3    [
     4      "ec2_networkacl_allow_ingress_any_port",
     5      "ec2_networkacl_allow_ingress_tcp_port_22",
     6      "ec2_networkacl_allow_ingress_tcp_port_3389",
     7      "ec2_securitygroup_allow_ingress_from_internet_to_any_port",
     8      "ec2_securitygroup_allow_ingress_from_internet_to_port_mongodb_27017_27018",
     9      "ec2_securitygroup_allow_ingress_from_internet_to_tcp_ftp_port_20_21",
    10      "ec2_securitygroup_allow_ingress_from_internet_to_tcp_port_22",
    11      "ec2_securitygroup_allow_ingress_from_internet_to_tcp_port_3389",
...
[Results Truncated]
Next, run prowler with the options to read from that configuration file (--check-file), to show only results from the us-east-2 region (-f flag) and to save HTML output (-M flag) into a file with a base name of AWS-Net-Ingress (-F flag):
prowler aws --checks-file ec2checks.json -f us-east-2 -M html -F AWS-Net-Ingress
Sample Results
``` student@ubuntu:$prowler aws --checks-file ec2checks.json -f us-east-2 -M html -F AWS-Net-Ingress _
_ __ _ __ _____ | | ___ _ __ | ' | '/ _ / / / |/ _ '| | |) | | | () V V /| | / | | ./|| ___/ _/_/ ||___||v5.4.3 || the handy multi-cloud security tool
Date: 2025-07-02 14:18:12
-> Using the AWS credentials below: · AWS-CLI Profile: default · AWS Regions: us-east-2 · AWS Account: 098451652541 · User Id: AIDARN3BM7665XHOQE6GP · Caller Identity ARN: arn:aws:iam::098451652541:user/student-92s0z
-> Using the following configuration: · Config File: /home/student/.local/share/pipx/venvs/prowler/lib/python3.12/site-packages/prowler/config/config.yaml · Mutelist File: /home/student/.local/share/pipx/venvs/prowler/lib/python3.12/site-packages/prowler/config/aws_mutelist.yaml · Scanning unused services and resources: False
Executing 23 checks, please wait... -> Scan completed! |▉▉▉▉▉▉▉▉▉▉▉▉▉▉▉▉▉▉▉▉▉▉▉▉▉▉▉▉▉▉▉▉▉▉▉▉▉▉▉▉| 23/23 [100%] in 9.7s
Overview Results: ╭────────────────────┬────────────────────┬────────────────╮ │ 32.95% (29) Failed │ 67.05% (59) Passed │ 0.0% (0) Muted │ ╰────────────────────┴────────────────────┴────────────────╯
Account 098451652541 Scan Results (severity columns are for fails only): ╭────────────┬───────────┬───────────┬────────────┬────────┬──────────┬───────┬─────────╮ │ Provider │ Service │ Status │ Critical │ High │ Medium │ Low │ Muted │ ├────────────┼───────────┼───────────┼────────────┼────────┼──────────┼───────┼─────────┤ │ aws │ ec2 │ FAIL (29) │ 0 │ 2 │ 27 │ 0 │ 0 │ ╰────────────┴───────────┴───────────┴────────────┴────────┴──────────┴───────┴─────────╯ * You only see here those services that contains resources.
Detailed results are in:
- HTML: /home/student/labFiles/prowler/output/AWS-Net-Ingress.html
```
Live Data in Use!
Remember that your data may differ from these results!
Now you can copy the output file into the web root directory of the web server on the Ubuntu VM:
cp ./output/AWS-Net-Ingress.html /var/www/html
Then, open Firefox on the Windows VM and browse to:
http://10.50.7.50/AWS-Net-Ingress.html
http://10.50.7.50/AWS-Net-Ingress.html
Notice that Prowler finds similar problems to Custodian. Either tool would be appropriate for automated checks - we try to "live off the land" by using the same tools as our administrators and engineers use when we conduct audits. Remember also that Prowler can also save results as JSON for analysis or even into AWS Security Hub.
Part 4: Infrastructure SAST
Environment Check
Before proceeding, ensure that you are working in Windows Terminal in a SSH session to the Ubuntu VM.
Background: Many organizations use tools like HashiCorp Terraform or AWS Cloud Formation (CFN) to build their infrastructure using code (known as infrastructure as code, or IaC). Tools like cfn_nag and terrascan can be used to scan the IaC code before deployment to ensure that no common configuration errors are present.
Your engineers have developed the code for a new operating environment using Terraform targeting AWS. In this section of the lab, you will run a static analysis scan against their Terraform templates.
Instructions: Navigate to the directory where the Terraform code has been stored.
cd /home/student/labFiles/infrastructure/terraform/aws
The engineers have created a number of .tf files with the code to build the new environment. They have separated their code in the modules directory so that compute, network, and storage creation files are grouped together. You can view the structure of the directories with the ls command:
ls -lR modules/
Sample Results
student@ubuntu:$ls -lR modules/
modules/:
total 12
drwxrwxr-x 2 student student 4096 Dec  6 21:57 compute
drwxrwxr-x 2 student student 4096 Dec  6 21:57 network
drwxrwxr-x 2 student student 4096 Dec  6 21:57 storage

modules/compute:
total 16
-rw-rw-r-- 1 student student  274 Dec  6 21:57 data.tf
-rw-rw-r-- 1 student student 3588 Dec  6 21:57 main.tf
-rw-rw-r-- 1 student student  431 Dec  6 21:57 task-definitions.json
-rw-rw-r-- 1 student student  337 Dec  6 21:57 variables.tf

modules/network:
total 16
-rw-rw-r-- 1 student student 5074 Dec  6 21:57 main.tf
-rw-rw-r-- 1 student student  420 Dec  6 21:57 output.tf
-rw-rw-r-- 1 student student  218 Dec  6 21:57 variables.tf

modules/storage:
total 8
-rw-rw-r-- 1 student student 3361 Dec  6 21:57 main.tf
-rw-rw-r-- 1 student student    0 Dec  6 21:57 output.tf
-rw-rw-r-- 1 student student  286 Dec  6 21:57 variables.tf
The main.tf file in the modules/storage directory defines the S3 storage buckets and databases that will be allocated when the infrastructure is deployed. You can view that file (with line numbers) to get a feel for how the .tf files are put together.
cat -n modules/storage/main.tf
Scroll up and look at the code. Looking at lines 45-64, you should see a block that defines a database instance. The engineers have used local variables to define some important settings like usernames and passwords. They have also defined the database type and instance class that will be used to host the database.
45  resource "aws_db_instance" "km_db" {
46    name                      = "km_db_${var.environment}"
47    allocated_storage         = 20
48    engine                    = "postgres"
49    engine_version            = "10.6"
50    instance_class            = "db.t3.medium"
51    storage_type              = "gp2"
52    password                  = var.db_password
53    username                  = var.db_username
54    vpc_security_group_ids    = [aws_security_group.km_rds_sg.id]
55    db_subnet_group_name      = aws_db_subnet_group.km_rds_subnet_grp.id
56    identifier                = "km-db-${var.environment}"
57    storage_encrypted         = true
58    skip_final_snapshot       = true
59    final_snapshot_identifier = "km-db-${var.environment}-db-destroy-snapshot"
60    kms_key_id                = aws_kms_key.km_db_kms_key.arn
61    tags = merge(var.default_tags, {
62      Name = "km_db_${var.environment}"
63    })
64  }
65
Beginning on line 104, you'll see two S3 buckets and a public access configuration for one of the buckets. Notice that one of the buckets has an ACL and tags applied, while the other does not.
104  resource "aws_s3_bucket" "km_blob_storage" {
105    bucket = "km-blob-storage-${var.environment}"
106    acl    = "private"
107    tags = merge(var.default_tags, {
108      name = "km_blob_storage_${var.environment}"
109    })
110  }
111
112  resource "aws_s3_bucket" "km_public_blob" {
113    bucket = "km-public-blob"
114  }
115
116  resource "aws_s3_bucket_public_access_block" "km_public_blob" {
117    bucket = aws_s3_bucket.km_public_blob.id
118
119    block_public_acls   = false
120    block_public_policy = false
121  }
122
Explore the contents of any .tf files you want, and then continue with the lab.
The terrascan tool from Tenable (the same company that produces the Nessus vulnerability scanner) is a static analyzer for Terraform projects. It will look for common misconfigurations in the templates. Ideally, your engineering team should scan its code before deploying to avoid having vulnerabilities running in production.
Once you've explored the Terraform files and how the DevOps developers have organized them, run Terrascan against the templates using this command:
terrascan scan .
Sample Results
student@ubuntu:$terrascan scan .
20##-04-26T20:03:12.008Z        warn    commons/extract-container-images.go:111 failed to fetch containers from aws resource: invalid character '$' looking for beginning of value
20##/04/26 20:03:12 [DEBUG] GET https://registry.terraform.io/v1/providers/hashicorp/aws/versions
20##-04-26T20:03:12.158Z        warn    commons/extract-container-images.go:111 failed to fetch containers from aws resource: invalid character '$' looking for beginning of value


Scan Errors -

        IaC Type            :   docker
        Directory           :   /home/student/labFiles/infrastructure/terraform/aws
        Error Message       :   Dockerfile not found in the directory /home/student/labFiles/infrastructure/terraform/aws
...
[Results Truncated]
Sample Results
Scan Summary -

    File/Folder         :   /home/student/labFiles/infrastructure/terraform/aws
    IaC Type            :   terraform
    Scanned At          :   20##-04-26 20:03:13.818100208 +0000 UTC
    Policies Validated  :   173
    Violated Policies   :   23
    Low                 :   4
    Medium              :   8
    High                :   11
Scroll up to look through the results, noticing the summary of violations given at the end. You should notice some HIGH criticality findings for the S3 buckets you looked at before. Terrascan noted that the buckets have been created without versioning enabled, which will make it more difficult to recover data that has been altered or deleted in the buckets.
Description    :        Enabling S3 versioning will enable easy recovery from both unintended user actions, like deletes and overwrites
File           :        modules/storage/main.tf
Module Name    :        root
Plan Root      :        modules/storage
Line           :        104
Severity       :        HIGH
-----------------------------------------------------------------------

Description    :        Enabling S3 versioning will enable easy recovery from both unintended user actions, like deletes and overwrites
File           :        modules/storage/main.tf
Module Name    :        storage
Plan Root      :        ./
Line           :        112
Severity       :        HIGH
To remediate a finding like this, the engineers would need to add a setting to the bucket creation code in the templates. One example of code they could include is:
resource "aws_s3_bucket_versioning" "versioning_example" {
    bucket = aws_s3_bucket.km_blob_storage.id
    versioning_configuration {
        status = "Enabled"
    }
}
Explore all the results you'd like before moving on. Remember that the best use of a tool like Terrascan is NOT to have the auditor running it after deployment but to have it run as part of the deployment pipeline!
Close your Ubuntu SSH tab in Windows Terminal when you have finished the lab.