Lab 4.2: Cloud Identity and Access Management
VMs Needed
- Windows
- Ubuntu
Lab Video
Cloud Identity and Access Management
Objectives
- Use the AWS PowerShell module to check IAM configuration for an account
- Use Prowler to perform an automated audit of the IAM section of the CIS AWS benchmark
- Practice the use of Custodian tests against the AWS service
Lab Preparation
Boot the VMs required for the lab (see the "VMs Needed" section above) and log on to the Windows VM using the username student and the password student.
Launch a PowerShell Core terminal by clicking the Windows Terminal icon in the taskbar.

Part 1: IAM in AWS
Environment Check
Before proceeding, ensure that you are working in Windows Terminal in PowerShell Core.

Cloud Resource Names Will Vary!
The cloud-based labs for this class are auto-provisioned using infrastructure as code (IaC) technologies. To ensure unique names across every running course, we have added random strings to some of the resource names. This will cause small variances between the screenshots and the tool output you will see.
For example, you may see a screenshot where a username is shown as TSmith-a1b2c, while your testing reveals a user named TSmith-z3x4q. This is expected behavior, and you may see it occur for ANY resource, including VM instances, networks, users, and groups. In many cases, we have blurred these parts of the results in our screenshots to let you focus on the important information.
Instructions: Ensure that the AWS module is loaded in your PowerShell session. NOTE: the module is quite large and may take a long time to load.
Import-Module AWSPowerShell.NetCore
The AWS benchmark (control 1.4) recommends that you should have no access keys associated with the root account for the organization. These keys can be used for automated access, and the root account should not be used for day-to-day administrative tasks. Check the identity and access management (IAM) account summary to count how many access keys are present. If there are zero, then the root account does not have access keys (0 is compliant, > 0 is noncompliant):
Get-IAMAccountSummary
Sample Results
PS > Get-IAMAccountSummary

Key                               Value
---                               -----
GroupPolicySizeQuota               5120
InstanceProfilesQuota              1000
Policies                              1
GroupsPerUserQuota                   10
InstanceProfiles                      0
AttachedPoliciesPerUserQuota         10
Users                                 8
PoliciesQuota                      1500
Providers                             2
AccountMFAEnabled                     1
AccessKeysPerUserQuota                2
AssumeRolePolicySizeQuota          2048
PolicyVersionsInUseQuota          10000
GlobalEndpointTokenVersion            1
VersionsPerPolicyQuota                5
AttachedPoliciesPerGroupQuota        10
PolicySizeQuota                    6144
Groups                                2
AccountSigningCertificatesPresent     0
UsersQuota                         5000
ServerCertificatesQuota              20
MFADevices                            1
UserPolicySizeQuota                2048
PolicyVersionsInUse                  20
ServerCertificates                    0
Roles                                20
RolesQuota                         1000
SigningCertificatesPerUserQuota       2
MFADevicesInUse                       1
RolePolicySizeQuota               10240
AttachedPoliciesPerRoleQuota         10
AccountAccessKeysPresent              0
GroupsQuota                         300
To query only the value of interest, you could use this command:
(Get-IAMAccountSummary).AccountAccessKeysPresent
Sample Results
PS > (Get-IAMAccountSummary).AccountAccessKeysPresent
0
Control 1.5 recommends that the root user should be configured to use multi-factor authentication (MFA). This can also be checked using the Get-IAMAccountSummary cmdlet, as follows (1 is compliant, 0 is noncompliant):
(Get-IAMAccountSummary).AccountMFAEnabled
Sample Results
PS > (Get-IAMAccountSummary).AccountMFAEnabled
1
Control 1.8 recommends a minimum password length of 14 characters for IAM users. This can be queried with the Get-IAMAccountPasswordPolicy cmdlet. You can see that password length, aging, and complexity can all be queried with this cmdlet:
Get-IAMAccountPasswordPolicy
Sample Results
PS > Get-IAMAccountPasswordPolicy

AllowUsersToChangePassword : True
ExpirePasswords            : False
HardExpiry                 :
MaxPasswordAge             :
MinimumPasswordLength      : 8
PasswordReusePrevention    :
RequireLowercaseCharacters : True
RequireNumbers             : True
RequireSymbols             : True
RequireUppercaseCharacters : True
Control 1.13 recommends that each user should have a maximum of one access key available. This can be verified with the Get-IAMAccessKey cmdlet. To verify this setting for the user account you are using to access AWS, you can begin by getting your username from the AWS Security Token Service:
$myusername = (Get-STSCallerIdentity).Arn -replace ".*\/", ""
$myusername
Sample Results
PS > $myusername = (Get-STSCallerIdentity).Arn -replace ".*\/", ""
PS > $myusername
student-XXXXX
Then you can query IAM for access keys associated with your account:
Get-IAMAccessKey -UserName $myusername
Sample Results
PS > Get-IAMAccessKey -UserName $myusername

AccessKeyId          CreateDate           Status UserName
-----------          ----------           ------ --------
XXXXXXXXXXXXXXXXXXX  2/5/2023 10:36:49 PM Active student-XXXXX
Using a PowerShell foreach loop, you could count access keys per user. Remember that a count of more than one is a violation:
Get-IAMUserList | foreach {
    $userName = $_.UserName
    $keyCount = (Get-IAMAccessKey -UserName $userName).Count
    "$userName : $keyCount"
}
Sample Results
PS > Get-IAMUserList | foreach {
>>     $userName = $_.UserName
>>     $keyCount = (Get-IAMAccessKey -UserName $userName).Count
>>     "$userName : $keyCount"
>> }
AMartinez-eksgd : 1
BSmith-eksgd : 1
GLee-eksgd : 2
instructor-eksgd : 1
JAllen-eksgd : 1
KJones-eksgd : 1
student-eksgd : 1
WAlexander-eksgd : 1
Control 1.15 recommends that users be granted permissions through roles rather than directly. This is a form of role-based access control, like using Active Directory groups to manage permissions and rights within a Windows domain rather than assigning them to users. You can validate that no users have directly accessed permissions by running the following commands.
Begin by getting a list of users:
Get-IAMUserList
Sample Results
PS > Get-IAMUserList

Arn                 : arn:aws:iam::635360817199:user/AMartinez-eksgd
CreateDate          : 2/5/2023 10:36:47 PM
PasswordLastUsed    : 1/1/0001 12:00:00 AM
Path                : /
PermissionsBoundary :
Tags                : {}
UserId              : AIDAZH3TUWAXXM5P3TND2
UserName            : AMartinez-eksgd

Arn                 : arn:aws:iam::635360817199:user/BSmith-eksgd
CreateDate          : 2/5/2023 10:36:47 PM
PasswordLastUsed    : 1/1/0001 12:00:00 AM
Path                : /
PermissionsBoundary :
Tags                : {}
UserId              : AIDAZH3TUWAXZDHSQZ6ID
UserName            : BSmith-eksgd
...
[Results Truncated]
Then you need to check the lists of user policies against the list of users to see if any policies are directly attached to a user. Policies can be assigned "inline" when the user is created (revealed by the Get-IAMUserPolicies cmdlet) or attached to a user after they are created (tested with Get-IAMAttachedUserPolicies). To do the tests manually, you could query each list to see if they are attached to the user returned in the last result. To test the user whose username starts with "JAllen," you would run these manual commands.
$userName = (Get-IAMUserList | Where-Object username -like 'JAllen*').UserName
Get-IAMUserPolicies -UserName $userName
Get-IAMAttachedUserPolicies -UserName $userName
Sample Results
PS > $userName = (Get-IAMUserList | Where-Object username -like 'JAllen*').UserName
PS > Get-IAMUserPolicies -UserName $userName
PS > Get-IAMAttachedUserPolicies -UserName $userName

PolicyArn                                PolicyName
---------                                ----------
arn:aws:iam::aws:policy/AWSSupportAccess AWSSupportAccess
Manual testing is obviously not going to be very efficient if the list of users is quite large. A foreach loop can be used to automate the test for all users:
Get-IAMUserList | foreach {
    #Get the username
    $userName = $_.UserName
    "Processing user: $userName"
    #Count inline policies (>0 is a violation)
    $inlineCount = (Get-IAMUserPolicies -UserName $_.UserName |
        Select-Object PolicyName).Count
    #Count attached policies (>0 is a violation)
    $attachedCount = (Get-IAMAttachedUserPolicies -UserName $_.UserName |
        Select-Object PolicyName).Count
    "$username inline: $inlineCount attached: $attachedCount"
}
Sample Results
PS > Get-IAMUserList | foreach {
>>     #Get the username
>>     $userName = $_.UserName
>>     "Processing user: $userName"
>>     #Count inline policies (>0 is a violation)
>>     $inlineCount = (Get-IAMUserPolicies -UserName $_.UserName |
>>         Select-Object PolicyName).Count
>>     #Count attached policies (>0 is a violation)
>>     $attachedCount = (Get-IAMAttachedUserPolicies -UserName $_.UserName |
>>         Select-Object PolicyName).Count
>>     "$username inline: $inlineCount attached: $attachedCount"
>> }
Processing user: AMartinez-eksgd
AMartinez-eksgd inline: 0 attached: 0
Processing user: BSmith-eksgd
BSmith-eksgd inline: 0 attached: 0
Processing user: GLee-eksgd
GLee-eksgd inline: 0 attached: 0
Processing user: instructor-eksgd
instructor-eksgd inline: 0 attached: 1
Processing user: JAllen-eksgd
JAllen-eksgd inline: 0 attached: 1
Processing user: KJones-eksgd
KJones-eksgd inline: 0 attached: 0
Processing user: student-eksgd
student-eksgd inline: 0 attached: 0
Processing user: WAlexander-eksgd
WAlexander-eksgd inline: 1 attached: 0
Results greater than zero for any user in either category would indicate a violation of the control.
Part 2: Testing AWS IAM with Prowler
Background: In this section of the lab, you will use Prowler's AWS provider to audit the IAM settings for the AWS lab environment.
Instructions: Open an SSH connection to the Ubuntu VM in Windows Terminal. Click the down arrow icon and select SSH-Ubuntu from the drop-down menu.
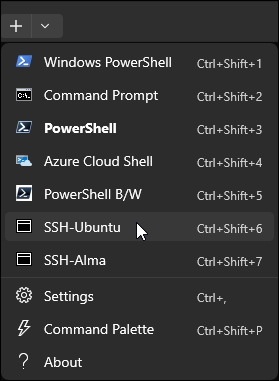
The following commands should be run in the SSH-Ubuntu terminal you just opened.
Ensure that you are in your user's home directory:
cd /home/student
View the help content for Prowler. Notice the options for listing and specifying the checks and groups that will be run and for filtering the AWS regions that will be tested.
prowler aws -h
The full help output for the AWS provider is given at the bottom of this page for your reference.
Note that Prowler can run full compliance benchmark scans (you will do this in another lab), but it can also run checks for individual AWS services. List the services which Prowler can audit using this command:
prowler aws --list-services
Sample Results
student@ubuntu:$prowler aws --list-services
                         _
 _ __  _ __ _____      _| | ___ _ __
| '_ \| '__/ _ \ \ /\ / / |/ _ \ '__|
| |_) | | | (_) \ V  V /| |  __/ |
| .__/|_|  \___/ \_/\_/ |_|\___|_|v3.10.0
|_| the handy cloud security tool

Date: 20##-04-26 19:20:09

- accessanalyzer
- account
- acm
- apigateway
- apigatewayv2
- appstream
- athena
...
[Results Truncated]
Sample Results
...
- elbv2
- emr
- fms
- glacier
- glue
- guardduty
- iam
- inspector2
- kms
- macie
- networkfirewall
- opensearch
- organizations
...
[Results Truncated]
The IAM service is included in the list. Since we are interested in the IAM service for this lab, we'll have Prowler run all the available checks for that service.
prowler aws --services iam
Sample Results
student@ubuntu:$prowler aws --services iam

                         _
 _ __  _ __ _____      _| | ___ _ __
| '_ \| '__/ _ \ \ /\ / / |/ _ \ '__|
| |_) | | | (_) \ V  V /| |  __/ |
| .__/|_|  \___/ \_/\_/ |_|\___|_|v5.4.3
|_| the handy multi-cloud security tool

Date: 2025-07-02 13:53:29

-> Using the AWS credentials below:
· AWS-CLI Profile: default
· AWS Regions: all
· AWS Account: 098451652541
· User Id: AIDARN3BM7665XHOQE6GP
· Caller Identity ARN: arn:aws:iam::098451652541:user/student-92s0z

-> Using the following configuration:
· Config File: /home/student/.local/share/pipx/venvs/prowler/lib/python3.12/site-packages/prowler/config/config.yaml
· Mutelist File: /home/student/.local/share/pipx/venvs/prowler/lib/python3.12/site-packages/prowler/config/aws_mutelist.yaml
· Scanning unused services and resources: False

Executing 43 checks, please wait...
-> Scan completed! |▉▉▉▉▉▉▉▉▉▉▉▉▉▉▉▉▉▉▉▉▉▉▉▉▉▉▉▉▉▉▉▉▉▉▉▉▉▉▉▉| 43/43 [100%] in 40.3s

Overview Results:
╭────────────────────┬─────────────────────┬────────────────╮
│ 23.56% (41) Failed │ 76.44% (133) Passed │ 0.0% (0) Muted │
╰────────────────────┴─────────────────────┴────────────────╯

Account 098451652541 Scan Results (severity columns are for fails only):
╭────────────┬───────────┬───────────┬────────────┬────────┬──────────┬───────┬─────────╮
│ Provider   │ Service   │ Status    │   Critical │   High │   Medium │   Low │   Muted │
├────────────┼───────────┼───────────┼────────────┼────────┼──────────┼───────┼─────────┤
│ aws        │ iam       │ FAIL (41) │          1 │     13 │       22 │     5 │       0 │
╰────────────┴───────────┴───────────┴────────────┴────────┴──────────┴───────┴─────────╯
* You only see here those services that contains resources.

Detailed results are in:
- JSON-OCSF: /home/student/output/prowler-output-098451652541-20250702135329.ocsf.json
- CSV: /home/student/output/prowler-output-098451652541-20250702135329.csv
- HTML: /home/student/output/prowler-output-098451652541-20250702135329.html
Prowler gives a nice summary at the command line. including statistics for passed and failed tests. It also saves output in multiple file formats by default. You can specify file formats and output paths at the command line. This is useful for saving your results into a network share or even onto a web server for easier viewing.
Prowler can save results in a number of output formats, including:
- JSON (useful for the lab)
- HTML (useful for quick tactical reports in the real world)
- JSON-ASFF (the JSON finding format used by AWS Security Hub)
- JUnit XML files
- CSV
Run the AWS IAM checks again, this time specifying HTML for the output. The -F flag tells the tools the base filename for the result file, which will be saved in a directory called "output."
prowler aws --services iam -M html -F AWS-CIS-IAM
Sample Results
student@ubuntu:$prowler aws --services iam -M html -F AWS-CIS-IAM

                        _
 _ __  _ __ _____      _| | ___ _ __
| '_ \| '__/ _ \ \ /\ / / |/ _ \ '__|
| |_) | | | (_) \ V  V /| |  __/ |
| .__/|_|  \___/ \_/\_/ |_|\___|_|v5.4.3
|_| the handy multi-cloud security tool

Date: 2025-07-02 13:55:52

-> Using the AWS credentials below:
· AWS-CLI Profile: default
· AWS Regions: all
· AWS Account: 098451652541
· User Id: AIDARN3BM7665XHOQE6GP
· Caller Identity ARN: arn:aws:iam::098451652541:user/student-92s0z

-> Using the following configuration:
· Config File: /home/student/.local/share/pipx/venvs/prowler/lib/python3.12/site-packages/prowler/config/config.yaml
· Mutelist File: /home/student/.local/share/pipx/venvs/prowler/lib/python3.12/site-packages/prowler/config/aws_mutelist.yaml
· Scanning unused services and resources: False

Executing 43 checks, please wait...
-> Scan completed! |▉▉▉▉▉▉▉▉▉▉▉▉▉▉▉▉▉▉▉▉▉▉▉▉▉▉▉▉▉▉▉▉▉▉▉▉▉▉▉▉| 43/43 [100%] in 39.8s

Overview Results:
╭────────────────────┬─────────────────────┬────────────────╮
│ 23.56% (41) Failed │ 76.44% (133) Passed │ 0.0% (0) Muted │
╰────────────────────┴─────────────────────┴────────────────╯

Account 098451652541 Scan Results (severity columns are for fails only):
╭────────────┬───────────┬───────────┬────────────┬────────┬──────────┬───────┬─────────╮
│ Provider   │ Service   │ Status    │   Critical │   High │   Medium │   Low │   Muted │
├────────────┼───────────┼───────────┼────────────┼────────┼──────────┼───────┼─────────┤
│ aws        │ iam       │ FAIL (41) │          1 │     13 │       22 │     5 │       0 │
╰────────────┴───────────┴───────────┴────────────┴────────┴──────────┴───────┴─────────╯
* You only see here those services that contains resources.

Detailed results are in:
- HTML: /home/student/output/AWS-CIS-IAM.html
To make it easier to view the HTML output from a browser, you can copy it to the web root directory on the Ubuntu VM.
cp ./output/AWS-CIS-IAM.html /var/www/html
Then, open Firefox on the Windows VM and browse to:
http://10.50.7.50/AWS-CIS-IAM.html
http://10.50.7.50/AWS-CIS-IAM.html
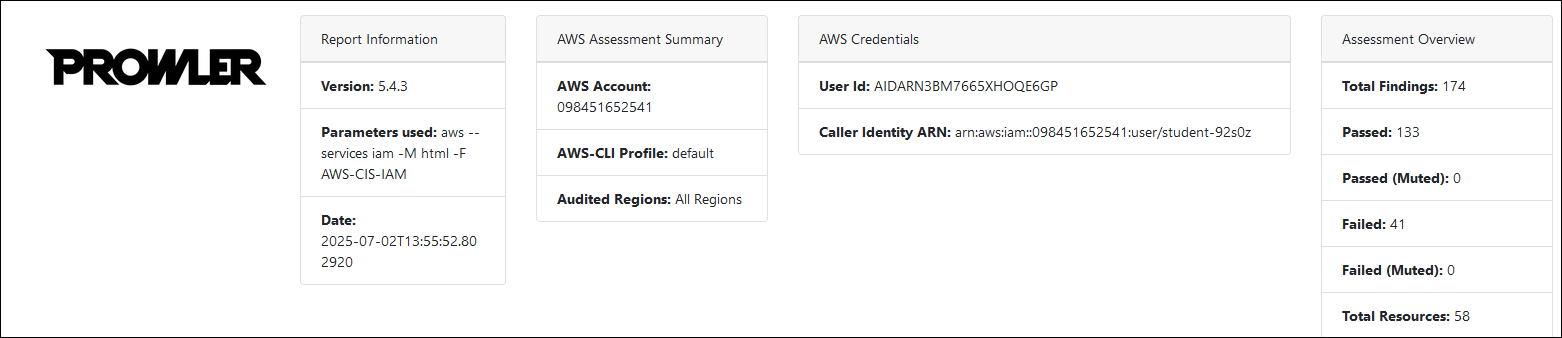
Take some time to browse through your results, noting that the HTML file gives you links to AWS documentation pages for the controls being tested. They are indicated with this icon:

Close Firefox when you have finished.
Part 3: Testing AWS IAM with Custodian
Background: Cloud Custodian, often called simply Custodian or even just c7n, is a very powerful tool for monitoring resources in cloud providers. While it has both detective and responsive capabilities, in this lab section, you will use Custodian rules to find AWS IAM users whose accounts violate common best practices.
Instructions: Return to the Ubuntu SSH session you have open in Windows Terminal, or open a new session.
Set your location to the working directory, which contains your pre-built custodian YAML files.
cd /home/student/labFiles/custodian
Ensure that the latest copies of the c7n policies are available in the directory:
git pull
Your security engineers have created a c7n configuration file called aws_iam.yaml, which contains two policies: one to check for users with no active multi-factor authentication and one which looks for users that have had an inline policy applied directly to their account instead of through membership to a group or role.
You can view the contents of the policy file with the command below.
cat aws_iam.yaml
Sample Results
student@ubuntu:$cat aws_iam.yaml
policies:
- name: iam-no-mfa
  resource: iam-user
  filters:
    - type: credential
      key: mfa_active
      value: false

- name: iam-inline-policy
  resource: iam-user
  filters:
    - type: has-inline-policy
      value: true
The first step in using a c7n policy is to use the custodian executable to validate that the policy syntax is correct. You can validate your AWS IAM policy with this command.
~/custodian/bin/custodian validate aws_iam.yaml
Sample Results
student@ubuntu:$~/custodian/bin/custodian validate aws_iam.yaml
20##-04-26 19:25:41,127: custodian.commands:INFO Configuration valid: aws_iam.yaml
With the policy validated, you can run it against your cloud provider. Custodian will use your default AWS profile to run (although it can also assume IAM roles using a configuration option in the policy file). Use the run option to run the policy, specifying that Custodian should create an output directory named aws_iam.
~/custodian/bin/custodian run --output-dir ./aws_iam aws_iam.yaml
Sample Results
student@ubuntu:$~/custodian/bin/custodian run --output-dir ./aws_iam aws_iam.yaml
20##-04-26 19:25:59,692: custodian.policy:INFO policy:iam-no-mfa resource:iam-user region:us-east-2 count:8 time:1.51
20##-04-26 19:26:00,543: custodian.policy:INFO policy:iam-inline-policy resource:iam-user region:us-east-2 count:1 time:0.85
List the contents of your working directory. Note that a new directory was created by Custodian, containing the results of each policy in the aws_iam.yaml file.
ls -l
Sample Results
student@ubuntu:$ls -l
total 24
drwxrwxr-x 4 student student 4096 Apr 26 19:25 aws_iam
-rw-rw-r-- 1 student student  235 Dec  6 21:57 aws_iam.yaml
-rw-rw-r-- 1 student student  302 Dec  6 21:57 aws_ingress.yaml
-rw-rw-r-- 1 student student 2837 Dec  6 21:57 aws_tag.yaml
-rw-rw-r-- 1 student student  271 Dec  6 21:57 azure_ingress.yaml
-rw-rw-r-- 1 student student  321 Dec  6 21:57 azure_tag.yaml
If you list the contents of this directory recursively, you will notice that there's a subdirectory for each policy and that each subdirectory contains a run log and JSON files containing metadata about the test and a list of resources that triggered the policy.
ls -lR aws_iam/
Sample Results
student@ubuntu:$ls -lR aws_iam/
aws_iam/:
total 8
drwxrwxr-x 2 student student 4096 Apr 26 19:26 iam-inline-policy
drwxrwxr-x 2 student student 4096 Apr 26 19:25 iam-no-mfa

aws_iam/iam-inline-policy:
total 12
-rw-rw-r-- 1 student student  130 Apr 26 19:26 custodian-run.log
-rw-rw-r-- 1 student student 1645 Apr 26 19:26 metadata.json
-rw-rw-r-- 1 student student 1114 Apr 26 19:26 resources.json

aws_iam/iam-no-mfa:
total 24
-rw-rw-r-- 1 student student   123 Apr 26 19:25 custodian-run.log
-rw-rw-r-- 1 student student  1712 Apr 26 19:25 metadata.json
-rw-rw-r-- 1 student student 13231 Apr 26 19:25 resources.json
View the contents of the metadata.json file for one of the policies to see what sort of data is logged about the policy run. The metrics section at the end of the file gives you information about how many noncompliant resources were returned and how long the tests took to run.
cat aws_iam/iam-inline-policy/metadata.json
Sample Results
student@ubuntu:$cat aws_iam/iam-inline-policy/metadata.json
{
  "policy": {
    "name": "iam-inline-policy",
    "resource": "iam-user",
    "filters": [
      {
        "type": "has-inline-policy",
        "value": true
      }
    ]
  },
...
[Results Truncated]
View the resources.json file to see which users matched the missing tag policy rule:
cat aws_iam/iam-inline-policy/resources.json
Sample Results
student@ubuntu:$cat aws_iam/iam-inline-policy/resources.json
{
    "Path": "/",
    "UserName": "WAlexander-92s0z",
    "UserId": "AIDARN3BM766VDUKZ3WFW",
    "Arn": "arn:aws:iam::098451652541:user/WAlexander-92s0z",
    "CreateDate": "2025-07-01T19:36:45+00:00",
    "Tags": [
    {
        "Key": "Stage",
        "Value": "92s0z"
    },
    {
        "Key": "Environment",
        "Value": "aud1-range-aws"
    },
    {
        "Key": "Name",
        "Value": "aud1-range-aws-92s0z"
    }
    ],
    "c7n:InlinePolicies": [
    "aud1-range-aws-92s0z-walexander-policy"
...
[Results Truncated]
Note that the details in the resources.json file will differ according to the type of resource being recorded. Since this file has results for an IAM user, you will notice both a UserName and UserId for the user. Tags associated with the user and even the name of the incorrectly applied policy are also included.
On your own, you can explore the results returned by the iam-no-mfa rule in the Custodian file. See if you can determine how many users are configured with no MFA.
Hint: the jq executable on Ubuntu can very quickly give you a list of usernames. PowerShell's ConvertFrom-Json would also work.
Solution
cat aws_iam/iam-no-mfa/resources.json | jq '.[].UserName'
OR
pwsh -c "(Get-Content ./aws_iam/iam-no-mfa/resources.json | ConvertFrom-Json).UserName"
Appendix: Prowler Help Output
Prowler AWS Provider Help Output
usage: prowler aws [-h] [-q] [-M {csv,json,json-asff,html,json-ocsf} [{csv,json,json-asff,html,json-ocsf} ...]] [-F [OUTPUT_FILENAME]]
[-o [OUTPUT_DIRECTORY]] [--verbose] [-z] [-b]
[--slack] [--unix-timestamp] [--log-level {DEBUG,INFO,WARNING,ERROR,CRITICAL}] [--log-file [LOG_FILE]] [--only-logs] [-c CHECKS [CHECKS ...] | -C [CHECKS_FILE] |
-s SERVICES [SERVICES ...] | --severity {informational,low,medium,high,critical} [{informational,low,medium,high,critical} ...] |
--compliance {gdpr_aws,nist_csf_1.1_aws,soc2_aws,mitre_attack_aws,ens_rd2022_aws,nist_800_53_revision_4_aws,
    aws_foundational_security_best_practices_aws, iso27001_2013_aws,cis_1.5_aws,cis_2.0_aws,cisa_aws,fedramp_moderate_revision_4_aws,
    ffiec_aws,rbi_cyber_security_framework_aws,cis_1.4_aws,fedramp_low_revision_4_aws,aws_well_architected_framework_reliability_pillar_aws,
    pci_3.2.1_aws,gxp_21_cfr_part_11_aws,nist_800_171_revision_2_aws,nist_800_53_revision_5_aws,hipaa_aws,
    aws_audit_manager_control_tower_guardrails_aws,gxp_eu_annex_11_aws,aws_well_architected_framework_security_pillar_aws,cis_2.0_gcp}
    [{gdpr_aws,nist_csf_1.1_aws,soc2_aws,mitre_attack_aws,ens_rd2022_aws,nist_800_53_revision_4_aws,
    aws_foundational_security_best_practices_aws,iso27001_2013_aws,cis_1.5_aws,cis_2.0_aws,cisa_aws,fedramp_moderate_revision_4_aws,
    ffiec_aws,rbi_cyber_security_framework_aws,cis_1.4_aws,fedramp_low_revision_4_aws,aws_well_architected_framework_reliability_pillar_aws,
    pci_3.2.1_aws,gxp_21_cfr_part_11_aws,nist_800_171_revision_2_aws,nist_800_53_revision_5_aws,hipaa_aws,
    aws_audit_manager_control_tower_guardrails_aws,gxp_eu_annex_11_aws,aws_well_architected_framework_security_pillar_aws,cis_2.0_gcp} ...]
    | --categories CATEGORIES [CATEGORIES ...]] [-x [CHECKS_FOLDER]] [-e EXCLUDED_CHECKS [EXCLUDED_CHECKS ...]]
    [--excluded-services EXCLUDED_SERVICES [EXCLUDED_SERVICES ...]]
    [-l | --list-checks-json | --list-services | --list-compliance | --list-compliance-requirements {gdpr_aws,nist_csf_1.1_aws,soc2_aws,
    mitre_attack_aws,ens_rd2022_aws,nist_800_53_revision_4_aws,aws_foundational_security_best_practices_aws,iso27001_2013_aws,cis_1.5_aws,
    cis_2.0_aws,cisa_aws,fedramp_moderate_revision_4_aws,ffiec_aws,rbi_cyber_security_framework_aws,cis_1.4_aws,fedramp_low_revision_4_aws,
    aws_well_architected_framework_reliability_pillar_aws,pci_3.2.1_aws,gxp_21_cfr_part_11_aws,nist_800_171_revision_2_aws,
    nist_800_53_revision_5_aws,hipaa_aws,aws_audit_manager_control_tower_guardrails_aws,gxp_eu_annex_11_aws,
    aws_well_architected_framework_security_pillar_aws,cis_2.0_gcp} [{gdpr_aws,nist_csf_1.1_aws,soc2_aws,mitre_attack_aws,ens_rd2022_aws,
    nist_800_53_revision_4_aws,aws_foundational_security_best_practices_aws,iso27001_2013_aws,cis_1.5_aws,cis_2.0_aws,cisa_aws,
    fedramp_moderate_revision_4_aws,ffiec_aws,rbi_cyber_security_framework_aws,cis_1.4_aws,fedramp_low_revision_4_aws,
    aws_well_architected_framework_reliability_pillar_aws,pci_3.2.1_aws,gxp_21_cfr_part_11_aws,nist_800_171_revision_2_aws,
    nist_800_53_revision_5_aws,hipaa_aws,aws_audit_manager_control_tower_guardrails_aws,gxp_eu_annex_11_aws,
    aws_well_architected_framework_security_pillar_aws,cis_2.0_gcp} ...]
    | --list-categories] [--config-file [CONFIG_FILE]] [-p [PROFILE]] [-R [ROLE]] [--sts-endpoint-region [STS_ENDPOINT_REGION]] [--mfa] [-T [SESSION_DURATION]]
    [-I [EXTERNAL_ID]]
    [-f {cn-northwest-1,us-west-2,us-east-2,ap-southeast-2,us-gov-east-1,ap-south-2,af-south-1,eu-north-1,eu-south-2,eu-west-3,eu-central-2,
    us-east-1,ap-northeast-3,eu-west-1,sa-east-1,ap-northeast-1,ap-southeast-3,me-central-1,ap-southeast-1,us-west-1,il-central-1,
    us-gov-west-1,eu-south-1,ca-central-1,eu-west-2,me-south-1,ap-southeast-4,ap-east-1,cn-north-1,eu-central-1,ap-northeast-2,ap-south-1}
    [{cn-northwest-1,us-west-2,us-east-2,ap-southeast-2,us-gov-east-1,ap-south-2,af-south-1,eu-north-1,eu-south-2,eu-west-3,eu-central-2,
    us-east-1,ap-northeast-3,eu-west-1,sa-east-1,ap-northeast-1,ap-southeast-3,me-central-1,ap-southeast-1,us-west-1,il-central-1,
    us-gov-west-1,eu-south-1,ca-central-1,eu-west-2,me-south-1,ap-southeast-4,ap-east-1,cn-north-1,eu-central-1,ap-northeast-2,
    ap-south-1} ...]]
    [-O [ORGANIZATIONS_ROLE]] [-S] [--skip-sh-update] [-i] [-B [OUTPUT_BUCKET] | -D [OUTPUT_BUCKET_NO_ASSUME]] [-N [SHODAN]] [-w [ALLOWLIST_FILE]]
    [--resource-tags RESOURCE_TAGS [RESOURCE_TAGS ...] | --resource-arn RESOURCE_ARN [RESOURCE_ARN ...]] [--aws-retries-max-attempts [AWS_RETRIES_MAX_ATTEMPTS]]

    options:
    -h, --help            show this help message and exit
    -c CHECKS [CHECKS ...], --checks CHECKS [CHECKS ...]
                            List of checks to be executed.
    -C [CHECKS_FILE], --checks-file [CHECKS_FILE]
                            JSON file containing the checks to be executed. See config/checklist_example.json
    -s SERVICES [SERVICES ...], --services SERVICES [SERVICES ...]
                            List of services to be executed.
    --severity {informational,low,medium,high,critical} [{informational,low,medium,high,critical} ...]
                            List of severities to be executed [informational, low, medium, high, critical]
    --compliance {gdpr_aws,nist_csf_1.1_aws,soc2_aws,mitre_attack_aws,ens_rd2022_aws,nist_800_53_revision_4_aws,
    aws_foundational_security_best_practices_aws,iso27001_2013_aws,cis_1.5_aws,cis_2.0_aws,cisa_aws,fedramp_moderate_revision_4_aws,ffiec_aws,
    rbi_cyber_security_framework_aws,cis_1.4_aws,fedramp_low_revision_4_aws,aws_well_architected_framework_reliability_pillar_aws,pci_3.2.1_aws,
    gxp_21_cfr_part_11_aws,nist_800_171_revision_2_aws,nist_800_53_revision_5_aws,hipaa_aws,aws_audit_manager_control_tower_guardrails_aws,
    gxp_eu_annex_11_aws,aws_well_architected_framework_security_pillar_aws,cis_2.0_gcp} [{gdpr_aws,nist_csf_1.1_aws,soc2_aws,mitre_attack_aws,
    ens_rd2022_aws,nist_800_53_revision_4_aws,aws_foundational_security_best_practices_aws,iso27001_2013_aws,cis_1.5_aws,cis_2.0_aws,cisa_aws,
    fedramp_moderate_revision_4_aws,ffiec_aws,rbi_cyber_security_framework_aws,cis_1.4_aws,fedramp_low_revision_4_aws,
    aws_well_architected_framework_reliability_pillar_aws,pci_3.2.1_aws,gxp_21_cfr_part_11_aws,nist_800_171_revision_2_aws,nist_800_53_revision_5_aws,
    hipaa_aws,aws_audit_manager_control_tower_guardrails_aws,gxp_eu_annex_11_aws,aws_well_architected_framework_security_pillar_aws,cis_2.0_gcp} ...]
                            Compliance Framework to check against for. The format should be the following: framework_version_provider (e.g.: ens_rd2022_aws)
    --categories CATEGORIES [CATEGORIES ...]
                            List of categories to be executed.
    -l, --list-checks     List checks
    --list-checks-json    Output a list of checks in json for use with --checks-file
    --list-services       List services
    --list-compliance     List compliance frameworks
    --list-compliance-requirements {gdpr_aws,nist_csf_1.1_aws,soc2_aws,mitre_attack_aws,ens_rd2022_aws,nist_800_53_revision_4_aws,
    aws_foundational_security_best_practices_aws,iso27001_2013_aws,cis_1.5_aws,cis_2.0_aws,cisa_aws,fedramp_moderate_revision_4_aws,ffiec_aws,
    rbi_cyber_security_framework_aws,cis_1.4_aws,fedramp_low_revision_4_aws,aws_well_architected_framework_reliability_pillar_aws,pci_3.2.1_aws,
    gxp_21_cfr_part_11_aws,nist_800_171_revision_2_aws,nist_800_53_revision_5_aws,hipaa_aws,aws_audit_manager_control_tower_guardrails_aws,
    gxp_eu_annex_11_aws,aws_well_architected_framework_security_pillar_aws,cis_2.0_gcp} [{gdpr_aws,nist_csf_1.1_aws,soc2_aws,mitre_attack_aws,
    ens_rd2022_aws,nist_800_53_revision_4_aws,aws_foundational_security_best_practices_aws,iso27001_2013_aws,cis_1.5_aws,cis_2.0_aws,cisa_aws,
    fedramp_moderate_revision_4_aws,ffiec_aws,rbi_cyber_security_framework_aws,cis_1.4_aws,fedramp_low_revision_4_aws,
    aws_well_architected_framework_reliability_pillar_aws,pci_3.2.1_aws,gxp_21_cfr_part_11_aws,nist_800_171_revision_2_aws,nist_800_53_revision_5_aws,
    hipaa_aws,aws_audit_manager_control_tower_guardrails_aws,gxp_eu_annex_11_aws,aws_well_architected_framework_security_pillar_aws,cis_2.0_gcp} ...]
                            List compliance requirements for a given compliance framework
    --list-categories     List the available check's categories

    Outputs:
    -q, --quiet           Store or send only Prowler failed findings
    -M {csv,json,json-asff,html,json-ocsf} [{csv,json,json-asff,html,json-ocsf} ...], --output-modes {csv,json,json-asff,html,json-ocsf} [{csv,json,json-asff,html,json-ocsf} ...]
                            Output modes, by default csv, html and json
    -F [OUTPUT_FILENAME], --output-filename [OUTPUT_FILENAME]
                            Custom output report name without the file extension, if not specified will use default output/prowler-output-ACCOUNT_NUM-OUTPUT_DATE.format
    -o [OUTPUT_DIRECTORY], --output-directory [OUTPUT_DIRECTORY]
                            Custom output directory, by default the folder where Prowler is stored
    --verbose             Display detailed information about findings
    -z, --ignore-exit-code-3
                            Failed checks do not trigger exit code 3
    -b, --no-banner       Hide Prowler banner
    --slack               Send a summary of the execution with a Slack APP in your channel. Environment variables SLACK_API_TOKEN and SLACK_CHANNEL_ID are required (see more in
                            https://docs.prowler.cloud/en/latest/tutorials/integrations/#slack).
    --unix-timestamp      Set the output timestamp format as unix timestamps instead of iso format timestamps (default mode).

    Logging:
    --log-level {DEBUG,INFO,WARNING,ERROR,CRITICAL}
                            Select Log Level
    --log-file [LOG_FILE]
                            Set log file name
    --only-logs           Print only Prowler logs by the stdout. This option sets --no-banner.

    Specify checks/services to run:
    -x [CHECKS_FOLDER], --checks-folder [CHECKS_FOLDER]
                            Specify external directory with custom checks (each check must have a folder with the required files, see more in
                            https://docs.prowler.cloud/en/latest/tutorials/misc/#custom-checks).

    Exclude checks/services to run:
    -e EXCLUDED_CHECKS [EXCLUDED_CHECKS ...], --excluded-checks EXCLUDED_CHECKS [EXCLUDED_CHECKS ...]
                            Checks to exclude
    --excluded-services EXCLUDED_SERVICES [EXCLUDED_SERVICES ...]
                            Services to exclude

    Configuration:
    --config-file [CONFIG_FILE]
                            Set configuration file path

    Authentication Modes:
    -p [PROFILE], --profile [PROFILE]
                            AWS profile to launch prowler with
    -R [ROLE], --role [ROLE]
                            ARN of the role to be assumed
    --sts-endpoint-region [STS_ENDPOINT_REGION]
                            Specify the AWS STS endpoint region to use. Read more at https://docs.aws.amazon.com/IAM/latest/UserGuide/id_credentials_temp_enable-regions.html
    --mfa                 IAM entity enforces MFA so you need to input the MFA ARN and the TOTP
    -T [SESSION_DURATION], --session-duration [SESSION_DURATION]
                            Assumed role session duration in seconds, must be between 900 and 43200. Default: 3600
    -I [EXTERNAL_ID], --external-id [EXTERNAL_ID]
                            External ID to be passed when assuming role

    AWS Regions:
    -f {cn-northwest-1,us-west-2,us-east-2,ap-southeast-2,us-gov-east-1,ap-south-2,af-south-1,eu-north-1,eu-south-2,eu-west-3,eu-central-2,us-east-1,
    ap-northeast-3,eu-west-1,sa-east-1,ap-northeast-1,ap-southeast-3,me-central-1,ap-southeast-1,us-west-1,il-central-1,us-gov-west-1,eu-south-1,
    ca-central-1,eu-west-2,me-south-1,ap-southeast-4,ap-east-1,cn-north-1,eu-central-1,ap-northeast-2,ap-south-1} [{cn-northwest-1,us-west-2,us-east-2,
    ap-southeast-2,us-gov-east-1,ap-south-2,af-south-1,eu-north-1,eu-south-2,eu-west-3,eu-central-2,us-east-1,ap-northeast-3,eu-west-1,sa-east-1,
    ap-northeast-1,ap-southeast-3,me-central-1,ap-southeast-1,us-west-1,il-central-1,us-gov-west-1,eu-south-1,ca-central-1,eu-west-2,me-south-1,
    ap-southeast-4,ap-east-1,cn-north-1,eu-central-1,ap-northeast-2,ap-south-1} ...], --region {cn-northwest-1,us-west-2,us-east-2,ap-southeast-2,
    us-gov-east-1,ap-south-2,af-south-1,eu-north-1,eu-south-2,eu-west-3,eu-central-2,us-east-1,ap-northeast-3,eu-west-1,sa-east-1,ap-northeast-1,
    ap-southeast-3,me-central-1,ap-southeast-1,us-west-1,il-central-1,us-gov-west-1,eu-south-1,ca-central-1,eu-west-2,me-south-1,ap-southeast-4,
    ap-east-1,cn-north-1,eu-central-1,ap-northeast-2,ap-south-1} [{cn-northwest-1,us-west-2,us-east-2,ap-southeast-2,us-gov-east-1,ap-south-2,
    af-south-1,eu-north-1,eu-south-2,eu-west-3,eu-central-2,us-east-1,ap-northeast-3,eu-west-1,sa-east-1,ap-northeast-1,ap-southeast-3,me-central-1,
    ap-southeast-1,us-west-1,il-central-1,us-gov-west-1,eu-south-1,ca-central-1,eu-west-2,me-south-1,ap-southeast-4,ap-east-1,cn-north-1,eu-central-1,
    ap-northeast-2,ap-south-1} ...], --filter-region {cn-northwest-1,us-west-2,us-east-2,ap-southeast-2,us-gov-east-1,ap-south-2,af-south-1,eu-north-1,
    eu-south-2,eu-west-3,eu-central-2,us-east-1,ap-northeast-3,eu-west-1,sa-east-1,ap-northeast-1,ap-southeast-3,me-central-1,ap-southeast-1,us-west-1,
    il-central-1,us-gov-west-1,eu-south-1,ca-central-1,eu-west-2,me-south-1,ap-southeast-4,ap-east-1,cn-north-1,eu-central-1,ap-northeast-2,
    ap-south-1} [{cn-northwest-1,us-west-2,us-east-2,ap-southeast-2,us-gov-east-1,ap-south-2,af-south-1,eu-north-1,eu-south-2,eu-west-3,eu-central-2,
    us-east-1,ap-northeast-3,eu-west-1,sa-east-1,ap-northeast-1,ap-southeast-3,me-central-1,ap-southeast-1,us-west-1,il-central-1,us-gov-west-1,
    eu-south-1,ca-central-1,eu-west-2,me-south-1,ap-southeast-4,ap-east-1,cn-north-1,eu-central-1,ap-northeast-2,ap-south-1} ...]
                            AWS region names to run Prowler against

    AWS Organizations:
    -O [ORGANIZATIONS_ROLE], --organizations-role [ORGANIZATIONS_ROLE]
                            Specify AWS Organizations management role ARN to be assumed, to get Organization metadata

    AWS Security Hub:
    -S, --security-hub    Send check output to AWS Security Hub
    --skip-sh-update      Skip updating previous findings of Prowler in Security Hub

    Quick Inventory:
    -i, --quick-inventory
                            Run Prowler Quick Inventory. The inventory will be stored in an output csv by default

    AWS Outputs to S3:
    -B [OUTPUT_BUCKET], --output-bucket [OUTPUT_BUCKET]
                            Custom output bucket, requires -M <mode> and it can work also with -o flag.
    -D [OUTPUT_BUCKET_NO_ASSUME], --output-bucket-no-assume [OUTPUT_BUCKET_NO_ASSUME]
                            Same as -B but do not use the assumed role credentials to put objects to the bucket, instead uses the initial credentials.

    3rd Party Integrations:
    -N [SHODAN], --shodan [SHODAN]
                            Shodan API key used by check ec2_elastic_ip_shodan.

    Allowlist:
    -w [ALLOWLIST_FILE], --allowlist-file [ALLOWLIST_FILE]
                            Path for allowlist yaml file. See example prowler/config/allowlist.yaml for reference and format. It also accepts AWS DynamoDB Table or Lambda ARNs or S3 URIs,
                            see more in https://docs.prowler.cloud/en/latest/tutorials/allowlist/

    AWS Based Scans:
    --resource-tags RESOURCE_TAGS [RESOURCE_TAGS ...]
                            Scan only resources with specific AWS Tags (Key=Value), e.g., Environment=dev Project=prowler
    --resource-arn RESOURCE_ARN [RESOURCE_ARN ...]
                            Scan only resources with specific AWS Resource ARNs, e.g., arn:aws:iam::012345678910:user/test arn:aws:ec2:us-east-1:123456789012:vpc/vpc-12345678

    Boto3 Config:
    --aws-retries-max-attempts [AWS_RETRIES_MAX_ATTEMPTS]
                            Set the maximum attemps for the Boto3 standard retrier config (Default: 3)