Lab 4.4: Cloud Benchmarks
VMs Needed
- Windows
- Ubuntu
Lab Video
Objectives
- Perform full CIS benchmark testing against the AWS lab.
- Conduct manual tests of important settings that are not included in the benchmarks.
Lab Preparation
Boot the VMs required for the lab (see the "VMs Needed" section above) and log on to the Windows VM using the username student and the password student.
Launch a PowerShell Core terminal by clicking the Windows Terminal icon in the taskbar.

Part 1: Manual Tests of S3 Settings
Environment Check
Before proceeding, ensure that you are working in Windows Terminal in PowerShell Core.

Background: We know that many data breaches over the last several years have been caused by attackers directly accessing cloud storage accounts that have been misconfigured. In this section of the lab, you will look at some important configuration options on AWS S3 (simple storage service) buckets.
Cloud Resource Names Will Vary!
The cloud-based labs for this class are auto-provisioned using infrastructure as code (IaC) technologies. To ensure unique names across every running course, we have added random strings to some of the resource names. This will cause small variances between the screenshots and the tool output you will see.
For example, you may see a screenshot where a username is shown as TSmith-a1b2c, while your testing reveals a user named TSmith-z3x4q. This is expected behavior, and you may see it occur for ANY resource, including VM instances, networks, users, and groups. In many cases, we have blurred these parts of the results in our screenshots to let you focus on the important information.
Volatile fields like login dates and password/key ages will vary, also.
Instructions: Ensure that the AWS PowerShell modules are imported into your PowerShell session. Remember that the AWS modules are quite extensive, so they may take a while to load!
Import-Module AWSPowerShell.NetCore
Use the AWS CLI to get a list of S3 buckets in the target AWS account.
Get-S3Bucket
Sample Results
PS > Get-S3Bucket

BucketName                                               BucketRegion CreationDate
----------                                               ------------ ------------
aud1-range-aws-92s0z-cloudinit                                        7/1/2025 7:39:34 PM
cloudtrail.aud1.com-92s0z                                             7/1/2025 7:36:46 PM
do-not-delete-ssm-diagnosis-098451652541-us-east-2-3shpk              6/4/2025 1:05:36 PM
logbucket.aud1.com-92s0z                                              7/1/2025 7:36:48 PM
s3-website-test.aud1.com-92s0z                                        7/1/2025 7:36:49 PM
Save an array of buckets from the account into a variable for later processing:
$buckets = Get-S3Bucket
Validate that your variable has the correct buckets in it by invoking it in your shell. You should not see any of the SANS-specific buckets.
$buckets
Sample Results
PS > $buckets = Get-S3Bucket
PS > $buckets

BucketName                                               BucketRegion CreationDate
----------                                               ------------ ------------
aud1-range-aws-92s0z-cloudinit                                        7/1/2025 7:39:34 PM
cloudtrail.aud1.com-92s0z                                             7/1/2025 7:36:46 PM
do-not-delete-ssm-diagnosis-098451652541-us-east-2-3shpk              6/4/2025 1:05:36 PM
logbucket.aud1.com-92s0z                                              7/1/2025 7:36:48 PM
s3-website-test.aud1.com-92s0z                                        7/1/2025 7:36:49 PM
To check server-side encryption settings on every bucket, you can use a foreach loop against all buckets in the account. You should expect to see a ServerSideEncryptionByDefault for the buckets, which are configured to automatically encrypt new data sent to them. Any buckets without the default configuration would be potential audit findings.
foreach( $bucket in $buckets) {
    "Processing: $($bucket.BucketName)"
    ($bucket | Get-S3BucketEncryption).ServerSideEncryptionRules |
    Format-List *
}
Sample Results
PS > foreach( $bucket in $buckets) {
>>     "Processing: $($bucket.BucketName)"
>>     ($bucket | Get-S3BucketEncryption).ServerSideEncryptionRules |
>>     Format-List *
>> }
Processing: aud1-range-aws-92s0z-cloudinit

BucketKeyEnabled              : False
ServerSideEncryptionByDefault : Amazon.S3.Model.ServerSideEncryptionByDefault

Processing: cloudtrail.aud1.com-92s0z

BucketKeyEnabled              : False
ServerSideEncryptionByDefault : Amazon.S3.Model.ServerSideEncryptionByDefault

Processing: do-not-delete-ssm-diagnosis-098451652541-us-east-2-3shpk
...
[Results Truncated]
Live Data in Use!
Remember that your data may differ from these results!
S3 versioning on a bucket allows the organization to keep multiple historical versions of a file to preserve contents in the event of an accidental or malicious change or deletion. S3 buckets also have an optional setting that requires multi-factor authentication to be used for any object delete operations.
Check the versioning and MFA delete settings on your buckets with another foreach loop:
foreach( $bucket in $buckets) {
    "Processing: $($bucket.BucketName)"
    ($bucket | Get-S3BucketVersioning) | Format-List *
}
Sample Results
PS > foreach( $bucket in $buckets) {
>>     "Processing: $($bucket.BucketName)"
>>     ($bucket | Get-S3BucketVersioning) | Format-List *
>> }
Processing: aud1-range-aws-92s0z-cloudinit

EnableMfaDelete :
Status          : Off

Processing: cloudtrail.aud1.com-92s0z

EnableMfaDelete :
Status          : Off

Processing: do-not-delete-ssm-diagnosis-098451652541-us-east-2-3shpk
...
[Results Truncated]
Live Data in Use!
Remember that your data may differ from these results!
Notice that the EnableMfaDelete setting is an empty string for each of the buckets. According to AWS documentation, an empty string means that the feature is not enabled.
Excerpt from AWS CLI Documentation
MFADelete -> (string)
Specifies whether MFA delete is enabled in the bucket versioning configuration. This element is only returned if the bucket has been configured with MFA delete. If the bucket has never been so configured, this element is not returned.
Audit for Bucket Permissions
One last step in a storage audit for AWS would be to ensure that no buckets allow unrestricted public access, except by design. While this can be done with PowerShell or CLI commands, we often find it easier to use the Prowler S3 service checks. In the code block below, we have listed the S3 service checks provided by Prowler.
Prowler S3 Checks
prowler aws --services s3 --list-checks
...

[s3_access_point_public_access_block] Block Public Access Settings enabled on Access Points. - s3 [critical]
[s3_account_level_public_access_blocks] Check S3 Account Level Public Access Block. - s3 [high]
[s3_bucket_acl_prohibited] Check if S3 buckets have ACLs enabled - s3 [medium]
[s3_bucket_cross_account_access] Ensure that general-purpose bucket policies restrict access to other AWS accounts. - s3 [high]
[s3_bucket_cross_region_replication] Check if S3 buckets use cross region replication. - s3 [low]
[s3_bucket_default_encryption] Check if S3 buckets have default encryption (SSE) enabled or use a bucket policy to enforce it. - s3 [medium]
[s3_bucket_event_notifications_enabled] Check if S3 buckets have event notifications enabled. - s3 [medium]
[s3_bucket_kms_encryption] Check if S3 buckets have KMS encryption enabled. - s3 [medium]
[s3_bucket_level_public_access_block] Check S3 Bucket Level Public Access Block. - s3 [medium]
[s3_bucket_lifecycle_enabled] Check if S3 buckets have a Lifecycle configuration enabled - s3 [low]
[s3_bucket_no_mfa_delete] Check if S3 bucket MFA Delete is not enabled. - s3 [medium]
[s3_bucket_object_lock] Check if S3 buckets have object lock enabled - s3 [low]
[s3_bucket_object_versioning] Check if S3 buckets have object versioning enabled - s3 [medium]
[s3_bucket_policy_public_write_access] Check if S3 buckets have policies which allow WRITE access. - s3 [critical]
[s3_bucket_public_access] Ensure there are no S3 buckets open to Everyone or Any AWS user. - s3 [critical]
[s3_bucket_public_list_acl] Ensure there are no S3 buckets listable by Everyone or Any AWS customer. - s3 [critical]
[s3_bucket_public_write_acl] Ensure there are no S3 buckets writable by Everyone or Any AWS customer. - s3 [critical]
[s3_bucket_secure_transport_policy] Check if S3 buckets have secure transport policy. - s3 [medium]
[s3_bucket_server_access_logging_enabled] Check if S3 buckets have server access logging enabled - s3 [medium]
[s3_multi_region_access_point_public_access_block] Block Public Access Settings enabled on Multi Region Access Points. - s3 [high]

There are 20 available checks.
OPTIONAL: Checking bucket permissions with Prowler
If you would like to audit S3 bucket settings on your own, you can open an SSH connection to Ubuntu and run this command.
prowler aws --services s3 -f us-east-2
Sample Results
student@ubuntu:$prowler aws --services s3 -f us-east-2
                         _
 _ __  _ __ _____      _| | ___ _ __
| '_ \| '__/ _ \ \ /\ / / |/ _ \ '__|
| |_) | | | (_) \ V  V /| |  __/ |
| .__/|_|  \___/ \_/\_/ |_|\___|_|v5.4.3
|_| the handy multi-cloud security tool

Date: 2025-07-02 14:27:37

-> Using the AWS credentials below:
· AWS-CLI Profile: default
· AWS Regions: us-east-2
· AWS Account: 098451652541
· User Id: AIDARN3BM7665XHOQE6GP
· Caller Identity ARN: arn:aws:iam::098451652541:user/student-92s0z

-> Using the following configuration:
· Config File: /home/student/.local/share/pipx/venvs/prowler/lib/python3.12/site-packages/prowler/config/config.yaml
· Mutelist File: /home/student/.local/share/pipx/venvs/prowler/lib/python3.12/site-packages/prowler/config/aws_mutelist.yaml
· Scanning unused services and resources: False

Executing 20 checks, please wait...
-> Scan completed! |▉▉▉▉▉▉▉▉▉▉▉▉▉▉▉▉▉▉▉▉▉▉▉▉▉▉▉▉▉▉▉▉▉▉▉▉▉▉▉▉| 20/20 [100%] in 3.0s

Overview Results:
╭────────────────────┬────────────────────┬────────────────╮
│ 55.81% (48) Failed │ 44.19% (38) Passed │ 0.0% (0) Muted │
╰────────────────────┴────────────────────┴────────────────╯

Account 098451652541 Scan Results (severity columns are for fails only):
╭────────────┬───────────┬───────────┬────────────┬────────┬──────────┬───────┬─────────╮
│ Provider   │ Service   │ Status    │   Critical │   High │   Medium │   Low │   Muted │
├────────────┼───────────┼───────────┼────────────┼────────┼──────────┼───────┼─────────┤
│ aws        │ s3        │ FAIL (48) │          2 │      1 │       31 │    14 │       0 │
╰────────────┴───────────┴───────────┴────────────┴────────┴──────────┴───────┴─────────╯
...
[Results Truncated]
Close the Ubuntu SSH tab when you have finished.
Part 2: Manual Tests of EC2 Compute Settings
Preparation: Launch a PowerShell Core terminal on the Windows VM by clicking the Windows Terminal icon in the taskbar.
Environment Check
Before proceeding, ensure that you are working in Windows Terminal in PowerShell Core.
Background: Sometimes you will need to audit for things that are not listed in the benchmarks. A good example of this would be checking AWS EC2 instances to ensure that they are using version 2 of the instance metadata service (IMDS). Remember from the lecture that the IMDS has been leveraged in attacks to steal credentials from EC2 instances. These credentials can sometimes be used to access other resources in the account, allowing the attacker to "pivot" their way through organizational assets.
Prior to the most recent version (2.0.0 as of this writing), IMDS checks were not included in the CIS Amazon Web Services Foundations Benchmark, so manual checks were required. In this short lab section, you will test the EC2 instances in your lab account manually to ensure that they are using IMDS v2.
Instructions: Begin by ensuring that the AWS PowerShell module is loaded. It's a large module, so you may need to wait a while for it to load.
Import-Module AWSPowerShell.NetCore
Remember that the Get-EC2Instance cmdlet will give you information about the compute instances in your AWS account. The results returned will include an Instances property that has all the useful information about each instance.
Run this command to see the default properties returned by the cmdlet:
(Get-EC2Instance).Instances
Sample Results
PS > (Get-EC2Instance).Instances


InstanceId          InstanceType Platform PrivateIpAddress PublicIpAddress SecurityGroups     SubnetId    VpcId
----------          ------------ -------- ---------------- --------------- --------------     --------    -----
i-021530b6eb77f9c87 t2.micro              10.55.7.69       3.133.170.73    {default}          subnet-...  vpc-...
i-05cc5f246a94e2002 t2.large              10.55.0.89       3.149.55.127    {aud1-range-aws... subnet-...  vpc-...
i-0bc431e1c87c98a41 t2.micro              10.55.7.68       3.135.123.62    {default}          subnet-...  vpc-...
i-0d816a3a98f1c42eb m5.large     Windows  10.55.7.100                      {terraform-2025... subnet-...  vpc-...
i-094c5eea91e461383 t2.micro              10.55.7.15       18.225.30.36    {default}          subnet-...  vpc-...
Information on the IMDS settings is included in a property not displayed by default. To get a list of ALL properties for the instance object, pipe the previous command through the Get-Member cmdlet.
(Get-EC2Instance).Instances | Get-Member -Type Property
Sample Results
PS > (Get-EC2Instance).Instances | Get-Member -Type Property

   TypeName: Amazon.EC2.Model.Instance

Name                                    MemberType Definition
----                                    ---------- ----------
AmiLaunchIndex                          Property   int AmiLaunchIndex {get;set;}
Architecture                            Property   Amazon.EC2.ArchitectureValues Architecture {ge…
BlockDeviceMappings                     Property   System.Collections.Generic.List[Amazon.EC2.Mod…
BootMode                                Property   Amazon.EC2.BootModeValues BootMode {get;set;}
CapacityReservationId                   Property   string CapacityReservationId {get;set;}
...
[Results Truncated]
Sample Results
...
Licenses                                Property   System.Collections.Generic.List[Amazon.EC2.Mod…
MaintenanceOptions                      Property   Amazon.EC2.Model.InstanceMaintenanceOptions Ma…
MetadataOptions                         Property   Amazon.EC2.Model.InstanceMetadataOptionsRespon…
Monitoring                              Property   Amazon.EC2.Model.Monitoring Monitoring {get;se…
NetworkInterfaces                       Property   System.Collections.Generic.List[Amazon.EC2.Mod…
...
[Results Truncated]
Settings for IMDS are included in the MetadataOptions property of the instance. Check the properties of MetadataOptions, using the Get-Member cmdlet again.
(Get-EC2Instance).Instances.MetadataOptions | Get-Member -Type Property
Sample Results
PS > (Get-EC2Instance).Instances.MetadataOptions | Get-Member -Type Property

   TypeName: Amazon.EC2.Model.InstanceMetadataOptionsResponse

Name                    MemberType Definition
----                    ---------- ----------
HttpEndpoint            Property   Amazon.EC2.InstanceMetadataEndpointState HttpEndpoint {get;set…
HttpProtocolIpv6        Property   Amazon.EC2.InstanceMetadataProtocolState HttpProtocolIpv6 {get…
HttpPutResponseHopLimit Property   int HttpPutResponseHopLimit {get;set;}
HttpTokens              Property   Amazon.EC2.HttpTokensState HttpTokens {get;set;}
InstanceMetadataTags    Property   Amazon.EC2.InstanceMetadataTagsState InstanceMetadataTags {get…
State                   Property   Amazon.EC2.InstanceMetadataOptionsState State {get;set;}
The HttpTokens property determines how the instance will handle IMDS v2. A setting of required will ensure that only version 2 is used. Any other setting is a potential audit finding.
With this information, you can build a command to get enough useful audit evidence to complete your testing. Use Select-Object with a calculated property for IMDS to gather your data:
(Get-EC2Instance).Instances |
  Select-Object InstanceId, InstanceType, PlatformDetails, `
    @{n='IMDSv2Tokens';e={$_.MetadataOptions.HttpTokens}}
Sample Results
PS > (Get-EC2Instance).Instances |
>>   Select-Object InstanceId, InstanceType, PlatformDetails, `
>>     @{n='IMDSv2Tokens';e={$_.MetadataOptions.HttpTokens}}

InstanceId          InstanceType PlatformDetails IMDSv2Tokens
----------          ------------ --------------- ------------
i-094c10ef3ad15d6d3 m5.large     Windows         optional
i-0bc17737bf7fc8d2f t2.micro     Linux/UNIX      optional
i-074ac9bda221abfe9 t2.micro     Linux/UNIX      optional
i-0c1fa1f4bbf653025 t2.micro     Linux/UNIX      optional
i-064c394e2892fb0de t2.large     Linux/UNIX      optional
To check for only NONCOMPLIANT instances, you could use Where-Object to find instances with the token setting not equal to required.
(Get-EC2Instance).Instances |
  Select-Object InstanceId, InstanceType, PlatformDetails, `
    @{n='IMDSv2Tokens';e={$_.MetadataOptions.HttpTokens}} |
  Where-Object IMDSv2Tokens -ne 'Required'
Sample Results
PS > (Get-EC2Instance).Instances |
>>   Select-Object InstanceId, InstanceType, PlatformDetails, `
>>     @{n='IMDSv2Tokens';e={$_.MetadataOptions.HttpTokens}} |
>>   Where-Object IMDSv2Tokens -ne 'Required'

InstanceId          InstanceType PlatformDetails IMDSv2Tokens
----------          ------------ --------------- ------------
i-094c10ef3ad15d6d3 m5.large     Windows         optional
i-0bc17737bf7fc8d2f t2.micro     Linux/UNIX      optional
i-074ac9bda221abfe9 t2.micro     Linux/UNIX      optional
i-0c1fa1f4bbf653025 t2.micro     Linux/UNIX      optional
i-064c394e2892fb0de t2.large     Linux/UNIX      optional
Any returned results would be an audit finding. Remember that the risk associated with NOT using IMDS v2 is that in some circumstances (such as a web server with a server-side request forgery vulnerability), the older service can be used to steal credentials.
Part 3: Prowler for Benchmark Testing
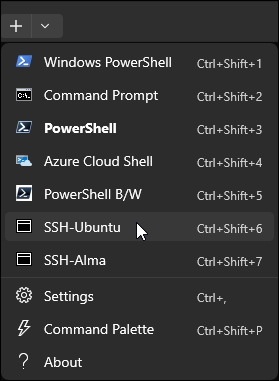
Preparation: Open an SSH connection to the Ubuntu VM in Windows Terminal. Click the down arrow icon and select SSH-Ubuntu from the drop-down menu.
Environment Check
Before proceeding, ensure that you are working in Windows Terminal in a SSH session to the Ubuntu VM.

Background: You have used Prowler for testing groups of controls in AWS in other labs. It is also capable of running a full CIS benchmark test, along with several other compliance frameworks. In this section of the lab, you will use Prowler to perform a full benchmark scan of the AWS lab environment and view the results as HTML.
Instructions: Set your working directory to the Prowler installation folder.
cd /home/student/labFiles/prowler/
List the AWS compliance tests that Prowler can perform. Notice the cis_1.5_aws and cis_2.0_aws benchmark checks:
prowler aws --list-compliance
Sample Results
``` ... - aws_account_security_onboarding_aws - aws_audit_manager_control_tower_guardrails_aws - aws_foundational_security_best_practices_aws - aws_foundational_technical_review_aws - aws_well_architected_framework_reliability_pillar_aws - aws_well_architected_framework_security_pillar_aws - cis_1.4_aws - cis_1.5_aws - cis_2.0_aws - cis_3.0_aws - cis_4.0_aws - cisa_aws - ens_rd2022_aws - fedramp_low_revision_4_aws - fedramp_moderate_revision_4_aws - ffiec_aws - gdpr_aws - gxp_21_cfr_part_11_aws - gxp_eu_annex_11_aws - hipaa_aws - iso27001_2013_aws - iso27001_2022_aws - kisa_isms_p_2023_aws - kisa_isms_p_2023_korean_aws - mitre_attack_aws - nist_800_171_revision_2_aws - nist_800_53_revision_4_aws - nist_800_53_revision_5_aws - nist_csf_1.1_aws - pci_3.2.1_aws - pci_4.0_aws - rbi_cyber_security_framework_aws - soc2_aws
There are 33 available Compliance Frameworks. ... [Results Truncated] ```
Use the cis_2.0_aws group to run the benchmark test. The -M flag sets the output mode to HTML, and the -F flag sets the base file name to "AWS-CIS-Benchmark." Output is saved to the "output" directory. Notice in the output that Prowler is running both Level 1 and Level 2 control tests during the scan. This is over 150 checks, so the scan may take some time to run.
prowler aws --compliance cis_2.0_aws -f us-east-2 -M html -F AWS-CIS-Benchmark
Sample Results
student@ubuntu:$prowler aws --compliance cis_2.0_aws -f us-east-2 -M html -F AWS-CIS-Benchmark
                         _
 _ __  _ __ _____      _| | ___ _ __
| '_ \| '__/ _ \ \ /\ / / |/ _ \ '__|
| |_) | | | (_) \ V  V /| |  __/ |
| .__/|_|  \___/ \_/\_/ |_|\___|_|v5.4.3
|_| the handy cloud security tool

Date: 2024-04-26 20:31:07


This report is being generated using credentials below:

AWS-CLI Profile: [default] AWS Filter Region: [us-east-2]
AWS Account: [XXXXXXXXXXXX] UserId: [XXXXXXXXXXXXXXXXXXXXX]
    Caller Identity ARN: [arn:aws:iam::XXXXXXXXXXXX:user/XXXXXXX-XXXXX]

Executing 73 checks, please wait...
...
[Results Truncated]
Sample Results
Overview Results:
╭────────────────────┬─────────────────────┬────────────────╮
│ 46.63% (97) Failed │ 51.92% (108) Passed │ 0.0% (0) Muted │
╰────────────────────┴─────────────────────┴────────────────╯

Account 098451652541 Scan Results (severity columns are for fails only):
╭────────────┬────────────────┬───────────┬────────────┬────────┬──────────┬───────┬─────────╮
│ Provider   │ Service        │ Status    │   Critical │   High │   Medium │   Low │   Muted │
├────────────┼────────────────┼───────────┼────────────┼────────┼──────────┼───────┼─────────┤
│ aws        │ accessanalyzer │ PASS (1)  │          0 │      0 │        0 │     0 │       0 │
├────────────┼────────────────┼───────────┼────────────┼────────┼──────────┼───────┼─────────┤
│ aws        │ account        │ PASS (0)  │          0 │      0 │        0 │     0 │       0 │
├────────────┼────────────────┼───────────┼────────────┼────────┼──────────┼───────┼─────────┤
│ aws        │ cloudtrail     │ FAIL (5)  │          0 │      0 │        4 │     1 │       0 │
├────────────┼────────────────┼───────────┼────────────┼────────┼──────────┼───────┼─────────┤
│ aws        │ cloudwatch     │ FAIL (15) │          0 │      0 │       15 │     0 │       0 │
├────────────┼────────────────┼───────────┼────────────┼────────┼──────────┼───────┼─────────┤
...
[Results Truncated]
Once the scan finishes, copy the output file to the web root of the Ubuntu web server:
cp output/AWS-CIS-Benchmark.html /var/www/html/
To view the test results, open Firefox on the Windows VM and browse to the result file http://10.50.7.50/AWS-CIS-Benchmark.html.
http://10.50.7.50/AWS-CIS-Benchmark.html
Take some time to examine the results with an eye toward developing potential audit findings for your report. You can close Firefox when you have finished.
Part 4: Audit Cloud Service Providers with CloudQuery
Environment Check
Before proceeding, ensure that you are working in Windows Terminal in a SSH session to the Ubuntu VM.
Background: There are two import compliance products named "CloudQuery." In this lab, you will be using the tool from cloudquery.io, not the one from Uptycs that works with osquery! This particular CloudQuery tool can be configured to obtain data from several different cloud service providers (CPSs) into a local Postgresql database. By having a local cache of information concerning resources for multiple CSPs, you can make quick queries for inventory and settings, without waiting on longer API round-trip times.
Instructions: Return to the SSH session you have open to the Ubuntu server. Set your working directory to the CloudQuery installation folder and check to make sure you have the most recent lab files.
cd /home/student/labFiles/cloudquery.io
git pull
The cloudquery binary was copied directly from the cloudquery GitHub site and has not been marked as an executable file. Run this command to mark the file as executable by all users:
chmod a+x /home/student/labFiles/cloudquery.io/cloudquery
A good habit to develop before working with CLI tools is to check that you are authenticated to the cloud service provider (CSP) before attempting to collect data. Check your AWS cached credentials using this command:
aws sts get-caller-identity
Sample Results
student@ubuntu:$aws sts get-caller-identity
{
    "UserId": "AIDAZH3TUWAX4O4FGPRTR",
    "Account": "635360817199",
    "Arn": "arn:aws:iam::635360817199:user/student-eksgd"
}
CloudQuery is configured using YAML files. We've configured the AWS source plug-in using a file called aws.yml. View the contents of the file, noting the list of tables that will be fetched from the provider and the regions specification specifying which regions to query. You would want to customize these for your account.
We've saved the files in your student lab file GitHub repository. You can view the AWS configuration file using this command:
cat ~/labFiles/cloudquery.io/config/aws.yml
Sample Results
student@ubuntu:$cat ~/labFiles/cloudquery.io/config/aws.yml
kind: source
spec:
  name: "aws"
  path: "cloudquery/aws"
  registry: "cloudquery"
  version: "v22.18.0"
  tables: [
    "aws_accessanalyzer_analyzer_findings",
    "aws_accessanalyzer_analyzers",
    "aws_appconfig_deployment_strategies",
    "aws_apprunner_auto_scaling_configurations",
...
[Results Truncated]
Sample Results
...
    "aws_route53resolver_resolver_rules",
    "aws_s3_buckets",
    "aws_scheduler_schedule_groups",
    "aws_securityhub_hubs",
    "aws_sns_subscriptions",
    "aws_xray_groups",
    "aws_xray_sampling_rules",
  ]
  destinations: ["postgresql"]
  spec:
    regions: ["us-east-1","us-east-2"]
...
[Results Truncated]
For a full list of the tables available for AWS, see the Cloudquery AWS tables list.
See also the following:
Currently, CloudQuery only supports output to a PostgreSQL database. You can view its configuration file with this command:
cat ~/labFiles/cloudquery.io/config/postgresql.yml
Sample Results
student@ubuntu:$cat ~/labFiles/cloudquery.io/config/postgresql.yml
kind: destination
spec:
  name: "postgresql"
  path: "cloudquery/postgresql"
  registry: "cloudquery"
  version: "v6.1.3"
  write_mode: "overwrite" # overwrite, overwrite-delete-stale, append
  spec:
    connection_string: "postgresql://postgres:pass@localhost:5432/postgres?sslmode=disable"
Now that you've seen the configuration files, the next step is to load the local PostgreSQL database with configuration information from the live CSP environments. Having the data stored locally means that queries will run very quickly, but the data will not be "real-time." If you use CloudQuery.io as part of your compliance data gathering, you should make the sync action a regularly executed part of your process to ensure you are working with current data. Use CloudQuery's sync command to fetch data from your cloud providers using the cached credentials you tested earlier. The last command-line option is the folder that contains the configuration files. Be patient as the tool retrieves information for thousands of resources.
~/labFiles/cloudquery.io/cloudquery sync ~/labFiles/cloudquery.io/config/
Sample Results
student@ubuntu:$~/labFiles/cloudquery.io/cloudquery sync ~/labFiles/cloudquery.io/config/
Loading spec(s) from /home/student/labFiles/cloudquery.io/config/
Downloading https://plugins.cloudquery.io/cq-cloud-releases/cloudquery/source/aws/v22.18.0/linux_amd64
Downloading 100% |███████████████████████████████████████████████████| (63/63 MB, 11 MB/s)
Downloading https://plugins.cloudquery.io/cq-cloud-releases/cloudquery/destination/postgresql/v6.1.3/linux_amd64
Downloading 100% |███████████████████████████████████████████████████| (11/11 MB, 11 MB/s)
Starting sync for: aws (cloudquery@cloudquery/aws) -> [postgresql (cloudquery@cloudquery/postgresql)]
Sync completed with errors, see logs for details. Resources: 4516, Errors: 6, Warnings: 6, Time: 59s
Live Data in Use!
Remember that your data may differ from these results!
Explore CloudQuery Database Schema
Environment Check
Before proceeding, ensure that you are working in Windows Terminal in a SSH session to the Ubuntu VM.
Background: CloudQuery saves its data into a local PostgreSQL database, which was preconfigured on your Ubuntu server by the server administrators. In this section of the lab, you will connect to the local database and explore the CloudQuery tables and the data that you just fetched from your providers.
Instructions: Begin by saving the connection string to access the local database to an environment variable, to save typing in later commands. For production scripts using CloudQuery, you will want to save and retrieve connection strings like this in a password vault or secret store.
export DSN=postgres://postgres:pass@localhost:5432/postgres
Then, log in to the database:
psql ${DSN}
Sample Results
student@ubuntu:$export DSN=postgres://postgres:pass@localhost:5432/postgres
student@ubuntu:$psql ${DSN}
psql (14.11 (Ubuntu 14.11-0ubuntu0.22.04.1))
SSL connection (protocol: TLSv1.3, cipher: TLS_AES_256_GCM_SHA384, bits: 256, compression: off)
Type "help" for help.

postgres=#
The psql command line has an annoying habit of running query results through a paging tool. This can sometimes interfere with your ability to view results, so turn it off with this command:
\pset pager 0
Sample Results
postgres=# \pset pager 0
Pager usage is off.
To display a list of all the tables created by CloudQuery, use the \dt command in PSQL.
\dt
Sample Results
postgres=# \dt
                                  List of relations
 Schema |                           Name                           | Type  |  Owner
--------+----------------------------------------------------------+-------+----------
 public | aws_accessanalyzer_analyzer_archive_rules                | table | postgres
 public | aws_accessanalyzer_analyzer_findings                     | table | postgres
 public | aws_accessanalyzer_analyzers                             | table | postgres
 public | aws_appconfig_deployment_strategies                      | table | postgres
 public | aws_apprunner_auto_scaling_configurations                | table | postgres
 public | aws_apprunner_observability_configurations               | table | postgres
 public | aws_athena_data_catalog_database_tables                  | table | postgres
 public | aws_athena_data_catalog_databases                        | table | postgres
 public | aws_athena_data_catalogs                                 | table | postgres
...
[Results Truncated]
Scroll up and look at the names of the tables returned. There are a lot (over 300 available as of this writing, but we don't include them all in the lab)! To see the definition of the aws_iam_users table, use the \d command.
\d aws_iam_users
Sample Results
postgres-# \d aws_iam_users
                            Table "public.aws_iam_users"
        Column        |            Type             | Collation | Nullable | Default
----------------------+-----------------------------+-----------+----------+---------
 _cq_sync_time        | timestamp without time zone |           |          |
 _cq_source_name      | text                        |           |          |
 _cq_id               | uuid                        |           | not null |
 _cq_parent_id        | uuid                        |           |          |
 account_id           | text                        |           | not null |
 arn                  | text                        |           | not null |
 tags                 | jsonb                       |           |          |
 create_date          | timestamp without time zone |           |          |
 path                 | text                        |           |          |
 user_id              | text                        |           |          |
 user_name            | text                        |           |          |
 password_last_used   | timestamp without time zone |           |          |
 permissions_boundary | jsonb                       |           |          |
Indexes:
    "aws_iam_users_cqpk" PRIMARY KEY, btree (account_id, arn)
    "aws_iam_users__cq_id_key" UNIQUE CONSTRAINT, btree (_cq_id)
Once you understand the columns in a table, you can craft a custom query for the information you need to analyze. If you are interested in inventorying AWS IAM users, you might build and execute a query like this:
select account_id, user_name, password_last_used, arn
from aws_iam_users;
Sample Results
postgres=# select account_id, user_name, password_last_used, arn
from aws_iam_users;
 account_id  |    user_name     | password_last_used  |                       arn
-------------+------------------+---------------------+-------------------------------------------------
098451652541 | instructor-92s0z |                     | arn:aws:iam::098451652541:user/instructor-92s0z
098451652541 | GLee-92s0z       |                     | arn:aws:iam::098451652541:user/GLee-92s0z
098451652541 | AMartinez-92s0z  |                     | arn:aws:iam::098451652541:user/AMartinez-92s0z
098451652541 | WAlexander-92s0z |                     | arn:aws:iam::098451652541:user/WAlexander-92s0z
098451652541 | BSmith-92s0z     |                     | arn:aws:iam::098451652541:user/BSmith-92s0z
098451652541 | KJones-92s0z     |                     | arn:aws:iam::098451652541:user/KJones-92s0z
098451652541 | student-92s0z    | 2025-07-02 14:08:14 | arn:aws:iam::098451652541:user/student-92s0z
098451652541 | Terraform2541    |                     | arn:aws:iam::098451652541:user/Terraform2541
098451652541 | JAllen-92s0z     |                     | arn:aws:iam::098451652541:user/JAllen-92s0z
Live Data in Use!
Remember that your data may differ from these results!
If you were interested in viewing the last key rotation date for all of your users, CloudQuery provides a table for that. Run this select statement to see when your users last rotated their keys:
select distinct account_id, user_name,
access_key_id, last_used, last_rotated
from aws_iam_user_access_keys;
Sample Results
postgres=# select distinct account_id, user_name,
access_key_id, last_used, last_rotated
from aws_iam_user_access_keys;
 account_id  |    user_name     |    access_key_id     |      last_used      |    last_rotated
-------------+------------------+----------------------+---------------------+---------------------
098451652541 | BSmith-92s0z     | AKIARN3BM766V6D5Z75M |                     | 2025-07-01 19:36:45
098451652541 | KJones-92s0z     | AKIARN3BM766UVCHGJJE |                     | 2025-07-01 19:36:46
098451652541 | student-92s0z    | AKIARN3BM7665VMXWHJA | 2025-07-02 14:42:00 | 2025-07-01 19:36:46
098451652541 | Terraform2541    | AKIARN3BM766RZGDFL7E | 2025-07-01 19:40:00 | 2025-01-29 15:20:21
098451652541 | GLee-92s0z       | AKIARN3BM766ZCZCHAES |                     | 2025-07-01 19:36:45
098451652541 | WAlexander-92s0z | AKIARN3BM766UNH6TZ6W |                     | 2025-07-01 19:36:46
098451652541 | GLee-92s0z       | AKIARN3BM766YGNGYDMR |                     | 2025-07-01 19:36:45
098451652541 | JAllen-92s0z     | AKIARN3BM7667CNMLF6B |                     | 2025-07-01 19:36:46
098451652541 | instructor-92s0z | AKIARN3BM7662Z7PF55H |                     | 2025-07-01 19:36:45
098451652541 | AMartinez-92s0z  | AKIARN3BM7666OIQPQPC |                     | 2025-07-01 19:36:46
  (10 rows)
Live Data in Use!
Remember that your data may differ from these results!
If your enterprise policy calls for rotating access keys every 90 days, then you could add a where clause to show only the users who are out of compliance. Run this query to see any user/key combinations that are out of compliance with the 90-day rotation policy.
Since we are working in a volatile lab environment, we'll test with a much shorter threshold of 1 hour:
select distinct account_id, user_name, access_key_id, last_used, last_rotated from aws_iam_user_access_keys
WHERE last_rotated < (now() - '1 hours'::interval);
Sample Results
postgres=# select distinct account_id, user_name, access_key_id, last_used, last_rotated from aws_iam_user_access_keys
WHERE last_rotated < (now() - '1 hours'::interval);
  account_id  |    user_name     |    access_key_id     |      last_used      |    last_rotated

--------------+------------------+----------------------+---------------------+---------------------
 098451652541 | BSmith-92s0z     | AKIARN3BM766V6D5Z75M |                     | 2025-07-01 19:36:45
 098451652541 | KJones-92s0z     | AKIARN3BM766UVCHGJJE |                     | 2025-07-01 19:36:46
 098451652541 | Terraform2541    | AKIARN3BM766RZGDFL7E | 2025-07-01 19:40:00 | 2025-01-29 15:20:21
 098451652541 | GLee-92s0z       | AKIARN3BM766ZCZCHAES |                     | 2025-07-01 19:36:45
 098451652541 | WAlexander-92s0z | AKIARN3BM766UNH6TZ6W |                     | 2025-07-01 19:36:46
 098451652541 | GLee-92s0z       | AKIARN3BM766YGNGYDMR |                     | 2025-07-01 19:36:45
 098451652541 | student-92s0z    | AKIARN3BM7665VMXWHJA | 2025-07-02 14:42:00 | 2025-07-01 19:36:46
 098451652541 | JAllen-92s0z     | AKIARN3BM7667CNMLF6B |                     | 2025-07-01 19:36:46
 098451652541 | instructor-92s0z | AKIARN3BM7662Z7PF55H |                     | 2025-07-01 19:36:45
 098451652541 | AMartinez-92s0z  | AKIARN3BM7666OIQPQPC |                     | 2025-07-01 19:36:46
Live Data in Use!
Remember that your data may differ from these results!
Imagine now that your enterprise has a policy to tag all AWS resources with a "business_unit" tag to assist with maintaining control over inventory. To query for only the noncompliant subnets, you could use a where clause in a query to find subnets that are missing that tag (indicating NONCOMPLIANCE). In the following query, the :: operator is a shortcut for the SQL cast command, which is being used to convert the JSON data in the tags column to text, to allow the like operator to be run against it:
select request_region,cidr_block,vpc_id
from aws_ec2_subnets where request_region = 'us-east-2'
and tags::text not like '%business_unit%';
Sample Results
postgres=# select request_region,cidr_block,vpc_id
from aws_ec2_subnets where request_region = 'us-east-2'
and tags::text not like '%business_unit%';
 request_region |   cidr_block   |        vpc_id
----------------+----------------+-----------------------
 us-east-2      | 10.55.0.0/26   | vpc-07b32ea295f9a1c21
 us-east-2      | 10.55.7.128/26 | vpc-07b32ea295f9a1c21
 us-east-2      | 10.55.7.192/26 | vpc-07b32ea295f9a1c21
 us-east-2      | 10.55.7.64/26  | vpc-07b32ea295f9a1c21
 us-east-2      | 10.55.0.64/26  | vpc-07b32ea295f9a1c21
 us-east-2      | 10.55.7.0/26   | vpc-07b32ea295f9a1c21
Live Data in Use!
Remember that your data may differ from these results!
Run as many queries as you want, using the AWS schema linked above. When you have finished, close PSQL with this command:
\q
Sample Results
postgres=# \q
student@ubuntu:$
CloudQuery Resource Views
Background: The psql command can be used at the command line, with queries passed as files or strings on the command line. CloudQuery includes interesting queries and policies as part of its monolithic GitHub repository. One very useful resource is a SQL script to create database views with a consolidated list of ALL resources retrieved from a provider. In this section, you will use the psql command to create these views in your local database.
Instructions: Run the scripts to create the aws_resources view.
psql ${DSN} -f /home/student/labFiles/cloudquery.io/aws/views/resources.sql
Sample Results
student@ubuntu:$psql ${DSN} -f /home/student/labFiles/cloudquery.io/aws/views/resources.sql
psql:/home/student/labFiles/cloudquery.io/aws/views/resources.sql:1: NOTICE:  view "aws_resources" does not exist, skipping
DROP VIEW
DO
You can view the schema of the AWS resources view by issuing this command. Note that very limited data is returned for each resource, but the arn column is enough to uniquely identify everything. The _cq_table column lets you know what type of resource is being represented.
psql ${DSN} -c '\d aws_resources'
Sample Results
student@ubuntu:$psql ${DSN} -c '\d aws_resources'
                            View "public.aws_resources"
       Column       |            Type             | Collation | Nullable | Default
--------------------+-----------------------------+-----------+----------+---------
 _cq_id             | uuid                        |           |          |
 _cq_source_name    | text                        |           |          |
 _cq_sync_time      | timestamp without time zone |           |          |
 _cq_table          | text                        |           |          |
 account_id         | text                        |           |          |
 request_account_id | text                        |           |          |
 region             | text                        |           |          |
 partition          | text                        |           |          |
 service            | text                        |           |          |
 type               | text                        |           |          |
 arn                | text                        |           |          |
 tags               | jsonb                       |           |          |
Live Data in Use!
Remember that your data may differ from these results since you have retrieved live data from the cloud provider environment!
Then test the view by getting a count of total resources retrieved from AWS.
psql ${DSN} -c 'select count(*) from aws_resources;'
Sample Results
student@ubuntu:$psql ${DSN} -c 'select count(*) from aws_resources;'
 count
-------
  1709
(1 row)
Live Data in Use!
Remember that your data may differ from these results since you have retrieved live data from the cloud provider environment!
Next, use a SQL GROUP BY clause to get a count summarized by resource type (using the _cq_table column as a guide). Use -P pager 0 to disable the output pager.
psql ${DSN} -P pager 0 -c 'select _cq_table as resourceType, count(arn) as resourceCount from aws_resources group by _cq_table;'
Sample Results
student@ubuntu:$psql ${DSN} -P pager 0 -c 'select _cq_table as resourceType, count(arn) as resourceCount from aws_resources group by _cq_table;'
                  resourcetype                   | resourcecount
-------------------------------------------------+---------------
 aws_xray_groups                                 |             2
 aws_cloudtrail_trails                           |             3
 aws_route53resolver_firewall_domain_lists       |             8
 aws_scheduler_schedule_groups                   |             2
 aws_kms_aliases                                 |            28
 aws_iam_roles                                   |            20
 aws_appconfig_deployment_strategies             |             8
 aws_eventbridge_event_buses                     |             2
...
[Results Truncated]
Live Data in Use!
Remember that your data may differ from these results!
You could further refine this by region if you want. Note that some resources exist in the account and not a region, so they show unavailable as the region.
psql ${DSN} -P pager 0 -c 'select _cq_table as resourceType, region, count(arn) as resourceCount from aws_resources group by _cq_table, region order by region, _cq_table;'
Sample Results
    student@ubuntu:$psql ${DSN} -P pager 0 -c 'select _cq_table as resourceType, region, count(arn) as resourceCount from aws_resources group by _cq_table, region order by region, _cq_table;'
                  resourcetype                   |   region    | resourcecount
-------------------------------------------------+-------------+---------------
 aws_cloudfront_cache_policies                   | unavailable |             5
 aws_ec2_managed_prefix_lists                    | unavailable |            17
 aws_ec2_subnets                                 | unavailable |             6
 aws_iam_groups                                  | unavailable |             2
 aws_iam_policies                                | unavailable |            20
 aws_iam_policy_last_accessed_details            | unavailable |          1448
 aws_iam_roles                                   | unavailable |            20
 aws_iam_saml_identity_providers                 | unavailable |             1
 aws_iam_user_groups                             | unavailable |             2
 aws_iam_users                                   | unavailable |             8
 aws_organizations                               | unavailable |             1
 aws_appconfig_deployment_strategies             | us-east-1   |             4
 aws_apprunner_auto_scaling_configurations       | us-east-1   |             1
 aws_apprunner_observability_configurations      | us-east-1   |             1
 aws_athena_data_catalogs                        | us-east-1   |             1
...
[Results Truncated]
Live Data in Use!
Remember that your data may differ from these results!
Compliance Checks with CloudQuery
Background: CloudQuery ships with customizable query packs to check for compliance with different frameworks. Results from compliance runs are saved into a table named like aws_policy_results.
Instructions: To run the AWS CIS Benchmark version 1.5, you can tell PSQL to run the queries in the policy file:
psql ${DSN} -f /home/student/labFiles/cloudquery.io/aws/policies/cis_v1.5.0/policy.sql
Sample Results
student@ubuntu:$psql ${DSN} -f /home/student/labFiles/cloudquery.io/aws/policies/cis_v1.5.0/policy.sql
SET
CREATE TABLE
"Executing CIS V1.5.0 Section 1"
"Executing check 1.4"
INSERT 0 9
"Executing check 1.5"
INSERT 0 9
"Executing check 1.6"
INSERT 0 1
"Executing check 1.8"
INSERT 0 1
...
[Results Truncated]
Previous screenshot output truncated
Notice how fast the test runs! Since the data is local it's very fast to query. Remember though, that the local data is a snapshot as of the last sync operation. It would be important to do regular syncs to ensure your results are current.
To view the results of the test, simply select data from the results table.
psql ${DSN} -P pager 0 -c "select * from aws_policy_results"
Sample Results
student@ubuntu:$psql ${DSN} -P pager 0 -c "select * from aws_policy_results"
        execution_time         | framework  | check_id |                        title                            |  account_id  |                      resource_id                        | status
-------------------------------+------------+----------+---------------------------------------------------------+--------------+---------------------------------------------------------+--------
 2024-04-26 20:58:59.892419+00 | cis_v1.5.0 | 1.4      | Ensure no root account access key exists (Scored)       | XXXXXXXXXXXX | arn:aws:iam::XXXXXXXXXXXX:user/AMartinez-eksgd          | pass
 2024-04-26 20:58:59.892419+00 | cis_v1.5.0 | 1.4      | Ensure no root account access key exists (Scored)       | XXXXXXXXXXXX | arn:aws:iam::XXXXXXXXXXXX:user/WAlexander-eksgd         | pass
 2024-04-26 20:58:59.892419+00 | cis_v1.5.0 | 1.4      | Ensure no root account access key exists (Scored)       | XXXXXXXXXXXX | arn:aws:iam::XXXXXXXXXXXX:user/JAllen-eksgd             | pass
 2024-04-26 20:58:59.892419+00 | cis_v1.5.0 | 1.4      | Ensure no root account access key exists (Scored)       | XXXXXXXXXXXX | arn:aws:iam::XXXXXXXXXXXX:user/GLee-eksgd               | pass
...
[Results Truncated]
Live Data in Use!
Remember that your data may differ from these results!
You may notice that many of the results are for regions other than the us-east-2 which is used in our organization. To make the output a bit more readable, you could change the query to include only the columns that are of interest to your audit and to include only resources .
psql ${DSN} -P pager 0 -c "select status, framework,check_id,title from aws_policy_results"
Sample Results
student@ubuntu:$psql ${DSN} -P pager 0 -c "select status, framework,check_id,title from aws_policy_results"
 status | framework  | check_id |                                                  title

--------+------------+----------+----------------------------------------------------------------------------------------------------------
 pass   | cis_v1.5.0 | 1.4      | Ensure no root account access key exists (Scored)
 pass   | cis_v1.5.0 | 1.4      | Ensure no root account access key exists (Scored)
 pass   | cis_v1.5.0 | 1.4      | Ensure no root account access key exists (Scored)
 pass   | cis_v1.5.0 | 1.4      | Ensure no root account access key exists (Scored)
 pass   | cis_v1.5.0 | 1.4      | Ensure no root account access key exists (Scored)
 pass   | cis_v1.5.0 | 1.4      | Ensure no root account access key exists (Scored)
 pass   | cis_v1.5.0 | 1.4      | Ensure no root account access key exists (Scored)
 pass   | cis_v1.5.0 | 1.4      | Ensure no root account access key exists (Scored)
 pass   | cis_v1.5.0 | 1.4      | Ensure no root account access key exists (Scored)
        | cis_v1.5.0 | 1.5      | Ensure MFA is enabled for the "root" account
        | cis_v1.5.0 | 1.5      | Ensure MFA is enabled for the "root" account
        | cis_v1.5.0 | 1.5      | Ensure MFA is enabled for the "root" account
        | cis_v1.5.0 | 1.5      | Ensure MFA is enabled for the "root" account
...
[Results Truncated]
Live Data in Use!
Remember that your data may differ from these results!
Sometimes (like when we are preparing compliance dashboards for management), a summary query will suffice. Run the following query to get counts of passed and failed tests from the benchmark test.
psql ${DSN} -P pager 0 -c "select status, count(*) as numTests from aws_policy_results group by status"
Sample Results
student@ubuntu:$psql ${DSN} -P pager 0 -c "select status, count(*) as numTests from aws_policy_results group by status"
 status | numtests
--------+----------
        |       10
 fail   |      143
 pass   |       86
(3 rows)
Live Data in Use!
Remember that your data may differ from these results!
Explore the CloudQuery results further if you want, and then close the Ubuntu SSH session when you have finished.