Lab 2.4: Compliance and Testing at Scale
VMs Needed
- Windows
- Ubuntu
Lab Video
Windows Compliance and Testing at Scale
Objectives
- Explore the features of Fleet DM for querying across the enterprise.
- Review a Nessus credentialed scan with an emphasis on patch compliance.
Part 1: Setup Credentialed Vulnerability Scan
Preparation: If you are not already logged onto Nessus, open Firefox in the Windows VM and click on the bookmark for Nessus.

If prompted, log in with username student and password student.
Background: In this section of the lab, you will configure a full credentialed Nessus vulnerability scan against the Windows VM. Actually running the scan will be optional, since scans can take a long time to complete. We've provided a scan results file you will import and analyze in another section of this lab.
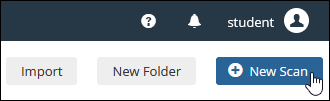
Instructions: In the Nessus web interface, click the New Scan button at the top right corner of your screen.
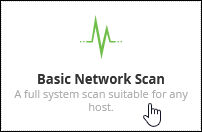
Choose the "Basic Network Scan" scan type by clicking on its icon.
On the settings tab, enter this information
Name:
Windows credentialed
Description:
Credentialed scan of Windows VM
Targets:
10.50.7.101
When you have finished, your screen should look like this:
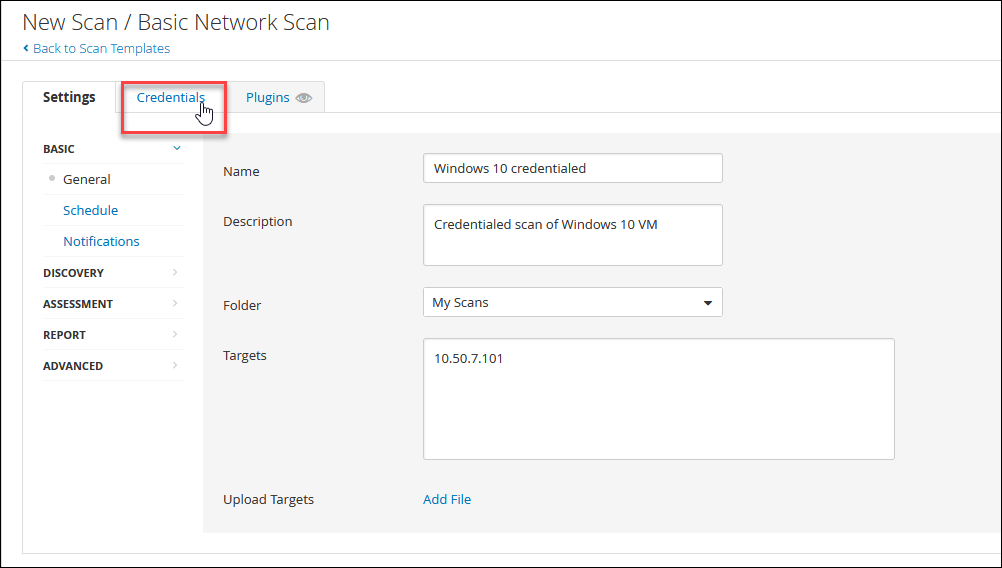
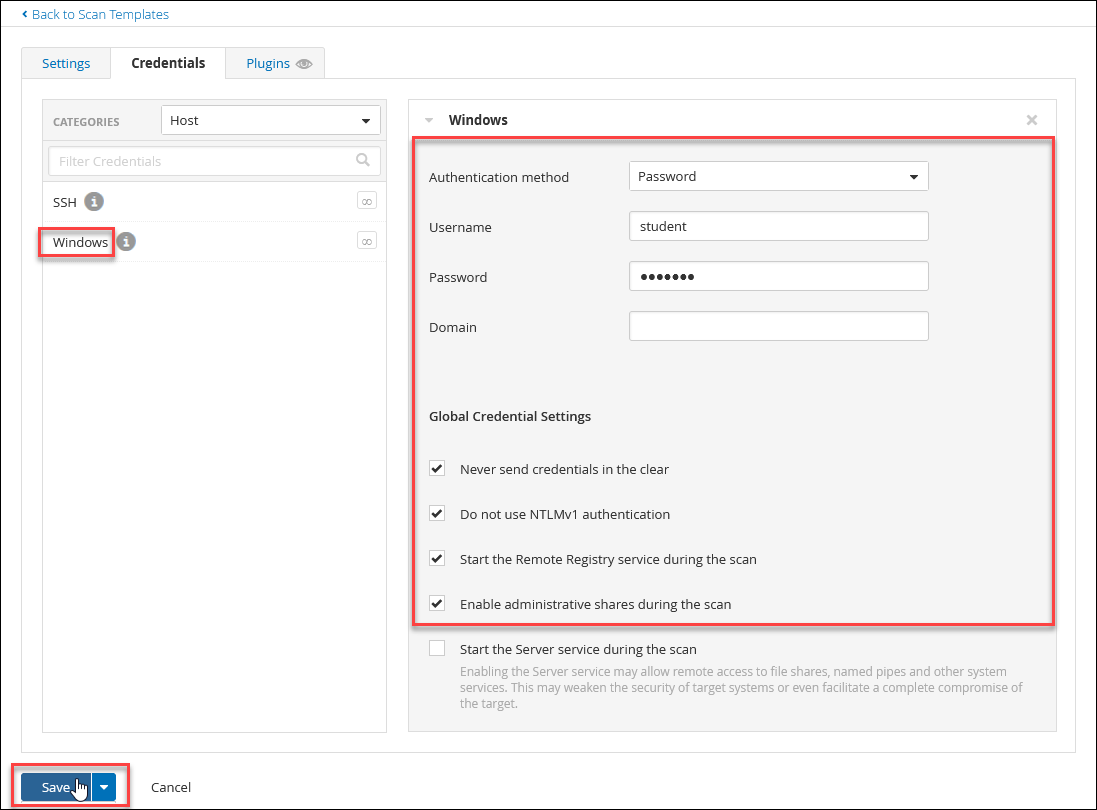
Next, click on the Credentials tab. Click the Windows link to add a new set of Windows credentials. Set the credential options as follows:
Authentication method: : Password
Username:
student
Password: Use the Windows password issued by your instructor - the same as you used to login to remote desktop
Check the boxes for:
Never send credentials in the clearDo not use NTLMv1 authenticationStart the Remote Registry service during the scanEnable administrative shares during the scan
When you have finished, your screen should like this. After you have verified the settings, click the Save button to save the scan setup.
Optional: Run the Scan
Click the Launch button if you would like to start running the scan.

Once the scan has started running (indicated by the spinning green arrows), you can continue with the next section of the lab.
Part 2: Fleet DM
Background: As discussed in the lecture, Fleet is an open-source tool that allows administrators to manage fleets of osquery deployments from a centralized server. In this section of the lab, you will use the Fleet web interface to run queries against your Windows and Ubuntu VMs.
Instructions: In Firefox on the Windows VM, click on the bookmark link for Fleet.

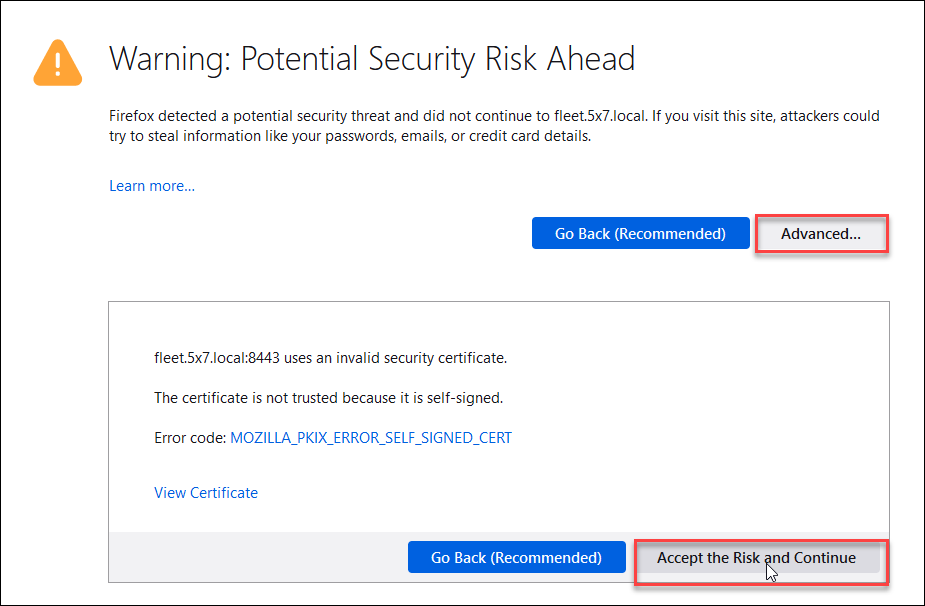
If prompted to accept the self-signed certificate for the server, click the Advanced button and then click Accept the Risk and Continue.
https://fleet.lab.local:8443/
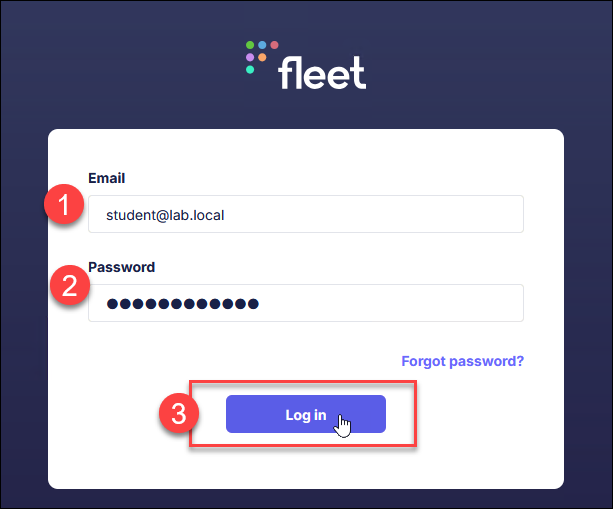
Log in to the Fleet web interface with these credentials:
Username:
student@lab.local
Password:
student1234!
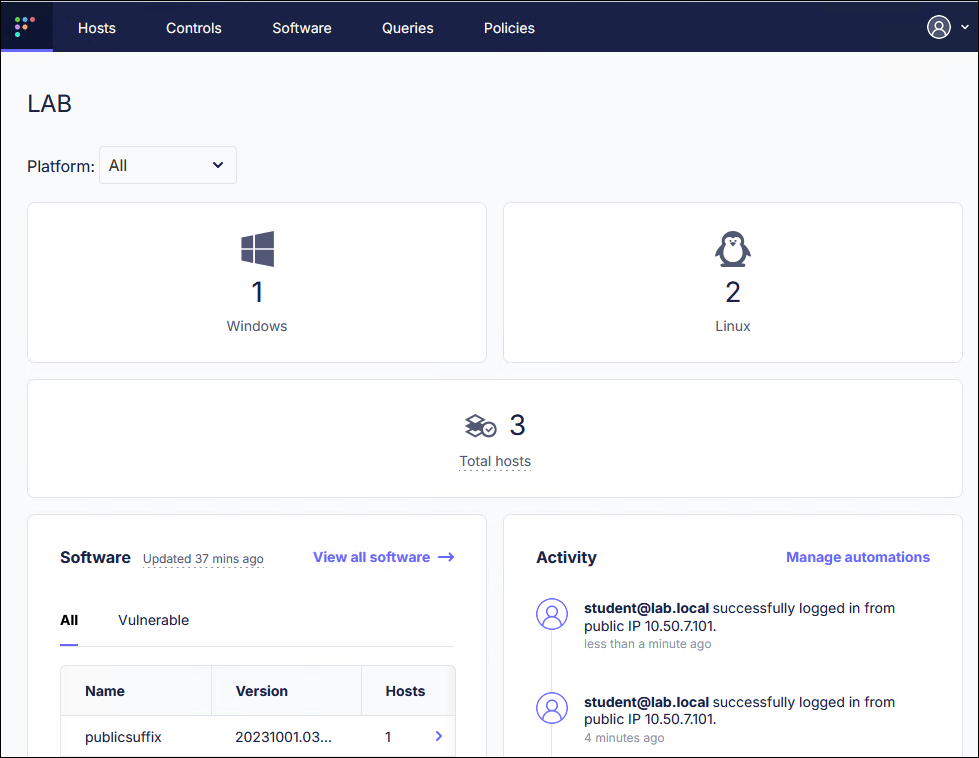
The Fleet home page includes information about your enterprise inventory and recent activity on the Fleet server.
Hosts
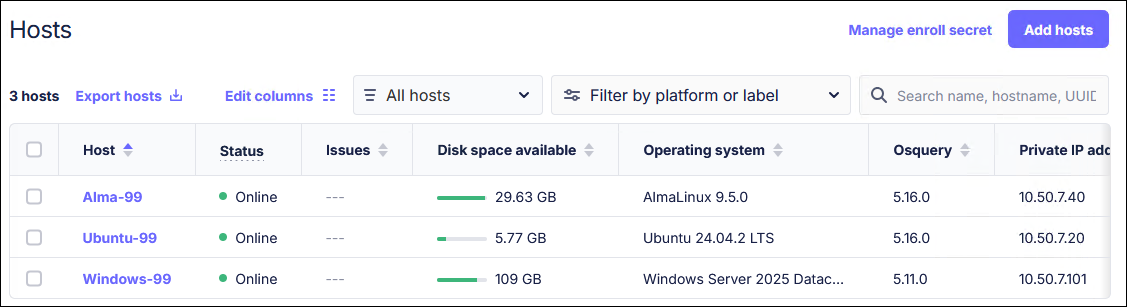
The Hosts tab in the bar at the top of the page will take you to the Hosts page, which gives information about the makeup of the fleet of systems being managed. Click on the Hosts tab to go to the Hosts page.
On the Hosts page, you will see a listing of all hosts managed by the Fleet server and a summary of hosts by OS type. Options are provided for filtering and searching for specific hosts at the right of the screen.
Controls
The Controls tab is used for managing macOS hosts and is not covered in this lab. It allows administrators to customize the "out of the box" setup experience for their macOS systems. It will not be covered in the lab.
Software
The Software page contains an aggregate view of all of the software discovered by Fleet on the managed hosts. Click on the Software tab to view this page.

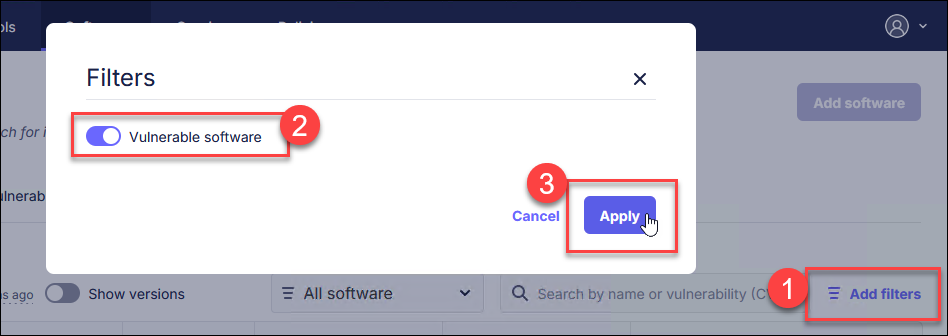
A relatively new feature of Fleet is the automated detection of software in your environment that has known vulnerabilities (CVEs). While we have found some false-negative results (the software is vulnerable to a known attack but not reported here) with this feature, we would say that false positives are few, so if Fleet flags software as vulnerable, you should certainly look into it. Check to see whether Fleet has identified any vulnerable software while it has been running. Click the Add filters button, toggle the Vulnerable software control and then click Apply to explore the vulnerable software.
While your results will certainly vary, in this screenshot, Fleet has found vulnerable software, and is indicating how many hosts are affected and how many vulnerabilities are known to exist in each program:
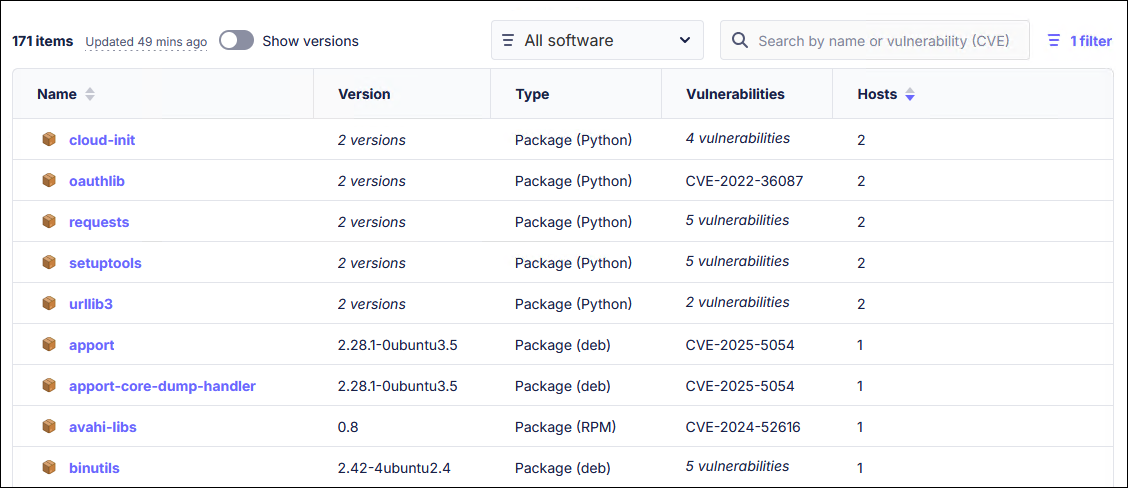
Live Data in Use!
Remember that your data may differ from these results!
Clicking on the Name link on any row will take you to a detail page for the vulnerabilities in that software.

Clicking on a vulnerability in the list will take you to the appropriate vulnerability database website to view the details of each entry. Feel free to explore the vulnerabilities found. If you drill down, you can even follow links to the national Vulnerability Database page for the vulnerability.
Click the Software tab again to get back to the main Software page after you have finished exploring.
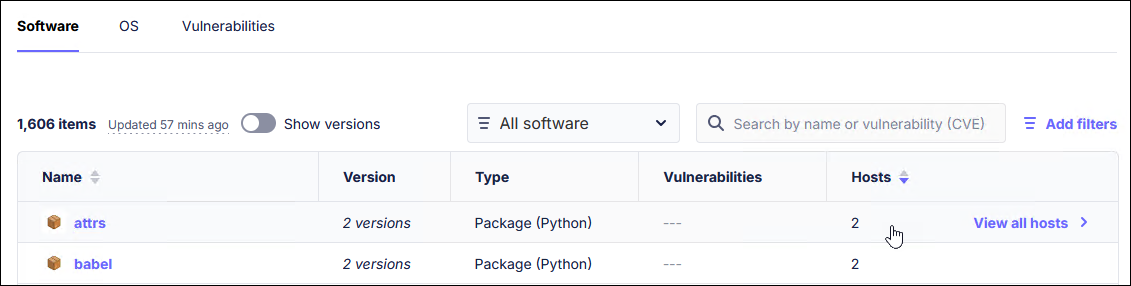
Finally, on the main Software page, notice that when you hover your mouse over a row in the table, it offers a link to see all hosts with that software installed. In your limited lab environment, clicking this link for any software will likely yield only one host (Windows or Ubuntu), in an enterprise, this would be a quick way to find all hosts affected by a vulnerability.
Queries
The Queries page is used to create and execute queries against hosts in the fleet. Click on the Queries tab in the toolbar to go to that page.

There are currently no queries saved on your Fleet server. In the next steps, you will create a query to identify Windows hosts that DO NOT meet the enterprise standard for the Windows build that should be installed. Imagine that the current enterprise standard authorizes the (fictional) build number 26101 for Windows Server 2025 systems and that any other version is noncompliant. To investigate this, you will create a query that you can run against all Windows systems.
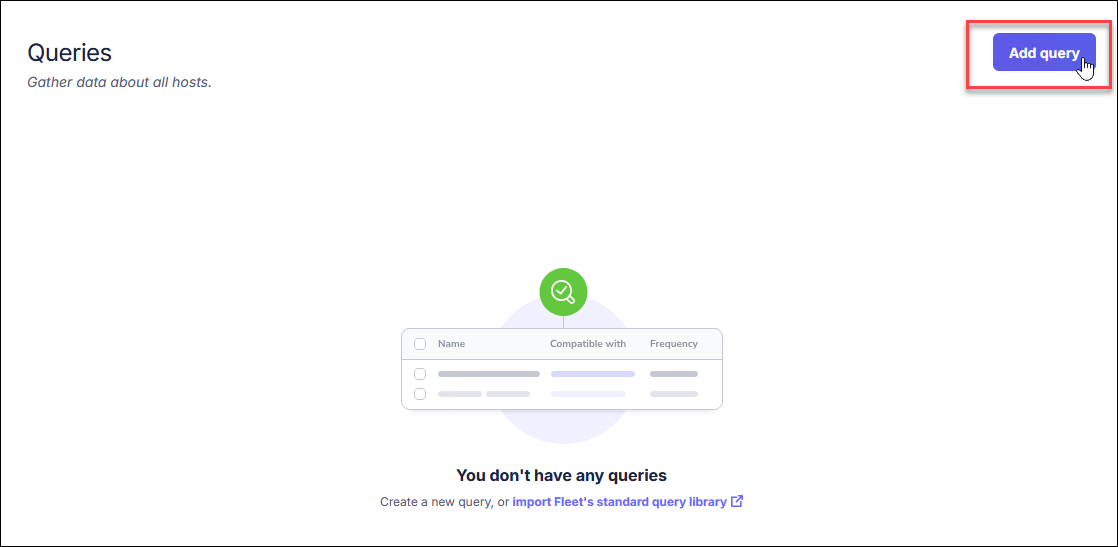
Begin by clicking the Add query button.
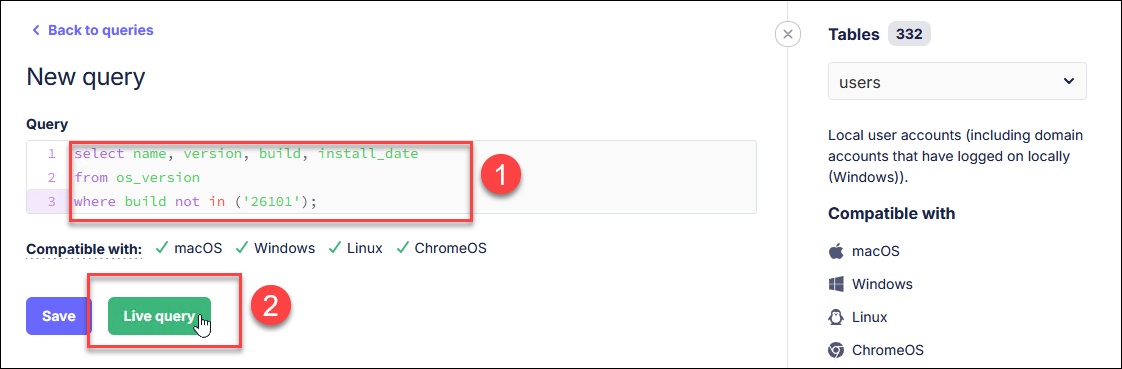
On the "New query" page, replace the contents of the Query textbox with the following query and then click the Live query button.
select name, version, build, install_date
from os_version
where build not in ('26101');
Change the target of the query to "MS Windows" systems and then click on the Run button to execute the query. Note that in a real enterprise setting, the administrators can create any number of categories of systems, and the query can be run against any number of those categories.
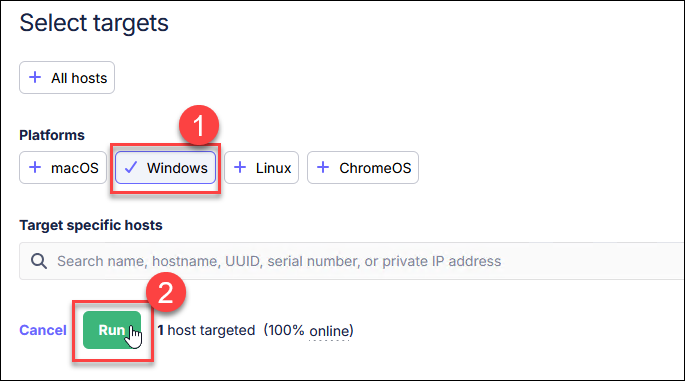
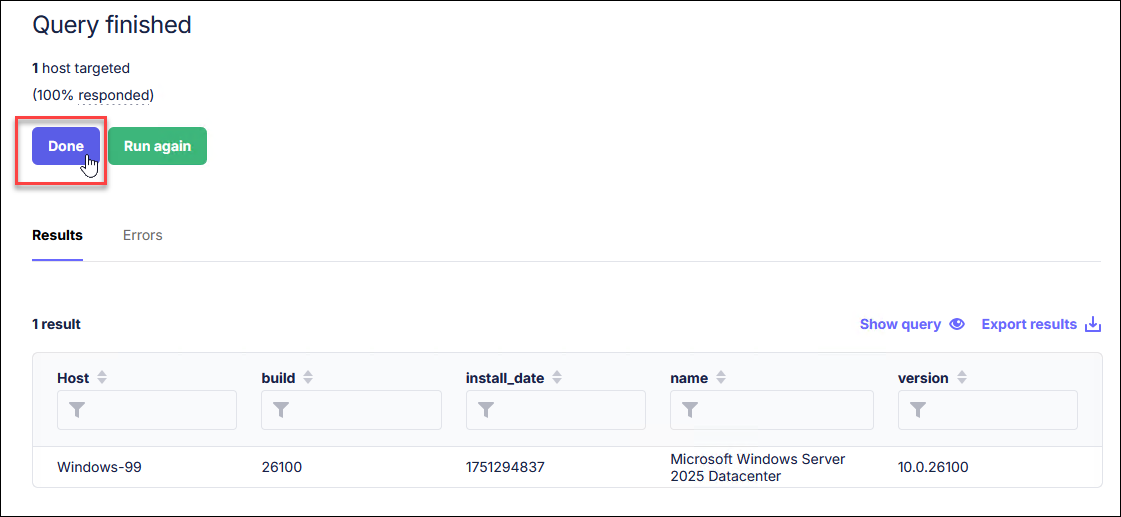
Fleet will send the query to all systems that are in the chosen list of platforms and then wait for the results to be returned. As the results come back, they will be added to the Results tab, and any communication errors will be sent to the Errors tab. Since you only have one Windows host running osquery in your lab, the results should come back rather quickly!
This query is written so that NONCOMPLIANT hosts will be returned. This single query would let you test any number of Windows systems to ensure they meet organizational standards!
After you have reviewed the results, you can return to the Queries page by clicking on the Done button.
Policies
The Policies page allows you to create policies that will be run against your fleet at regular intervals. You can automate running a saved query in this way so that you always have a current view of compliance in your managed systems.
Click on the Policies tab to explore this feature.

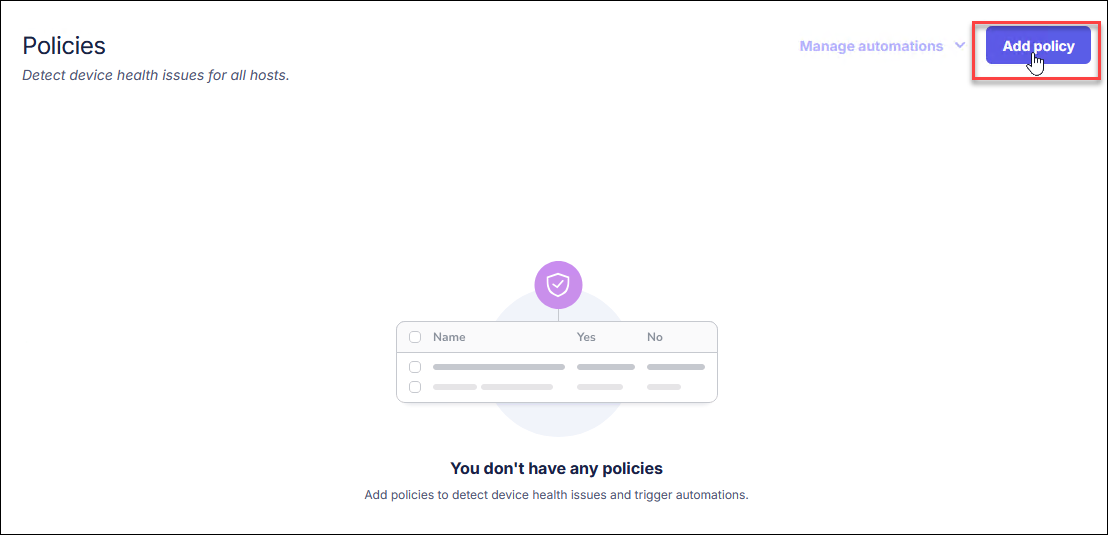
You don't yet have any policies defined in Fleet, so click on the Add a policy button to add one. We'll use the Windows version query you created earlier as the basis for a policy.
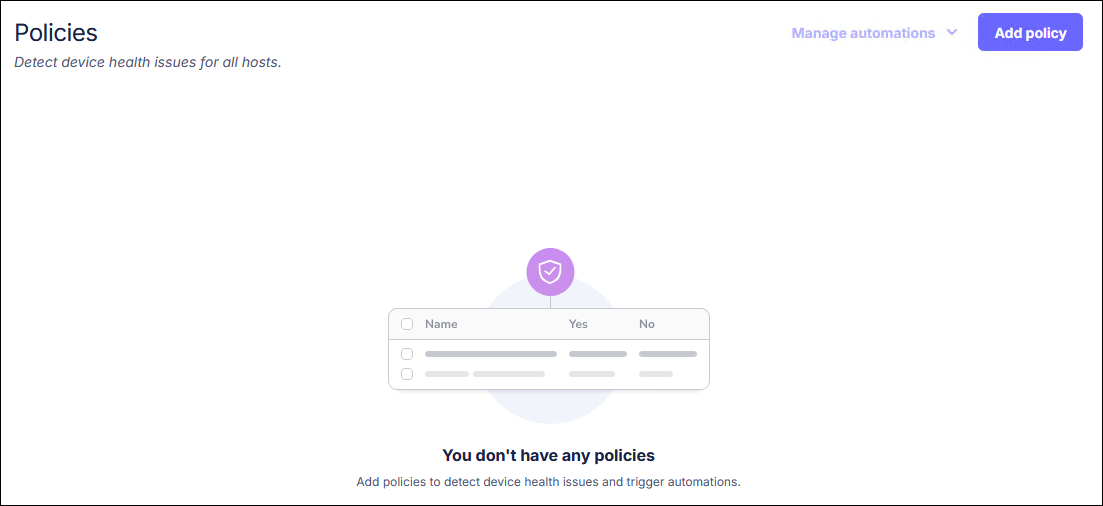
Click the Add policy button to continue.
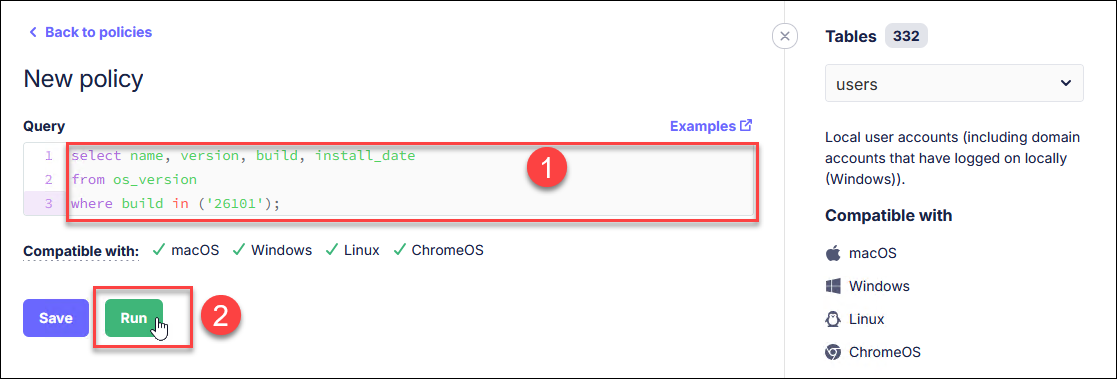
Use a query similar to the one that you tested earlier as the basis for the policy and click the Run button. Note that this time we are search for COMPLIANT hosts, since this is how Fleet uses its policy queries.
select name, version, build, install_date
from os_version
where build in ('26101');
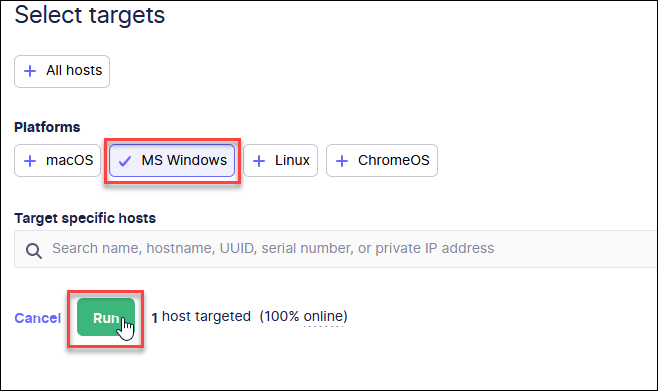
Choose MS Windows as the target and click Run to test the policy query.
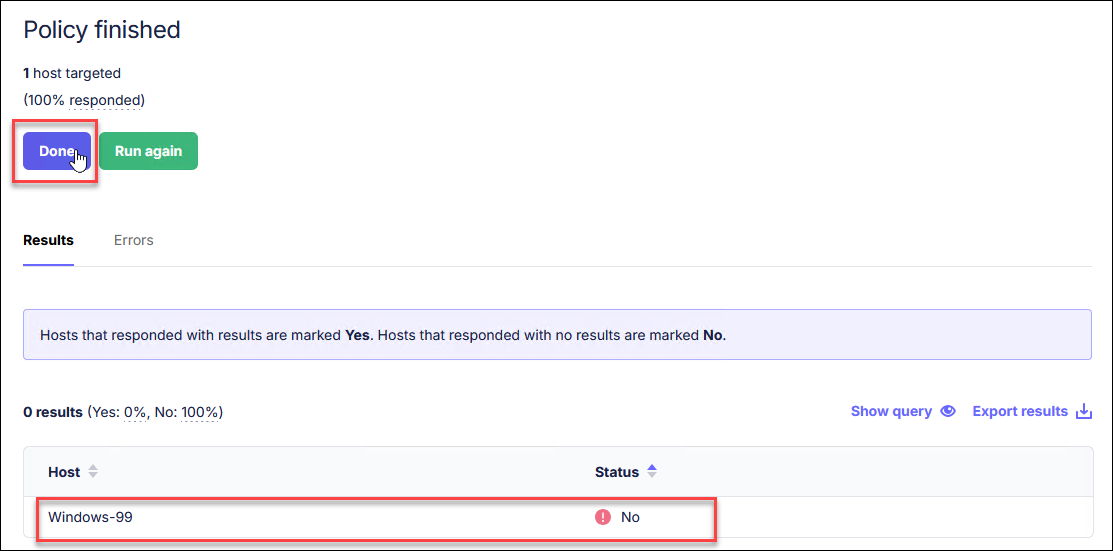
Validate that you see your noncompliant Windows VM in the results, then click the Done button.
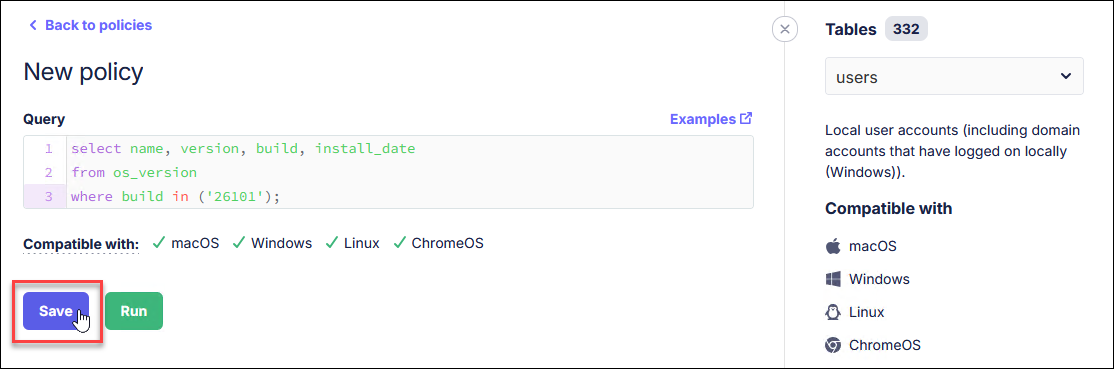
Now that you have validated the policy query, save it to run automatically. On the New policy page, click the Save button.
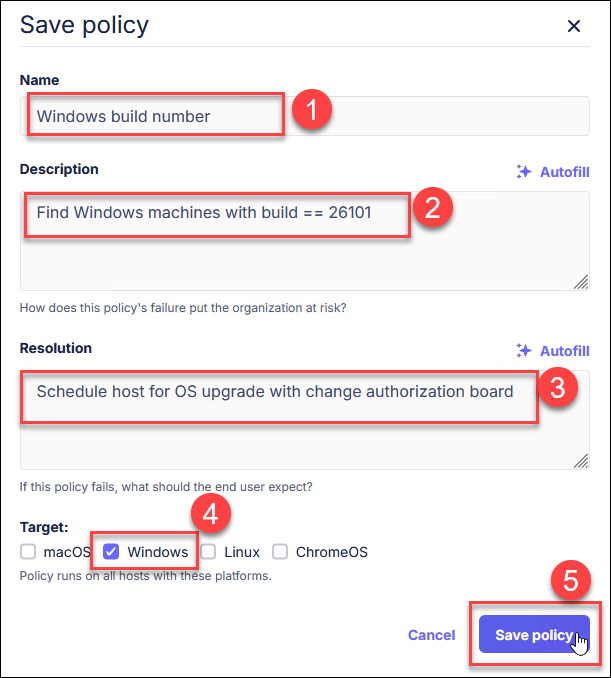
Enter this information on the Save policy page:
Name:
Windows build number
Description:
Find Windows machines with build == 26101
Resolution:
Schedule host for OS upgrade with change authorization board
Target: Select only Windows.
Then click the Save policy button.
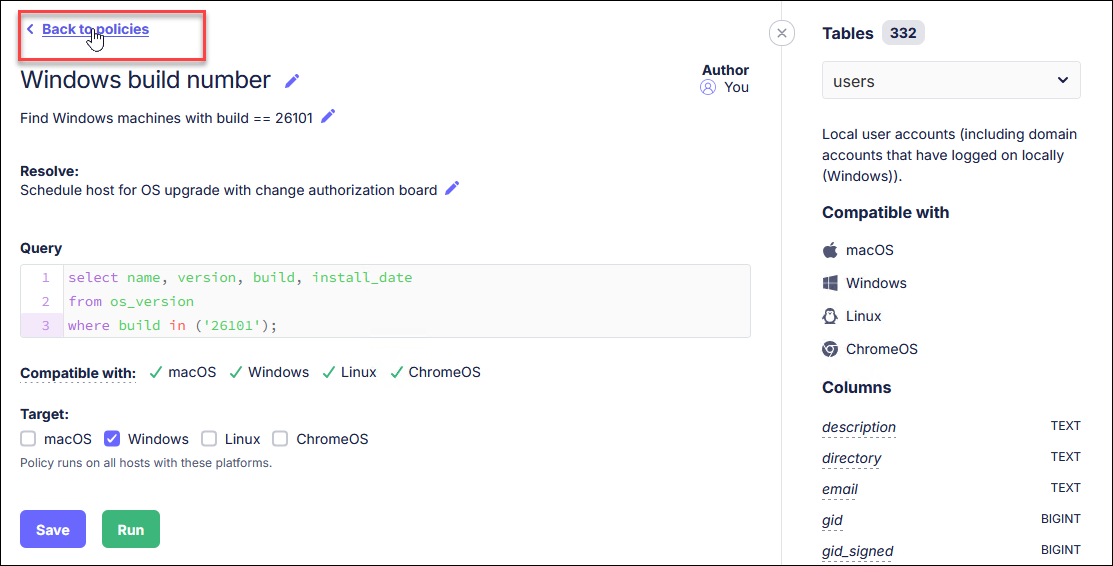
On the results page, click on the < Back to policies link.
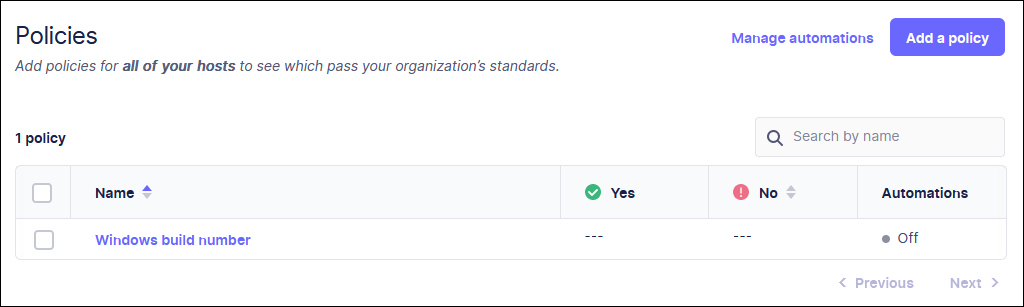
By default, policies will run once per hour. Fleet will update this page with new results as they are received.
You can close the Fleet tab when you have finished.
Part 3: Review Nessus CIS Compliance Scan Results
Background: Commercial versions of the Nessus vulnerability scanner allow you to run full CIS Benchmark scans against hosts. Since the Nessus Essentials scanner used in the labs does not have this capability, we have provided a Nessus Professional CIS benchmark scan against the Windows VM that you can import and view. In this section of the lab, you'll import this scan and explore the results.
Instructions: Open Firefox in the Windows VM and click on the bookmark for Nessus.
If prompted, log in with username student and password student.
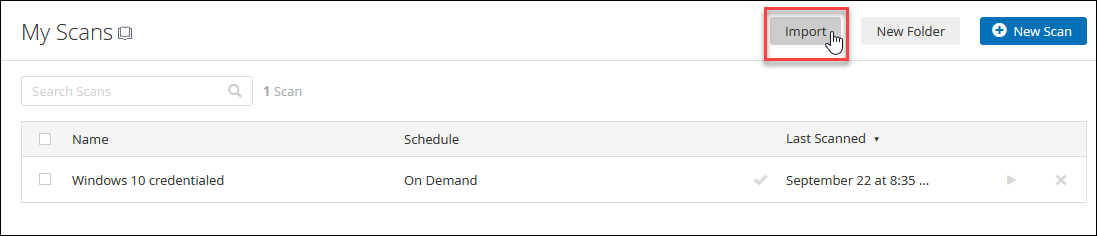
In the Nessus user interface, click on the Import button at the top-right of the screen.

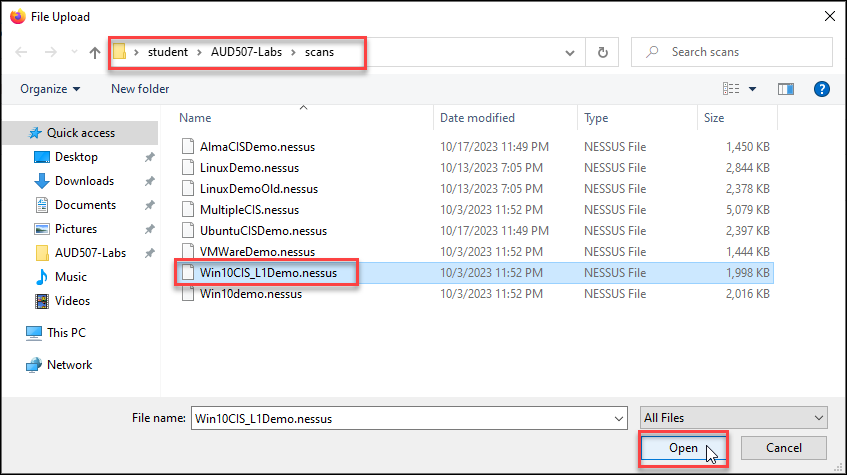
In the File Upload dialog box, navigate to the scans folder in the lab files repository (C:\LabFiles\scans), and select the file named "Win10CIS_L1Demo.nessus." Click the Open button to complete the file import.
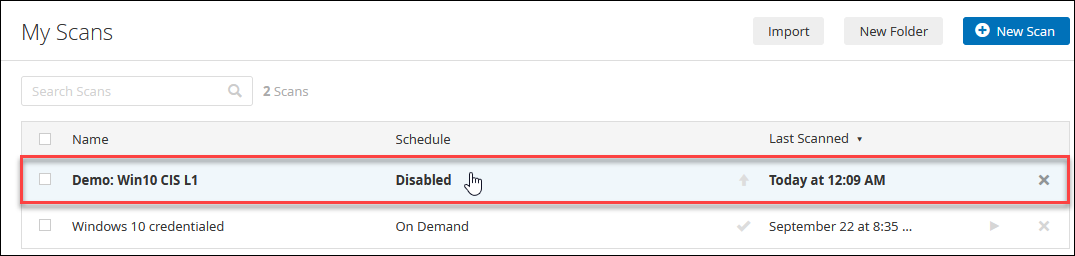
Once the import operation finishes, locate and click on the Demo: Windows CIS L1 scan in the list of Nessus scans. This will take you to the results for the compliance scan.
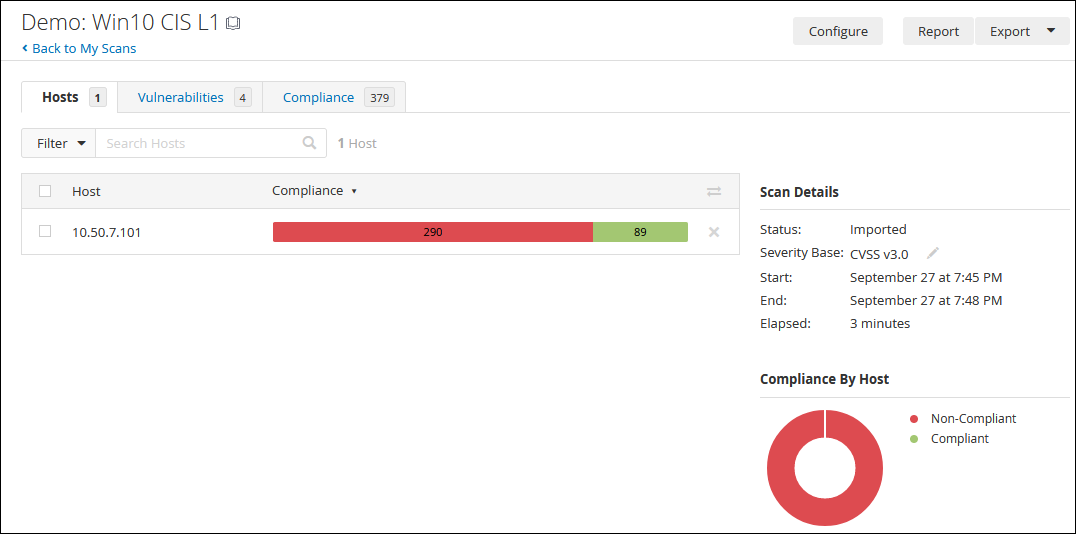
On the scan results page note the Hosts, Vulnerabilities and Compliance tabs. You can see in the Hosts tab, which is selected by default, that a single host was scanned to obtain these results. In fact, we scanned a version of the Windows VM in our lab using the Nessus Professional scanner and the "CIS_MS_Windows_10_Enterprise_Level_1_v2.0.0" Nessus audit file. You'll learn later in this section how to determine which Nessus compliance audit file was used to generate particular findings. Had there been multiple machines scanned, each would have its own line in the table on this tab.
You'll notice summary information on this tab, also. The compliance scan resulted in 290 control failures and only 89 successes. The Compliance By Host section shows a graph indicating that 100% of the hosts scanned were scored as Non-Compliant
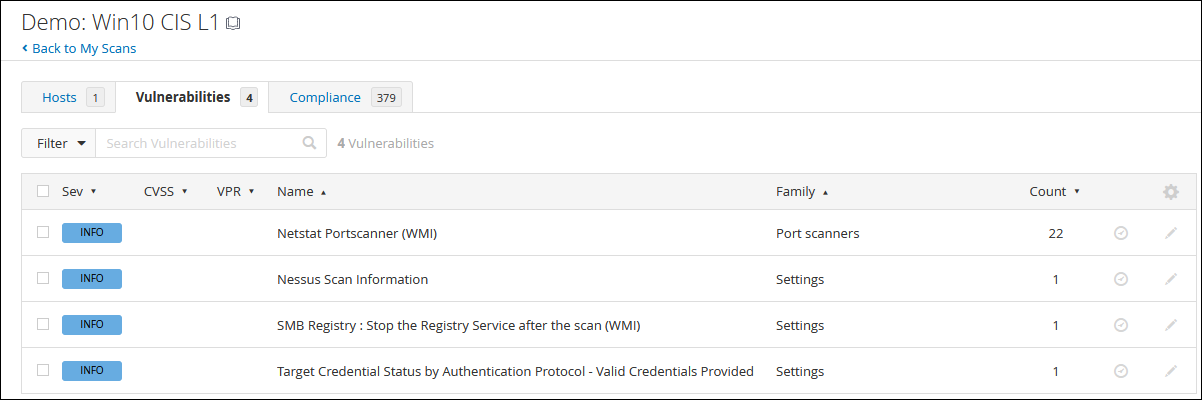
Click on the Vulnerabilities tab to see the list of Nessus scanning plugins which generated results on this scan.

Since you are examining results from a Compliance, (not a vulnerability) scan, it should not be surprising that there are very few plugins listed on this tab. The four that you see are commonly returned by most Nessus scans, and reveal information about the scan configuration or the state of the host being scanned.
Each result in the table on this tab is a link to a page containing detailed scan information returned by various scanner plugins. Feel free to view the output from these plugins by clicking on any of them you wish. Return to the Vulnerabilities tab when you have finished.
Next, click on the Compliance tab. This tab contains the detailed results for all of the audit tests performed during the scan.

As on the other tabs, each line in the table links to the detailed output for a particular control test. Click on the first result in the tab, with a title of 1.1.1 Ensure 'Enforce password history' is set to '24 or more password(s)' You'll use the results of this control test to learn how Nessus presents compliance information.
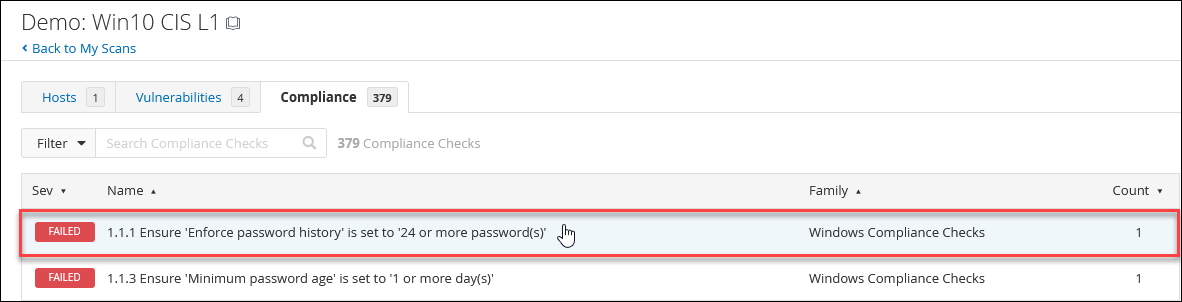
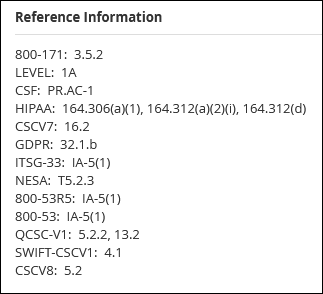
Nessus takes you to a page detailing the results of this control test on the Windows VM in our lab. At the top right of the page, you will see a list of controls from common frameworks which are related to the CIS control being tested. If your organization uses one of these frameworks, then you can easily map to it using this list.
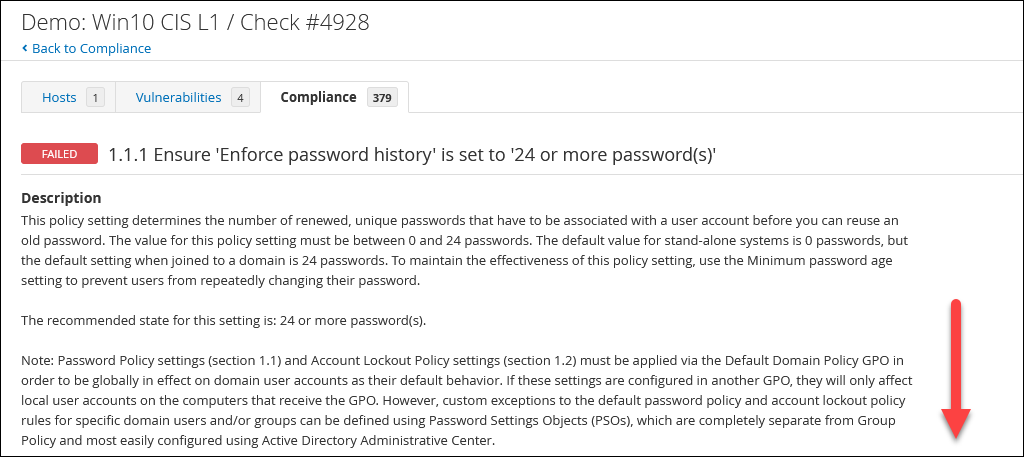
Scroll down and look at the sections of this test result.
The Description section of the page describes the policy test, the rationale or reason the control exists, and the impact that control implementation or control failure might have on a system.
The Solution section explains how to correctly implement the control on a system (normally by using a Microsoft group policy object, or GPO).
See also will refer you to external information about the control being tested. In this case Nessus gives a link to the CIS workbench page for this control. Unfortunately, the linked page requires authentication.
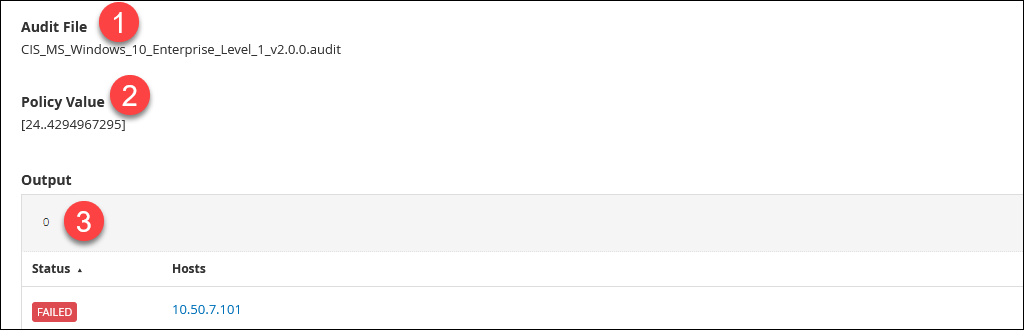
Toward the bottom of the page, the Audit File section (#1 in the screenshot below) shows the specific Nessus compliance audit file that caused this test to be run. In some audits, you might be using multiple audit files that would apply to a host. This section of the page will let you know which of them caused the test to be run.
The Policy Value section (#2 in the screenshot) shows the range of possible PASSING values for the control being tested. In this case, you are examining the number size of the password history. The CIS control calls for at least 24 to be remembered. Therefore, the range of valid values is from 24 to the maximum integer size of 4294967295.
The Output section (#3 in the screenshot) shows the results of the measurement on the host. In this case, it shows that ZERO passwords are remembered (no password history at all). Since the output is outside the valid range, this control test is marked with a status of Failed.
Scroll back to the top of the page and click the Back to Compliance link to return to the previous page.

Nessus scans will always return a large number of plugin and compliance results. It's obviously inefficient to manually search for specific results which might be of interest to you. Fortunately, Nessus provides a filtering function to make it easier to find what you are looking for. You'll use Nessus filters in several labs to quickly drill into the results you need to find.
Compliance audit items only have severity of Passed or Failed. Vulnerability scan items will have severity from None (informational) up to Critical. Imagine you need to search for only those CIS controls which have been scored as Passed. To do this, ensure that you are on the Compliance tab, and click on the Filter button.

Use the drop-down menus to change the filter to search for Audit Severity which is equal to PASSED. When your filter looks like the one in the screenshot, click the Apply button.
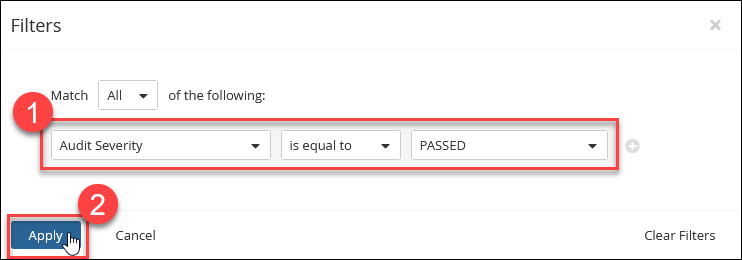
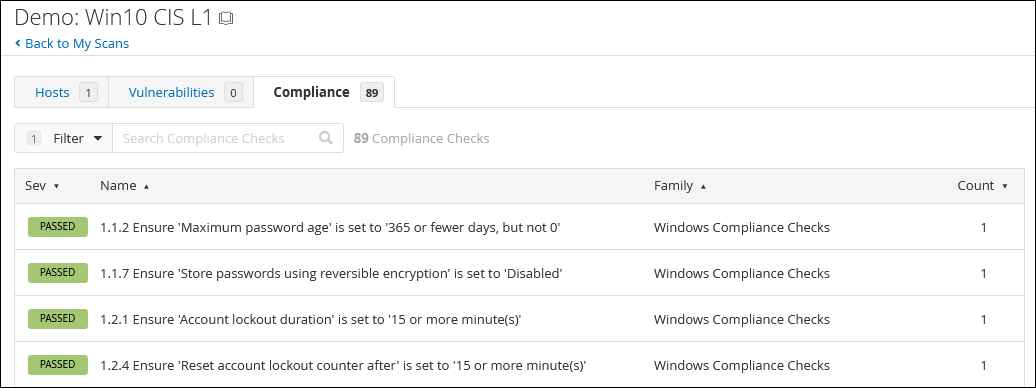
On the Compliance tab, you should now notice that only PASSED results are being shown. Feel free to click on any of the results to explore the plugin output. The results pages will have the same format as the output for the FAILED tests that you viewed above.
When you are through exploring, make sure to return to the My Scans area of Nessus by clicking on the Scans link in the Nessus header:

Part 4: Review Imported Credentialed Scan Results
Preparation: If you are not already logged onto Nessus, open Firefox in the Windows VM and click on the bookmark for Nessus.
If prompted, log in with username student and password student.
Background: We have provided a saved Nessus credentialed vulnerability scan against the Windows VM for you to review in this section of the lab. It was created with the same settings that you used earlier in this lab to create your own credentialed scan. In this section of the lab, you will import the scan results and analyze them.
Instructions: In the My Scans page of the Nessus web interface, click the Import button at the top-right of the screen.
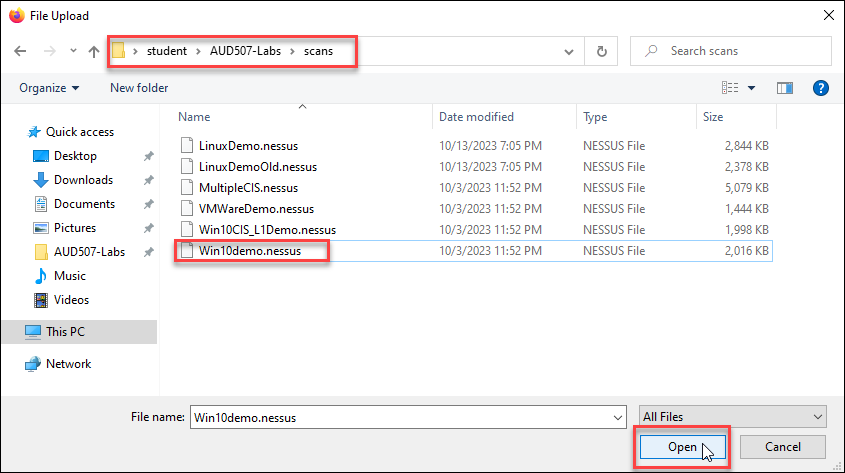
In the File Upload dialog box, navigate to the scans folder in the lab files repository (C:\LabFiles\scans), and select the file named "Win10demo.nessus." Click the Open button to complete the file import.
Once the import operation finishes, locate and click on the Demo: Windows 10 Basic scan in the list of Nessus scans. This will take you to the results for the credentialed scan.
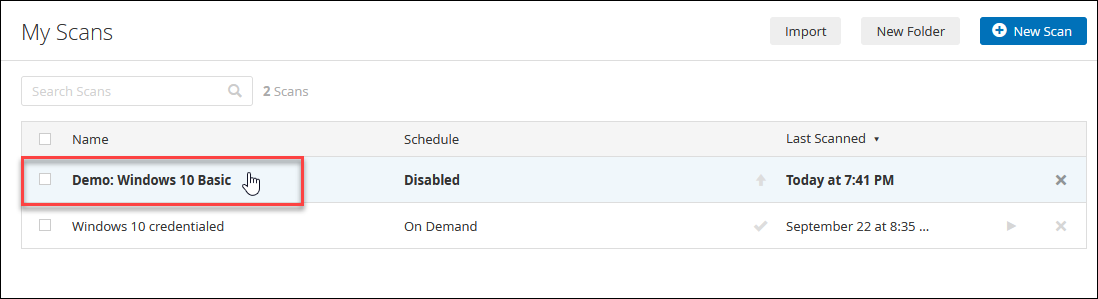
Explore the Nessus Results UI
Since this scan does not include any compliance testing, the tabs in the scan results are different than you saw elsewhere in the lab. Click on the Vulnerabilities tab to see a summary of the results for this host.
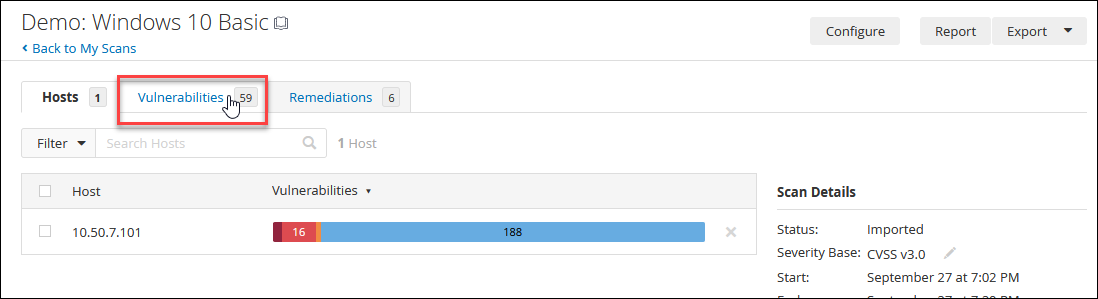
The Vulnerabilities tab contains a summary of the plugin results from the scan. Many of these will be useful for your audit report. Notice that many of the lines in the table on this tab have a count which is greater than 1. Clicking on one of these lines will take you to a group of related plugin findings. Click anywhere in the first line of the Vulnerabilities list, labeled Microsoft Windows (Multiple Issues) to see the details for that group of findings.
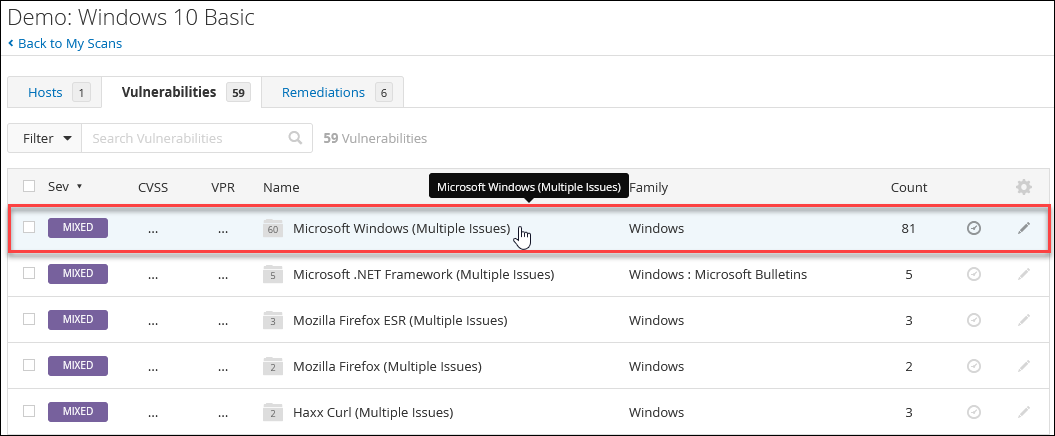
Nessus will take you to a list of all the plugins in this "family" which returned results for the scanned host. Notice these features on the page:
- Findings have a severity ranking (#1 in the screenshot below) which ranges from LOW to CRITICAL for vulnerabilities, and will have a value of INFO for plugins which return information about the host or the scan settings, rather than about a vulnerability.
- Some findings will have a CVSS (common vulnerability scoring system), with values ranging from 0.1 to 10 (#2 in the screenshot). According to NIST, CVSS is used in the National Vulnerability Database to "supply a qualitative measure of severity" to vulnerabilities. NIST assigns these CVSS version three ratings the following qualitative names:
| Severity | Severity Score Range |
|---|---|
| Low | 0.1 - 3.9 |
| Medium | 4.0 - 6.9 |
| High | 7.0 - 8.9 |
| Critical | 9.0 - 10.0 |
- Tenable also assigns a proprietary vulnerability priority rating (VPR) score to some findings (#3 in the screenshot). They intend for this score to help system owners and administrators prioritize their remediation efforts by remediating the highest-scoring results first.
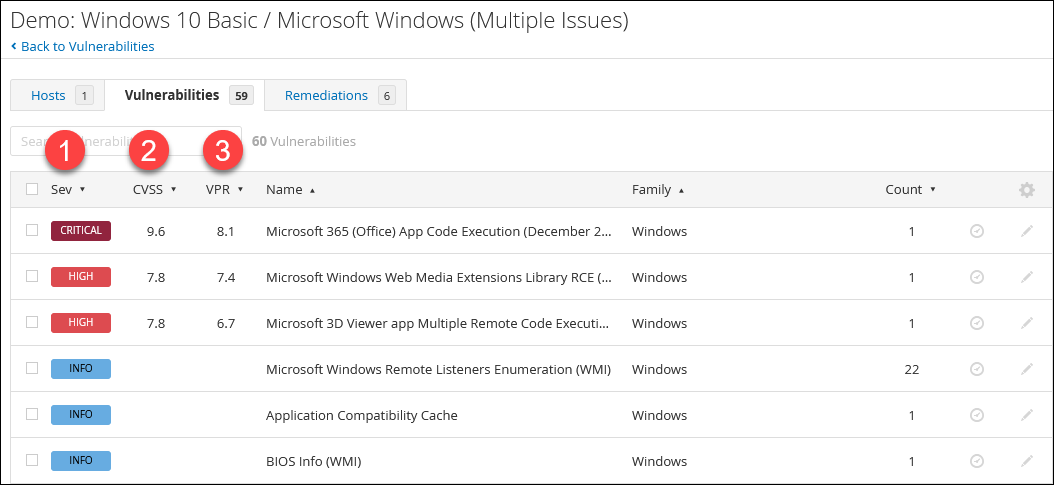
Explore the results in this plugin family. When you have finished, click the Back to Vulnerabilities link to return to the previous page.

Important Nessus Plugins for Auditors
There are certain plugins that we always check on our audits of Windows systems. While you could scroll through the Vulnerabilities tab looking for each interesting plugin, it is much easier to use the Filter function to quickly find what you need.
Plugin 66334 - Patch Report
The first you'll explore is Plugin ID 66334, which builds a summary report of patches which are missing from the scanned host. Plugin 66334 returns results for any operating system for which Nessus has the appropriate plugins to test patching - not just Windows!
Click on the Filter button to launch the dialog box.

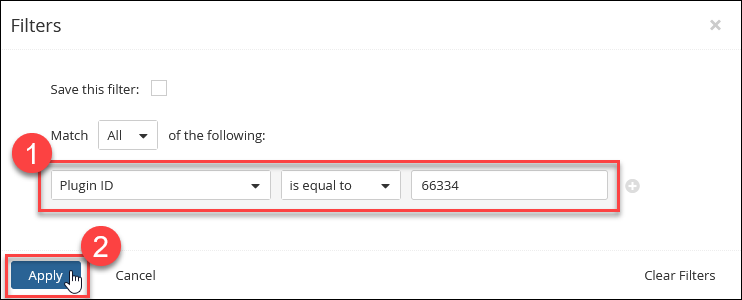
In the Filters dialog, Use the drop-down menus to change the filter to search for Plugin ID which is equal to 66334. When your filter looks like the one in the screenshot, click the Apply button.
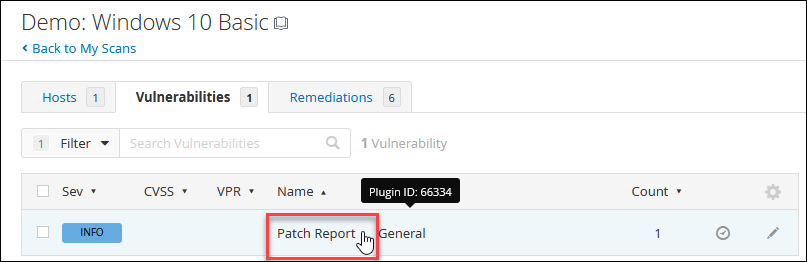
In the filtered results, click on the Patch Report line in the table to view the plugin output.
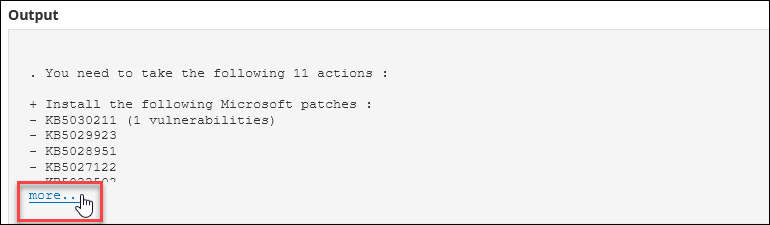
In the Output section, click the more... link to view the entire patch report.
Read through the patch report, paying attention to the sections we have marked in the screenshot:
- The host is missing 6 Windows patches. The associated KB numbers are given in the summary
- The
curlprogram installed on the system has a known vulnerability (CVE-2023-38039) and should be patched to ar least version 8.3.0 - The 3D Viewer app from the Windows Store has multiple known vulnerabilities
- Firefox ESR has 16 known CVEs and should be updated to at least version 102.15.1
- Visual Studio Code has 4 CVEs and an update available to patch them
- VMware Tools has an authentication bypass vulnerability and should be patched to version 12.3.0 or later
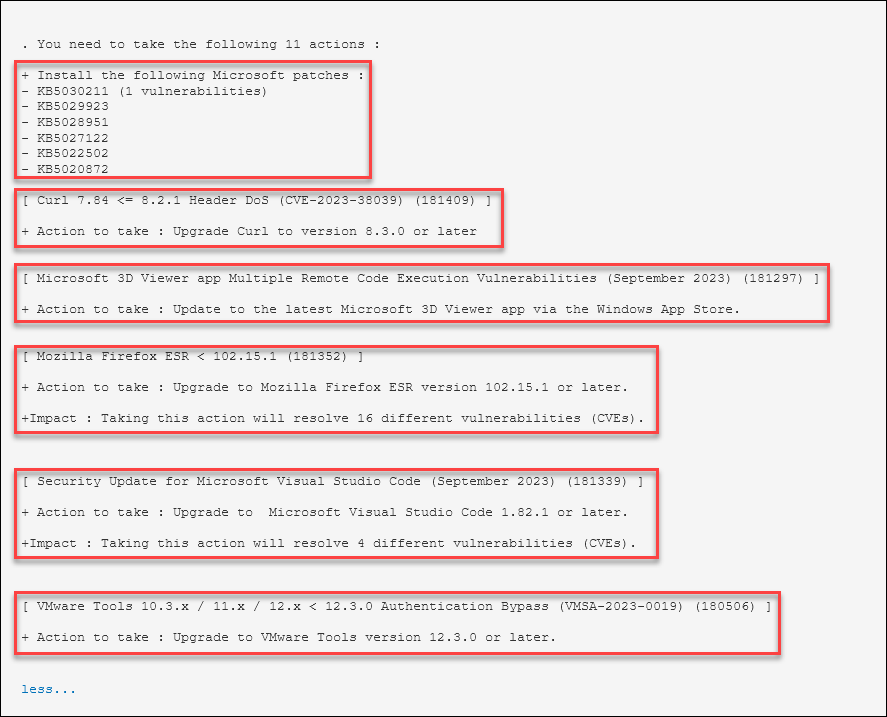
All of these would be important findings for your audit report! When you have finished viewing the patch report, click the Back to Vulnerabilities link to return to the previous page.

Plugin 38153 - Microsoft Patch Report
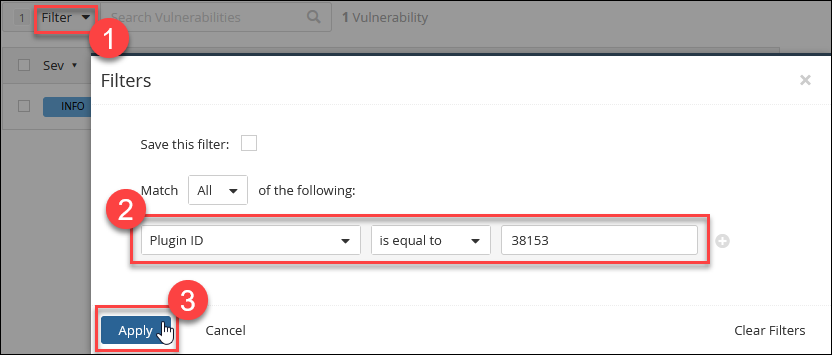
There is a separate plugin (ID #38153) specifically for Microsoft operating systems which lists the Microsoft patches which are missing from the scanned host. On the Vulnerabilities tab, click the Filter button again, and change the filter to look for Plugin ID 38153. Click the Apply button once your filter matches the screenshot.
Click the Microsoft Windows Summary of Missing Patches line in the result table to view this patch report.
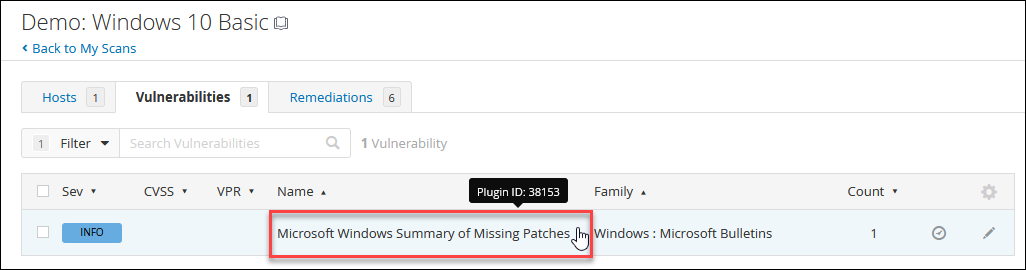
Notice that this report is a subset of the 66334 plugin you viewed earlier in the lab. One nice thing about this report is that it gives links to the Microsoft Knowledge Base article for each patch, which might allow the administrators to more easily research each missing patch.

Return to the Vulnerabilities tab after you have explored the patch report.

Plugin 19506 - Nessus Scan Information
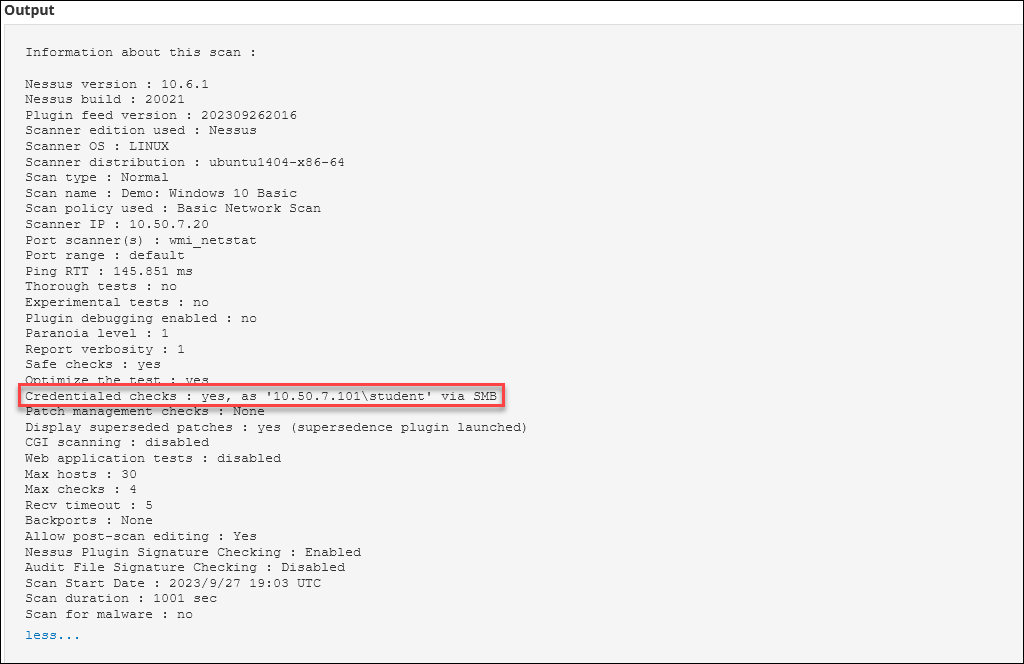
Plugin 19506 is used to give information about the operations performed against the scanned host. While a lot of the information returned by this plugin is "demographic" - describing the scanner and the host being scanned, there are some tidbits which are useful for troubleshooting. One of the most common causes of false negative results during scans is that authentication to the scanned host has failed. Plugin 19506 allows you to check that the credentialed host checks were able to be run.
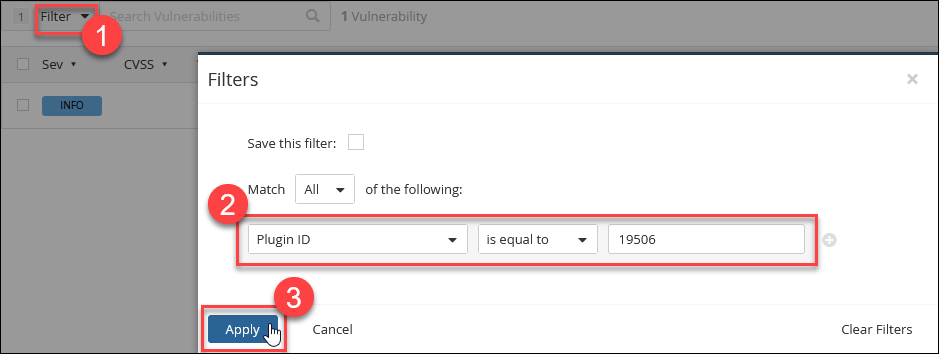
Change your filter to look at the results from this plugin. On the Vulnerabilities tab, click the Filter button again, and change the filter to look for Plugin ID 19506. Click the Apply button once your filter matches the screenshot.
Click the Nessus Scan Information line in the result table to view the plugin output.
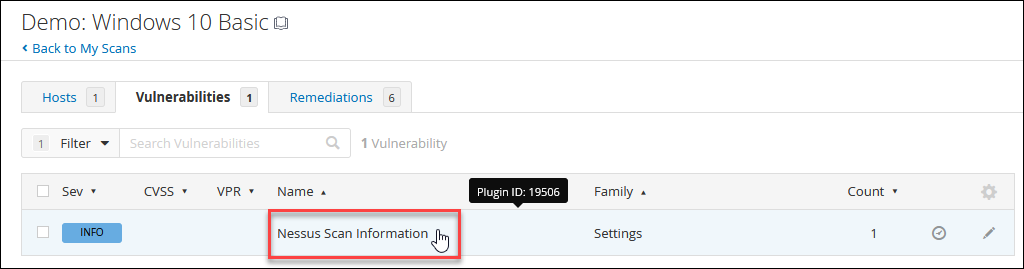
On the plugin results page, expand the Output section by clicking on the more... link.
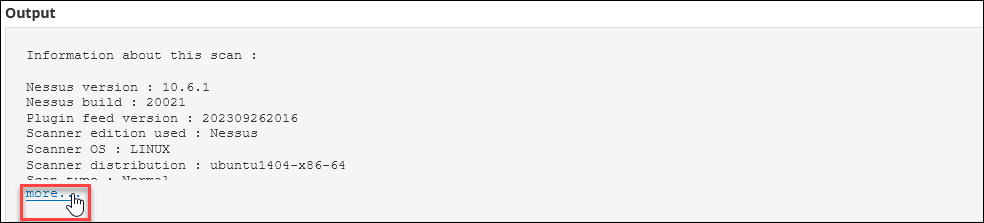
Read through the results, noting that you see information about the operating system and software version of the scanner, settings used for the scan, and the single Credentialed checks entry, which is useful for determining that authentication worked correctly. This is the line that's useful for troubleshooting false negative results, and we have highlighted it in the screenshot for you.
Return to the Vulnerabilities tab after you have explored the plugin output.
Remediations Tab
The last part of the Nessus UI you will examine in this lab is the Remediations tab. Like the name would suggest, this tab will contain recommended corrective actions for some or all of the vulnerabilities found during the scan. Click on the Remediations tab to see the recommendations for this scan.
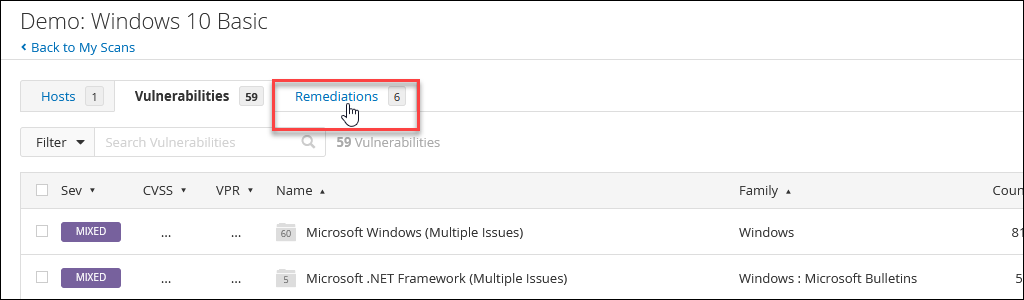
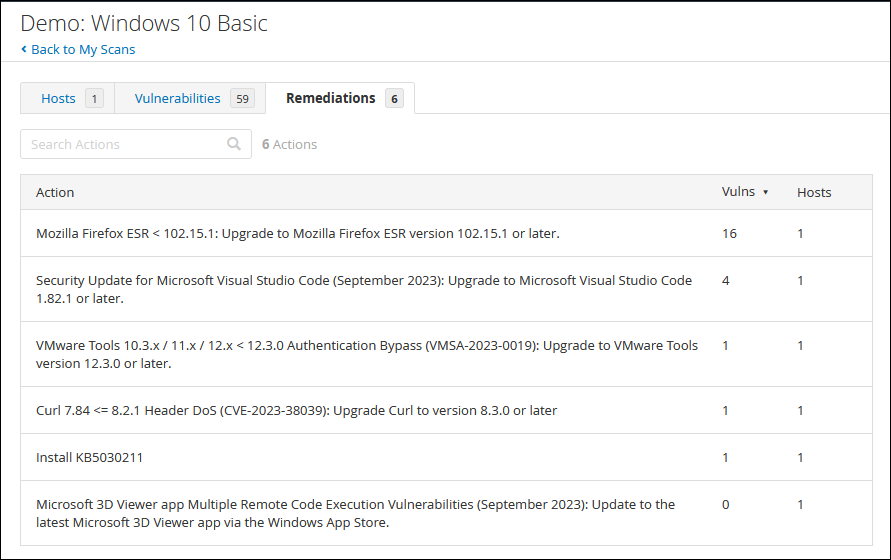
Notice that the contents of this tab are all actions which the administrators can take. Since the current scan only includes a single host, the Hosts count for all the remediation recommendations is one. If there were multiple hosts included in the scan, you might see rows with higher counts. This host count can help administrators to prioritize their corrective work. Also note that some patches may correct MULTIPLE vulnerabilities. The Firefox remediation in the screenshot below is a good example of that.
When you are through exploring, make sure to return to the My Scans area of Nessus by clicking on the Scans link in the Nessus header:
Part 5: (Optional) Review Your Credentialed Scan Results
Background: If you chose to run the credentialed vulnerability scan earlier in this lab (and the scan has finished running - they can take some time to run), then you can explore the results on your own, using the techniques and plugins discussed elsewhere in the lab.
Instructions: Find and click on the Windows credentialed scan that you started in the earlier lab.
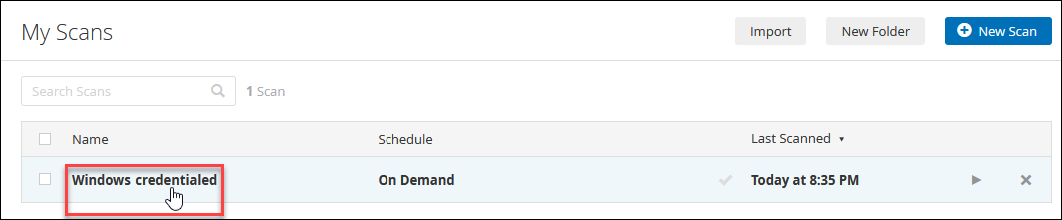
Analyze the results any way you want. Remember that this scan was run against your live hosts, so the results will very likely differ from the examples you've looked at elsewhere in the lab.
Close Firefox
When you have finished with Nessus, you can safely close the Firefox browser.