Lab 5.2: Server Configuration and Static Analysis
VMs Needed
-
Windows
-
Ubuntu
Lab Video
Server Configuration and Static Analysis
Objectives
-
Demonstrate the use of command-line tools to analyze the TLS settings on web servers.
-
Using SSLyze from the Windows command line
-
Using Nmap from the Linux command line
-
-
Analyze the contents of the robots.txt file on web servers to find potentially vulnerable information.
-
Explore the use of static analysis tools for auditing web application source code.
Lab Preparation
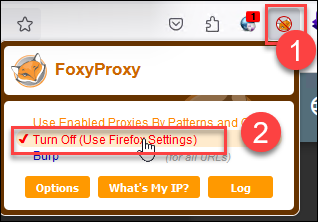
Disable the Burp Proxy in Firefox by clicking on the FoxyProxy icon and choosing the 'Turn Off (Use Firefox Settings)` option.
Launch a PowerShell Core terminal on the Windows VM by clicking the Windows Terminal icon in the taskbar.

Part 1: Using SSLyze to Inventory Protocols and Ciphers
Environment Check
Before proceeding, ensure that you are working in Windows Terminal in PowerShell Core.

Background: In this section of the lab, you will use the SSLyze tool to gather information about the TLS configuration and installed server certificate for the Juice Shop website hosted on the Ubuntu VM.
Instructions: Use the following command to change to the SSLyze program directory:
Set-Location 'C:\Tools\sslyze\'
You can get help with the SSLyze tool's command-line options at any time by typing the following command:
.\sslyze.exe --help
Sample Results
PS > Set-Location 'C:\Tools\sslyze\'
PS > .\sslyze.exe --help
usage: sslyze [-h] [--update_trust_stores] [--cert CERTIFICATE_FILE] [--key KEY_FILE]
              [--keyform KEY_FORMAT] [--pass PASSPHRASE] [--json_out JSON_FILE]
              [--targets_in TARGET_FILE] [--quiet] [--slow_connection]
              [--https_tunnel PROXY_SETTINGS] [--starttls PROTOCOL] [--xmpp_to HOSTNAME]
              [--sni SERVER_NAME_INDICATION] [--sslv3] [--heartbleed] [--reneg] [--certinfo]
              [--certinfo_ca_file CERTINFO_CA_FILE] [--http_headers] [--robot] [--resum]
              [--resum_attempts RESUM_ATTEMPTS] [--tlsv1_1] [--fallback] [--openssl_ccs]
              [--sslv2] [--elliptic_curves] [--tlsv1_3] [--tlsv1] [--compression] [--tlsv1_2]
              [--early_data] [--mozilla_config {modern,intermediate,old,disable}]
              [target [target ...]]

SSLyze version 5.0.5

positional arguments:
  target                The list of servers to scan.
...
[Results Truncated]
Begin your audit by examining the certificate installed on the server. In a real audit, you would be looking for the certificate to be signed by a valid certificate authority (CA) and to expire within a reasonable period of time, usually 1 year or less.
To analyze the certificate installed on the web server, run the following command and then use the results to answer the questions that follow:
.\sslyze.exe --certinfo juiceshop.lab.local:443
1. What certificate authority issued the server's TLS certificate?
2. What is the certificate's expiration date?
3. Would a Windows computer using the Windows CA Store trust this certificate?
Check to see if the server supports SSLv3 by running the following command and analyzing the output:
.\sslyze.exe --sslv3 juiceshop.lab.local:443
4. Is SSLv3 supported on this server? How do you know?
Check to see if the server supports TLSv1.0 by running the following command and analyzing the output:
.\sslyze.exe --tlsv1 juiceshop.lab.local:443
5. Is TLSv1.0 supported on this server? How do you know?
On your own, using the help file, run similar tests for TLS versions 1.1, 1.2, and 1.3.
6. Which versions of TLS are supported on the server?
7. Which TLS versions are not supported?
On your own: If your Windows VM has a working internet connection, you have permission to use SSLyze to inventory the protocols and certificates on the isc.sans.edu web server.
Solutions
Solutions to Part 1 Questions
1. What certificate authority issued the server's TLS certificate?
juiceshop.lab.local -- this is a self-signed certificate. Note the line that reads Issuer: juiceshop.lab.local.
2. What is the certificate's expiration date?
2035-03-30
Sample Results
Certificate #0 ( _RSAPublicKey )
  SHA1 Fingerprint:                  da0be391b0601f42ad182a596b628fb4be093fb7
  Common Name:                       juiceshop.lab.local
  Issuer:                            juiceshop.lab.local
  Serial Number:                     168823125928496115426999146416056826727247641712
  Not Before:                        2025-04-01
  Not After:                         2035-03-30
  Public Key Algorithm:              _RSAPublicKey
  Signature Algorithm:               sha256
  Key Size:                          2048
  Exponent:                          65537
  DNS Subject Alternative Names:     []
3. Would a Windows computer using the Windows CA Store trust this certificate?
No -- the Windows CA Store trust test failed because this is a self-signed certificate.
Sample Results
Certificate #0 - Trust
  Hostname Validation:               OK - Certificate matches server hostname
  Android CA Store (12.1.0_r5):      FAILED - Certificate is NOT Trusted: self signed certificate
  Apple CA Store (iOS 15.1, iPadOS 15.1, macOS 12.1, tvOS 15.1, and watchOS 8.1):FAILED - Certificate is NOT Trusted: self signed certificate
  Java CA Store (jdk-13.0.2):        FAILED - Certificate is NOT Trusted: self signed certificate
  Mozilla CA Store (2022-04-03):     FAILED - Certificate is NOT Trusted: self signed certificate
  Windows CA Store (2022-04-10):     FAILED - Certificate is NOT Trusted: self signed certificate
  Symantec 2018 Deprecation:         ERROR - Could not build verified chain (certificate untrusted?)
  Received Chain:                    juiceshop.lab.local
  Verified Chain:                    ERROR - Could not build verified chain (certificate untrusted?)
  Received Chain Contains Anchor:    ERROR - Could not build verified chain (certificate untrusted?)
  Received Chain Order:              OK - Order is valid
  Verified Chain contains SHA1:      ERROR - Could not build verified chain (certificate untrusted?)
4. Is SSLv3 supported on this server? How do you know?
No. No SSLv3 ciphers were reported as available. (The server rejected all cipher suites.)
Sample Results
PS > .\sslyze.exe --sslv3 juiceshop.lab.local:443

 CHECKING CONNECTIVITY TO SERVER(S)
 ----------------------------------

   juiceshop.lab.local:443   => 10.50.7.20

 SCAN RESULTS FOR JUICESHOP.lab.local:443 - 10.50.7.20
 -----------------------------------------------------

 * SSL 3.0 Cipher Suites:
     Attempted to connect using 80 cipher suites; the server rejected all cipher suites.

 SCANS COMPLETED IN 0.234394 S
 -----------------------------

 COMPLIANCE AGAINST MOZILLA TLS CONFIGURATION
 --------------------------------------------

    Disabled; use --mozilla_config={old, intermediate, modern}.
5. Is TLSv1.0 supported on this server? How do you know?
No. No TLSv1.0 ciphers were reported as available. (The server rejected all cipher suites.)
Sample Results
PS > .\sslyze.exe --tlsv1 juiceshop.lab.local:443

 CHECKING CONNECTIVITY TO SERVER(S)
 ----------------------------------

   juiceshop.lab.local:443   => 10.50.7.20

 SCAN RESULTS FOR JUICESHOP.lab.local:443 - 10.50.7.20
 -----------------------------------------------------

 * TLS 1.0 Cipher Suites:
     Attempted to connect using 80 cipher suites; the server rejected all cipher suites.

 SCANS COMPLETED IN 0.265547 S
 -----------------------------

 COMPLIANCE AGAINST MOZILLA TLS CONFIGURATION
 --------------------------------------------

    Disabled; use --mozilla_config={old, intermediate, modern}.
6. Which versions of TLS are supported on the server?
TLS versions 1.2 and 1.3 are supported. The command to test for all four protocols at once is:
.\sslyze.exe --tlsv1 --tlsv1_1 --tlsv1_2 --tlsv1_3 juiceshop.lab.local:443
Sample Results
SCAN RESULTS FOR JUICESHOP.lab.local:443 - 10.50.7.20
 -----------------------------------------------------

 * TLS 1.0 Cipher Suites:
     Attempted to connect using 80 cipher suites; the server rejected all cipher suites.

 * TLS 1.1 Cipher Suites:
     Attempted to connect using 80 cipher suites; the server rejected all cipher suites.

 * TLS 1.2 Cipher Suites:
     Attempted to connect using 156 cipher suites.

     The server accepted the following 27 cipher suites:
        TLS_RSA_WITH_CAMELLIA_256_CBC_SHA256              256
        TLS_RSA_WITH_CAMELLIA_256_CBC_SHA                 256
        TLS_RSA_WITH_CAMELLIA_128_CBC_SHA256              128
        TLS_RSA_WITH_CAMELLIA_128_CBC_SHA                 128
        TLS_RSA_WITH_ARIA_256_GCM_SHA384                  256
        TLS_RSA_WITH_ARIA_128_GCM_SHA256                  128
        TLS_RSA_WITH_AES_256_GCM_SHA384                   256
        TLS_RSA_WITH_AES_256_CCM_8                        128
        TLS_RSA_WITH_AES_256_CCM                          256
        TLS_RSA_WITH_AES_256_CBC_SHA256                   256
        TLS_RSA_WITH_AES_256_CBC_SHA                      256
        TLS_RSA_WITH_AES_128_GCM_SHA256                   128
        TLS_RSA_WITH_AES_128_CCM_8                        128
        TLS_RSA_WITH_AES_128_CCM                          128
        TLS_RSA_WITH_AES_128_CBC_SHA256                   128
        TLS_RSA_WITH_AES_128_CBC_SHA                      128
        TLS_ECDHE_RSA_WITH_CHACHA20_POLY1305_SHA256       256       ECDH: X25519 (253 bits)
        TLS_ECDHE_RSA_WITH_CAMELLIA_256_CBC_SHA384        256       ECDH: X25519 (253 bits)
        TLS_ECDHE_RSA_WITH_CAMELLIA_128_CBC_SHA256        128       ECDH: X25519 (253 bits)
        TLS_ECDHE_RSA_WITH_ARIA_256_GCM_SHA384            256       ECDH: X25519 (253 bits)
        TLS_ECDHE_RSA_WITH_ARIA_128_GCM_SHA256            128       ECDH: X25519 (253 bits)
        TLS_ECDHE_RSA_WITH_AES_256_GCM_SHA384             256       ECDH: prime256v1 (256 bits)
        TLS_ECDHE_RSA_WITH_AES_256_CBC_SHA384             256       ECDH: prime256v1 (256 bits)
        TLS_ECDHE_RSA_WITH_AES_256_CBC_SHA                256       ECDH: prime256v1 (256 bits)
        TLS_ECDHE_RSA_WITH_AES_128_GCM_SHA256             128       ECDH: prime256v1 (256 bits)
        TLS_ECDHE_RSA_WITH_AES_128_CBC_SHA256             128       ECDH: prime256v1 (256 bits)
        TLS_ECDHE_RSA_WITH_AES_128_CBC_SHA                128       ECDH: prime256v1 (256 bits)

     The group of cipher suites supported by the server has the following properties:
       Forward Secrecy                    OK - Supported
       Legacy RC4 Algorithm               OK - Not Supported


 * TLS 1.3 Cipher Suites:
     Attempted to connect using 5 cipher suites.

     The server accepted the following 3 cipher suites:
        TLS_CHACHA20_POLY1305_SHA256                      256       ECDH: X25519 (253 bits)
        TLS_AES_256_GCM_SHA384                            256       ECDH: X25519 (253 bits)
        TLS_AES_128_GCM_SHA256                            128       ECDH: X25519 (253 bits)
7. Which TLS versions are not supported?
TLS versions 1.0 and 1.1 are not supported on this server.
Part 2: Use Nmap to Inventory Certificates and Ciphers
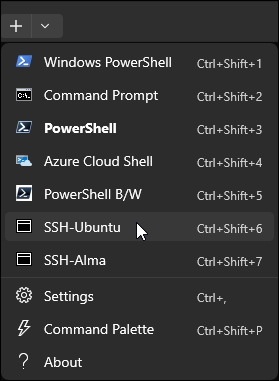
Preparation: Open an SSH connection to the Ubuntu VM in Windows Terminal. Click the down arrow icon and select SSH-Ubuntu from the drop-down menu.
Environment Check
Before proceeding, ensure that you are working in Windows Terminal in a SSH session to the Ubuntu VM.

Background: In this section of the lab, you will use Nmap's scripting engine (NSE) scripts included with the Nmap tool on your Linux web server VM to inventory the certificate, protocols, and ciphers in use on the server. Nmap ships with a lot of scripts, and using these scripts can sometimes be the fastest way to gather information on a host.
Instructions: Run the following command to check the certificate installed on the server:
sudo nmap -p443 10.50.7.20 --script ssl-cert
Sample Results
student@Ubuntu-99:~$ sudo nmap -p443 10.50.7.20 --script ssl-cert
Starting Nmap 7.95 ( https://nmap.org ) at 2025-04-16 16:09 UTC
Nmap scan report for Ubuntu-99 (10.50.7.20)
Host is up (0.000065s latency).

PORT    STATE SERVICE
443/tcp open  https
| ssl-cert: Subject: commonName=juiceshop.lab.local/organizationName=RCI/stateOrProvinceName=OK/countryName=US
| Issuer: commonName=juiceshop.lab.local/organizationName=RCI/stateOrProvinceName=OK/countryName=US
| Public Key type: rsa
| Public Key bits: 2048
| Signature Algorithm: sha256WithRSAEncryption
| Not valid before: 2025-04-01T20:34:05
| Not valid after:  2035-03-30T20:34:05
| MD5:   58bb:751c:c25a:811d:6566:e875:9e02:26af
|_SHA-1: da0b:e391:b060:1f42:ad18:2a59:6b62:8fb4:be09:3fb7

Nmap done: 1 IP address (1 host up) scanned in 1.04 seconds
Examine the output from Nmap and ensure that you can locate the following items. They should match what you saw in the SSLyze output above.
-
The certificate subject (name of the server the certificate was issued to)
-
The certificate issuer (name of the certificate authority who issued the certificate)
-
The issue (not valid before) and expiration (not valid after) dates of the certificate
Next, run this command to test the TLS settings for the server:
nmap -p443 10.50.7.20 --script ssl-enum-ciphers
Sample Results
student@Ubuntu-99:~$ nmap -p443 10.50.7.20 --script ssl-enum-ciphers
Starting Nmap 7.95 ( https://nmap.org ) at 2025-04-16 16:10 UTC
Nmap scan report for Ubuntu-99 (10.50.7.20)
Host is up (0.00015s latency).

PORT    STATE SERVICE
443/tcp open  https
| ssl-enum-ciphers:
|   TLSv1.2:
|     ciphers:
|       TLS_ECDHE_RSA_WITH_AES_256_GCM_SHA384 (ecdh_x25519) - A
|       TLS_ECDHE_RSA_WITH_CHACHA20_POLY1305_SHA256 (ecdh_x25519) - A
|       TLS_ECDHE_RSA_WITH_ARIA_256_GCM_SHA384 (ecdh_x25519) - A
|       TLS_ECDHE_RSA_WITH_AES_128_GCM_SHA256 (ecdh_x25519) - A
|       TLS_ECDHE_RSA_WITH_ARIA_128_GCM_SHA256 (ecdh_x25519) - A
|       TLS_ECDHE_RSA_WITH_AES_256_CBC_SHA384 (ecdh_x25519) - A
|       TLS_ECDHE_RSA_WITH_CAMELLIA_256_CBC_SHA384 (ecdh_x25519) - A
...
[Results Truncated]
|     compressors:
|       NULL
|     cipher preference: server
|   TLSv1.3:
|     ciphers:
|       TLS_AKE_WITH_AES_256_GCM_SHA384 (ecdh_x25519) - A
|       TLS_AKE_WITH_CHACHA20_POLY1305_SHA256 (ecdh_x25519) - A
|       TLS_AKE_WITH_AES_128_GCM_SHA256 (ecdh_x25519) - A
|     cipher preference: server
|_  least strength: A

Nmap done: 1 IP address (1 host up) scanned in 0.27 seconds
Examine the output and identify the TLS versions in use and ciphers available for each. Again, this should match the results you received with SSLyze. Either of these tools would be appropriate for your audit, but the Nmap script would be more useful for testing multiple hosts at once. An example would be the following command, which runs both of the previous SSL scanning scripts against two hosts. You could just as easily scan an entire network with Nmap. Feel free to run the command and view the results.
nmap -p443 10.50.7.20,50 --script ssl-cert,ssl-enum-ciphers
Leave your SSH session open for use later in the lab.
Part 3: Audit Server Configuration
Environment Check
Before proceeding, ensure that you are working in Windows Terminal in a SSH session to the Ubuntu VM.
Background: Web application audits will normally include checks of the server configuration beyond the TLS settings. Many headers can be returned by the server to influence the behavior of the browser as it interacts with the application. One example is the Strict-Transport-Security header to require the use of HTTPS for communication with the server. The robots.txt file can expose sensitive data. In this section of the lab, you will use Nmap to list the headers returned by the Juice Shop application and to view the robots.txt file.
Instructions: In your Ubuntu SSH session, run the Nmap command to view the headers being returned by the JuiceShop web server (in conjunction with the Nginx reverse HTTP proxy, which sits in front of it).
nmap -p80 10.50.7.20 --script http-headers
Sample Results
student@Ubuntu-99:~$ nmap -p80 10.50.7.20 --script http-headers
Starting Nmap 7.95 ( https://nmap.org ) at 2025-04-16 16:11 UTC
Nmap scan report for Ubuntu-99 (10.50.7.20)
Host is up (0.00020s latency).

PORT   STATE SERVICE
80/tcp open  http
| http-headers:
|   Server: nginx/1.24.0 (Ubuntu)
|   Date: Wed, 16 Apr 2025 16:11:50 GMT
|   Content-Type: text/html; charset=UTF-8
|   Content-Length: 2002
|   Connection: close
|   Access-Control-Allow-Origin: *
|   X-Content-Type-Options: nosniff
|   X-Frame-Options: SAMEORIGIN
|   Feature-Policy: payment 'self'
|   X-Recruiting: /#/jobs
|   Accept-Ranges: bytes
|   Cache-Control: public, max-age=0
|   Last-Modified: Wed, 16 Apr 2025 15:02:15 GMT
|   ETag: W/"7d2-1963f1f4108"
|   Vary: Accept-Encoding
|
|_  (Request type: HEAD)

Nmap done: 1 IP address (1 host up) scanned in 0.19 seconds
Examine the headers that were returned above and check to see if these important headers have been included:
-
Strict-Transport-Security- Requires HTTPS for all connections. -
Content-Security-Policy- Controls which origins content like scripts can come from. Protects against cross-site scripting (XSS) and other attacks. -
X-Frame-Options- Controls whether the browser should be able to load the site into aniframeor another container. Can protect against clickjacking attacks.
Your audit should check for all server headers that are required by your security policy or the risk profile of the application. Missing headers should be included in the audit findings.
While you can just browse to the robots.txt file on your server, Nmap also includes a script to view its contents. As mentioned elsewhere, these scripts will allow you to run the same checks against all the servers in an environment with little effort.
Run the Nmap script to view robots.txt with this command.
nmap -p80 10.50.7.20 --script http-robots.txt
Sample Results
student@Ubuntu-99:~$ nmap -p80 10.50.7.20 --script http-robots.txt
Starting Nmap 7.95 ( https://nmap.org ) at 2025-04-16 16:13 UTC
Nmap scan report for Ubuntu-99 (10.50.7.20)
Host is up (0.00014s latency).

PORT   STATE SERVICE
80/tcp open  http
| http-robots.txt: 1 disallowed entry
|_/ftp

Nmap done: 1 IP address (1 host up) scanned in 0.21 seconds
On your own, try to find the /ftp directory on the Juice Shop server and see if there is any sensitive information in there.
Leave your SSH session open for use later in the lab.
Part 4: Analyzing Components Used in Juice Shop
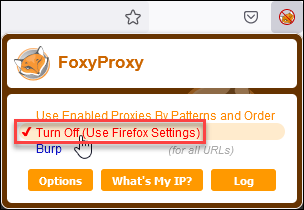
Preparation: Set Firefox on your Windows VM to not use a proxy server for this section of the lab. You'll turn it back on at the end of this section. Click on the FoxyProxy icon in Firefox and select the Turn Off (User Firefox Settings) option.
Background: In this section of the lab, you will use plug-ins in the Firefox browser to inventory programming libraries and web frameworks in use on the Juice Shop site.
Instructions: Browse to the Juice Shop application.

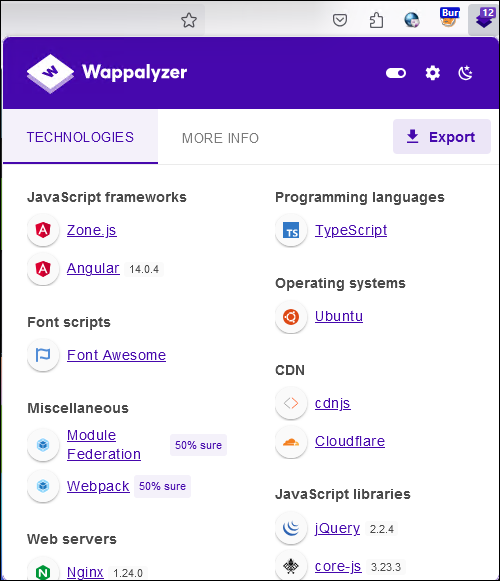
Click on the Wappalyzer icon in the upper right-hand corner of the Firefox window to view the components in use by this application.
If you are prompted to allow anonymous data submission, it is okay to allow it.
For those items that show a version, take a few moments to conduct a web search to see if the versions of these components are current. Can you find any known vulnerabilities in any of them?
-
Angular
-
core-js
-
jQuery
Next, check the Retire.JS plug-in to see if it has identified any problems with components. Click on the Retire.JS icon in the top-right corner of Firefox and examine the report. If there are numbers in square brackets after any of the report items, you can click on them to see the original vulnerability or bug reports.
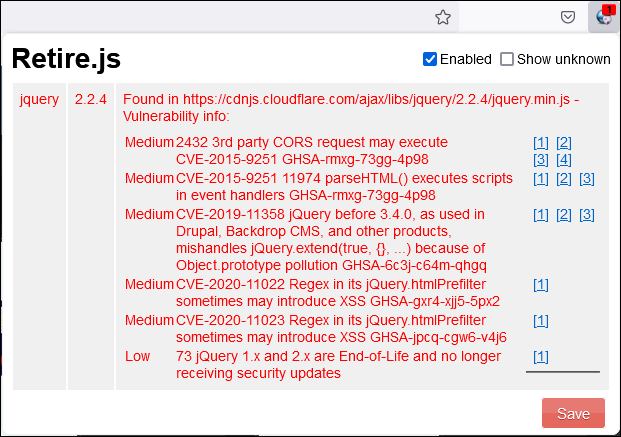
Live Data in Use!
Please note that the number and severity of issues shown may vary from our screenshot as new vulnerabilities are found.
Part 5: Analyze Juice Shop Source Code
Environment Check
Before proceeding, ensure that you are working in Windows Terminal in a SSH session to the Ubuntu VM.
Background: Static analysis of web applications, which involves using scanners to check the source code for common programming flaws, MAY be part of your audit, but it should definitely be part of the organization's secure coding practices. In this section of the lab, you will use a tool called NodeJSScan to check the source code of Juice Shop.
NodeJSScan is a static application security testing (SAST) tool that is made specifically for JavaScript-based apps, like Juice Shop. NodeJSScan can be run locally or in a Docker container and includes a command-line scanner that is ideal for integrating into continuous integration/continuous delivery (CI/CD) pipelines. There is also a NodeJSScan web application that can scan code in GitHub repositories or even extract and scan code in a ZIP file that is dragged into the web interface.
Instructions: Return to your SSH session to the Ubuntu server in Windows Terminal (or open a new session if you don't have one open). There's already a copy of the NodeJSScan container saved in the Docker cache on the Ubuntu server. Launch it in interactive mode using this command:
docker run -it -p 9090:9090 opensecurity/nodejsscan:5x7.22.1
Sample Results
student@ubuntu:$docker run -it -p 9090:9090 opensecurity/nodejsscan:5x7.22.1
The files belonging to this database system will be owned by user "postgres".
This user must also own the server process.

The database cluster will be initialized with locale "en_US.utf8".
The default database encoding has accordingly been set to "UTF8".
The default text search configuration will be set to "english".

Data page checksums are disabled.

fixing permissions on existing directory /var/lib/postgresql/data ... ok
creating subdirectories ... ok
selecting dynamic shared memory implementation ... posix
...
[Results Truncated]
Once you see the message that the web application is listening on port 9090, it is ready to accept source code for scanning.
Sample Results
[Results Truncated]
...
2024-05-01 00:21:11.954 UTC [67] LOG:  database system was shut down at 2024-05-01 00:21:11 UTC
2024-05-01 00:21:11.958 UTC [7] LOG:  database system is ready to accept connections
Database  Recreated!
[2024-05-01 00:21:21 +0000] [80] [INFO] Starting gunicorn 20.1.0
[2024-05-01 00:21:21 +0000] [80] [INFO] Listening at: http://0.0.0.0:9090 (80)
[2024-05-01 00:21:21 +0000] [80] [INFO] Using worker: gthread
[2024-05-01 00:21:21 +0000] [83] [INFO] Booting worker with pid: 83
Open a new tab in Firefox on the Windows VM and browse to the NodeJSScan web interface: http://10.50.7.20:9090
http://10.50.7.20:9090
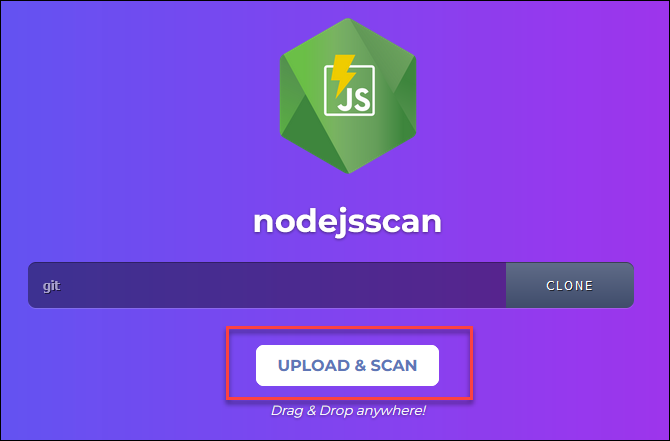
You should be presented with the web UI for the scanner. Click the UPLOAD & SCAN button to upload the Juice Shop source code archive for scanning.
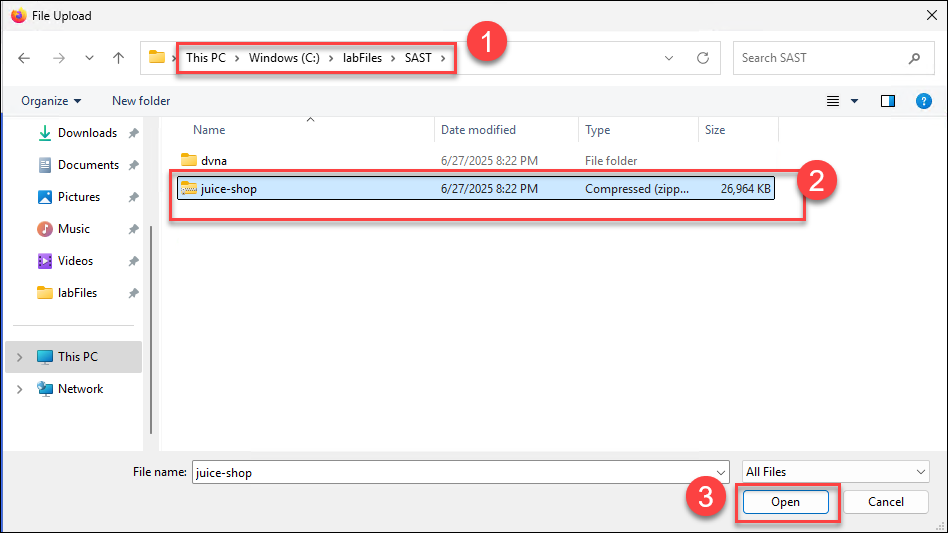
In the File Upload dialog box, browse to C:\LabFiles\SAST, select the juice-shop archive file, and click the Open button.
C:\LabFiles\SAST
The scanner will upload and unzip the source code and then analyze it. Analysis may take a minute or two since there are tens of thousands of lines of source code!

When scanning has finished, you'll see the results presented in the browser. At the top is a dashboard summarizing the issues found in the application.
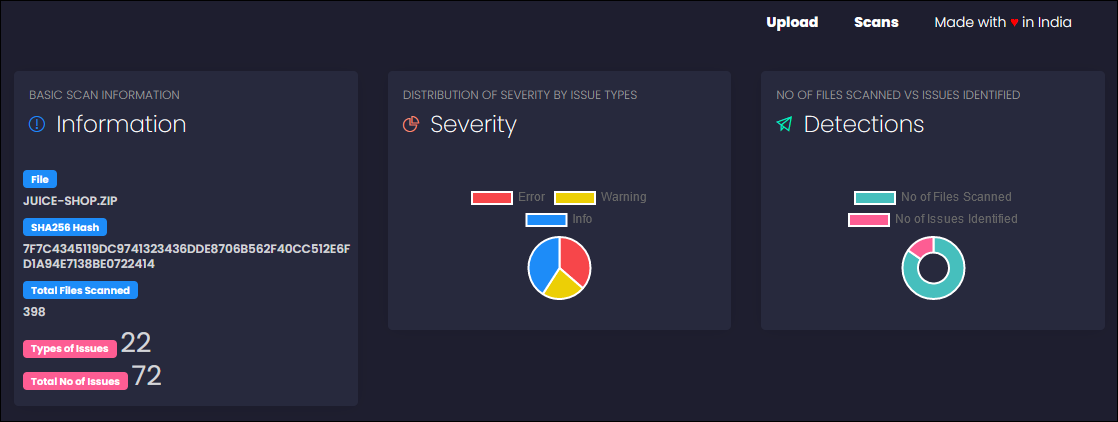
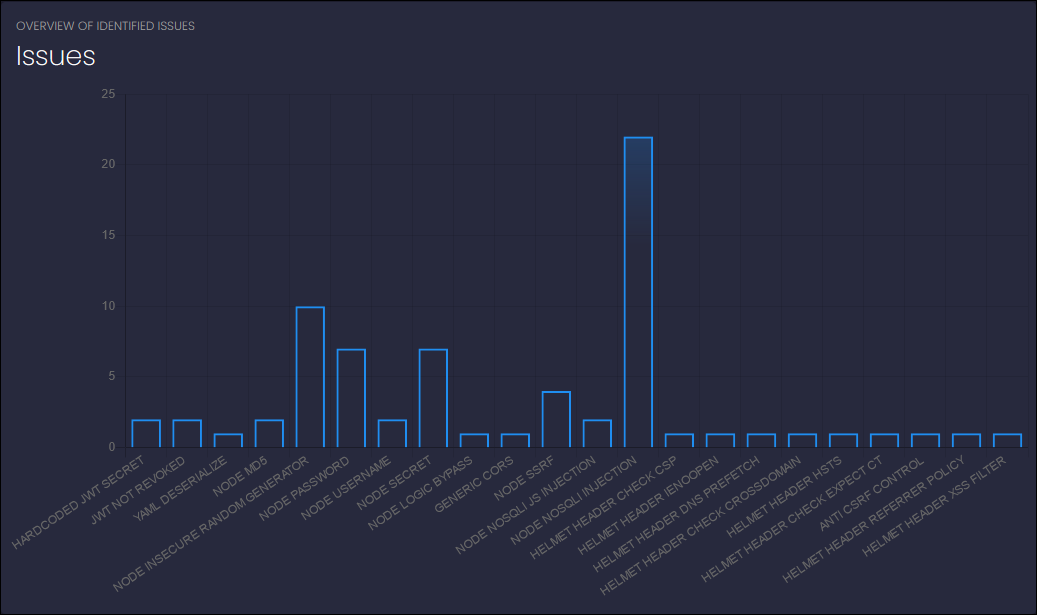
Below that is a graph of the numbers and types of issues found.
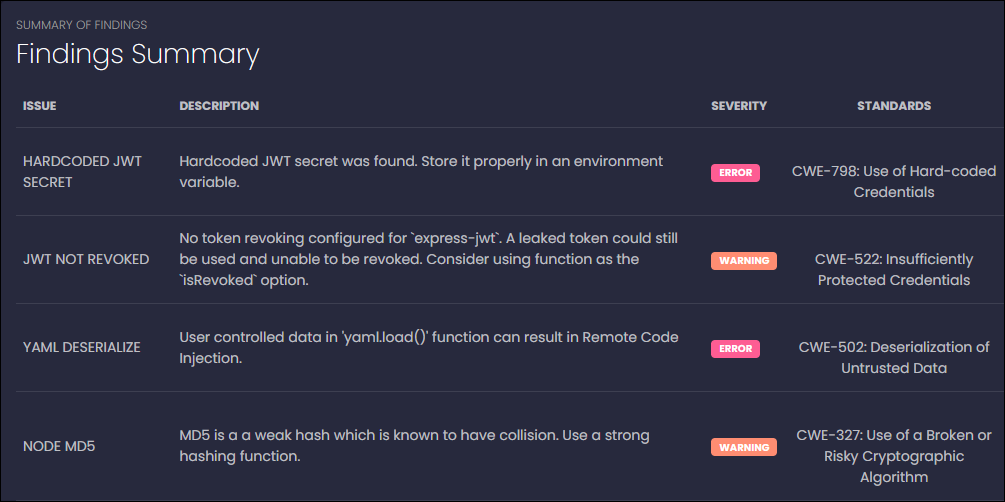
Next comes a summary of the findings.
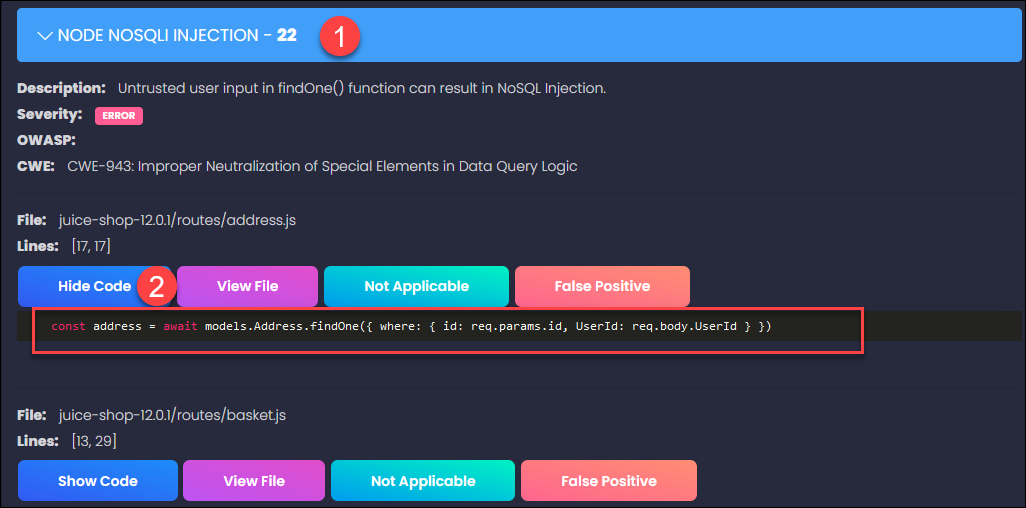
Finally comes a detailed listing of the findings, including a Show Code button for each that will show you the lines that triggered the finding. This can be a very useful tool during status reports or conferences to review the findings with developers and management.
In this screenshot, we scrolled through the results until we found the Node NOSQLI Injection section. When we clicked on that section, it expanded. We clicked the Show Code button for the first finding, and it showed the JavaScript code from which has been marked as possibly vulnerable to NOSQL injection.
The use of user input (req.body.UserId) inside the query in the code is what has led to the vulnerability.
Explore the findings and see if any of them seem that they should be included in your audit report or at least trigger questions for you to ask the developers.
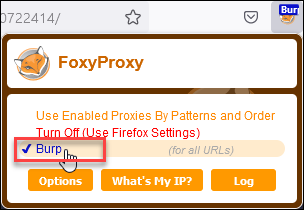
Re-enable the Burp proxy in Firefox after you have finished reviewing the findings. Click on the FoxyProxy icon in Firefox and select the Burp option.
Close the scanner's browser tab when you have switched back to the Burp proxy.
Then, return to your Ubuntu SSH session and use CTRL-C to stop the Docker container. You should return to a Bash shell when the container exits. Close the Ubuntu SSH tab in Windows Terminal after Docker exits.