Lab 3.2: File Integrity, Kernel Settings, and Services
VMs Needed
- Windows
- Ubuntu
- Alma
Lab Video
Linux File Integrity, Kernel Settings, and Services
Objectives
- Demonstrate proper configuration of file integrity assessment tools.
- Audit Linux kernel settings.
- Profile services and listening ports on Linux hosts.
Lab Preparation
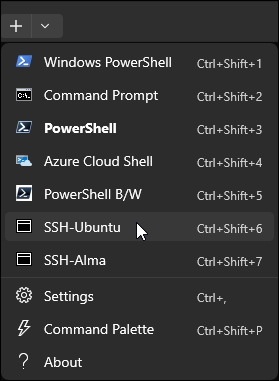
Open an SSH connection to the Ubuntu VM in Windows Terminal. Click the down arrow icon and select SSH-Ubuntu from the drop-down menu.
Part 1: File Integrity Monitoring
Environment Check
Before proceeding, ensure that you are working in Windows Terminal in a SSH session to the Ubuntu VM.

Background: In this section of the lab, you are playing the role of an administrator configuring Tripwire for use on a host. The software has already been installed and partially configured. Your job is to complete the installation and initialize the Tripwire database while the host is in a known-good state.
Instructions: Make sure you are connected to SSH on your Ubuntu VM before proceeding. If you are not, then open a new session in Windows Terminal.
Now you will run a script to simulate the steps that were taken by the administrator to download, install, and configure Tripwire. Run this script to simulate the administrator's activities to date:
cd /home/student/labFiles/tripwire/
sudo bash ./twSetup.sh
Sample Results
student@ubuntu-##:$cd /home/student/labFiles/tripwire/
sudo bash ./twSetup.sh
******************************************************
Admin has downloaded Tripwire and is setting up the site and local keys
******************************************************
Generating key (this may take several minutes)...Key generation complete.
Generating key (this may take several minutes)...Key generation complete.
******************************************************
These are the current contents of the /etc/tripwire directory
******************************************************
total 40
-rw-r--r--   1 root root  7557 Apr 12 19:47 twpol.txt
drwxr-xr-x   2 root root  4096 Apr 12 19:47 .
-rw-r--r--   1 root root   931 Apr 12 19:47 ubuntu-local.key
-rw-r--r--   1 root root   931 Apr 12 19:47 site.key
drwxr-xr-x 123 root root 12288 Apr 12 19:44 ..
-rw-r--r--   1 root root  4159 Nov 16 14:44 tw.pol
******************************************************
Admin is building a new configuration file
******************************************************
...
[Results Truncated]
As the command runs, watch the output for any errors that could indicate that the software is not correctly configured. The errors highlighted in the screen capture below are the result of the Tripwire configuration file pointing to nonexistent files for monitoring. This must be corrected to ensure that the Tripwire database contains valid information.
Sample Results
Generating the database...
*** Processing Unix File System ***
### Warning: File system error.
### Filename: /var/lib/tripwire/ubuntu-##.twd
### No such file or directory
### Continuing...
### Warning: File system error.
### Filename: /etc/rc.boot
### No such file or directory
### Continuing...
### Warning: File system error.
### Filename: /root/.xauth
### No such file or directory
### Continuing...
### Warning: File system error.
### Filename: /root/.tcshrc
### No such file or directory
### Continuing...
Wrote database file: /var/lib/tripwire/ubuntu.twd
The database was successfully generated.
******************************************************
Admin thinks they have finished configuring Tripwire
******************************************************
...
[Results Truncated]
The error related to the file /var/lib/tripwire/ubuntu-##.twd is a result of this being the first run of Tripwire on the host. The .twd file is the Tripwire hash database, which should be created by the first run of the tool. This error will resolve itself once the tool is properly initialized.
The other file system errors are caused by Tripwire trying to check the integrity of files or folders that do not exist. These will cause errors to happen EVERY TIME the tool is run. They are caused by errors in the configuration file, which must be resolved by the administrator.
View the content of the default policy file that was generated during the Tripwire installation.
cat -n /etc/tripwire/twpol.txt
Sample Results
student@ubuntu-##:$cat -n /etc/tripwire/twpol.txt
     1
     2  #
     3  # Standard Debian Tripwire configuration
     4  #
     5  #
     6  # This configuration covers the contents of all 'Essential: yes'
...
[Results Truncated]
The errors are caused by lines 117, 191, and 192, highlighted in the screenshots below.
Sample Results
   116          /etc/init.d             -> $(SEC_BIN) ;
   117          /etc/rc.boot            -> $(SEC_BIN) ;
   118          /etc/rcS.d              -> $(SEC_BIN) ;
   119          /etc/rc0.d              -> $(SEC_BIN) ;
   120          /etc/rc1.d              -> $(SEC_BIN) ;
   121          /etc/rc2.d              -> $(SEC_BIN) ;
...
[Results Truncated]
Sample Results
   190  #       /root/.xsession-errors          -> $(SEC_CONFIG) ;
   191          /root/.xauth                    -> $(SEC_CONFIG) ;
   192          /root/.tcshrc                   -> $(SEC_CONFIG) ;
   193  #       /root/.sawfish                  -> $(SEC_CONFIG) ;
   194  #       /root/.pinerc                   -> $(SEC_CONFIG) ;
   195  #       /root/.mc                       -> $(SEC_CONFIG) ;
...
[Results Truncated]
To properly configure Tripwire for this system, the administrators will need to remove these lines from the policy by "commenting them out" - adding a # character to the beginning of those lines. They have saved a corrected policy file that needs to be copied into the configuration directory and then built into a binary file for use by Tripwire. You can view the corrected file with the following command. Again, pay attention to lines 117, 191, and 192.
cat -n /home/student/labFiles/tripwire/twpol-corrected.txt
Sample Results
student@ubuntu-##:$cat -n /home/student/labFiles/tripwire/twpol-corrected.txt
     1
     2  #
     3  # Standard Debian Tripwire configuration
     4  #
     5  #
     6  # This configuration covers the contents of all 'Essential: yes'
...
[Results Truncated]
Sample Results
   116          /etc/init.d             -> $(SEC_BIN) ;
   117  #       /etc/rc.boot            -> $(SEC_BIN) ;
   118          /etc/rcS.d              -> $(SEC_BIN) ;
   119          /etc/rc0.d              -> $(SEC_BIN) ;
   120          /etc/rc1.d              -> $(SEC_BIN) ;
   121          /etc/rc2.d              -> $(SEC_BIN) ;
...
[Results Truncated]
Sample Results
   190  #       /root/.xsession-errors          -> $(SEC_CONFIG) ;
   191  #       /root/.xauth                    -> $(SEC_CONFIG) ;
   192  #       /root/.tcshrc                   -> $(SEC_CONFIG) ;
   193  #       /root/.sawfish                  -> $(SEC_CONFIG) ;
   194  #       /root/.pinerc                   -> $(SEC_CONFIG) ;
   195  #       /root/.mc                       -> $(SEC_CONFIG) ;
...
[Results Truncated]
You will now perform the steps the administrator should have completed to configure Tripwire properly. Begin by copying the corrected file into the Tripwire configuration directory.
sudo cp /home/student/labFiles/tripwire/twpol-corrected.txt /etc/tripwire/
Next, rebuild the tripwire configuration database using the following command. When prompted for a site key, enter AUD1SiteKey.
sudo twadmin -m P /etc/tripwire/twpol-corrected.txt
AUD1SiteKey
Sample Results
student@ubuntu-##:$sudo twadmin -m P /etc/tripwire/twpol-corrected.txt
Please enter your site passphrase:
Wrote policy file: /etc/tripwire/tw.pol
Now, you can retry the command to initialize Tripwire's database. When prompted for your local key, enter AUD1LocalKey.
sudo tripwire -m i
AUD1LocalKey
Ensure that the command has completed without errors before moving on to the next section. If "No such file or directory" errors persist, work back through the instructions above until the errors are corrected.
Sample Results
student@ubuntu-##:$sudo tripwire -m i
Please enter your local passphrase:
Parsing policy file: /etc/tripwire/tw.pol
Generating the database...
*** Processing Unix File System ***
The object: "/boot/efi" is on a different file system...ignoring.
Wrote database file: /var/lib/tripwire/ubuntu.twd
The database was successfully generated.
Perform a check of the filesystem now before any other changes have been made, so you can see what a "clean" Tripwire report looks like.
sudo tripwire -m c
Examine the output of the command to ensure that there were no integrity violations found on the system. This is what you should see on a clean Tripwire report:
Sample Results
student@ubuntu-##:$sudo tripwire -m c
Parsing policy file: /etc/tripwire/tw.pol
*** Processing Unix File System ***
Performing integrity check...
The object: "/boot/efi" is on a different file system...ignoring.
Wrote report file: /var/lib/tripwire/report/Ubuntu-99-20250702-122058.twr


Open Source Tripwire(R) 2.4.3.7 Integrity Check Report

Report generated by:          root
Report created on:            Wed Jul  2 12:20:58 2025
Database last updated on:     Never
...
[Results Truncated]
Sample Results
===============================================================================
Object Summary:
===============================================================================

-------------------------------------------------------------------------------
# Section: Unix File System
-------------------------------------------------------------------------------

No violations.

===============================================================================
Error Report:
===============================================================================

No Errors

-------------------------------------------------------------------------------
*** End of report ***
...
[Results Truncated]
Now that Tripwire is successfully installed, make some "unauthorized" changes to the filesystem. Imagine that an attacker has installed malware on the system, which has dropped a configuration file in the /etc directory and a new script in root's home directory. It has also added an entry into the /etc/hosts file for communication with the attacker.
Simulate these changes using these commands:
sudo touch /etc/malwareTest.txt
sudo touch /root/malware.txt
sudo bash -c "echo 127.0.0.1 hackerc2.evil.com >> /etc/hosts"
Now that you've made the changes to the system, it's time to rerun Tripwire to see if it identified that files on the host have changed. Run this command and analyze the report to see if Tripwire noticed that you've made changes to the system:
sudo tripwire -m c
Sample Results
student@ubuntu-##:$sudo tripwire -m c
Parsing policy file: /etc/tripwire/tw.pol
*** Processing Unix File System ***
Performing integrity check...
Wrote report file: /var/lib/tripwire/report/ubuntu-20250412-200430.twr


Open Source Tripwire(R) 2.4.3.7 Integrity Check Report

Report generated by:          root
Report created on:            Fri 12 Apr 2025 08:04:30 PM UTC
Database last updated on:     Never
...
[Results Truncated]
Sample Results
-------------------------------------------------------------------------------
# Section: Unix File System
-------------------------------------------------------------------------------

-------------------------------------------------------------------------------
Rule Name: Other configuration files (/etc)
Severity Level: 66
-------------------------------------------------------------------------------

Added:
"/etc/malwareTest.txt"

Modified:
"/etc"
"/etc/hosts"

-------------------------------------------------------------------------------
Rule Name: Root config files (/root)
Severity Level: 100
-------------------------------------------------------------------------------

Added:
"/root/malware.txt"

Modified:
"/root"

===============================================================================
...
[Results Truncated]
Remember that any number other than zero for the number of violations found indicates that the machine is no longer in its baselined, known-good state.
Part 2: Linux Kernel Settings
Background: Many compliance benchmarks require that you check kernel settings to ensure that security controls are properly configured. Since the kernel is the core of the operating system, most security decisions are controlled by it. The sysctl command allows you to query the settings currently in use on the system. Your enterprise should have standards for the kernel settings enforced on its systems. In this section of the lab, you will manually test a few kernel settings.
Environment Check
Before proceeding, ensure that you are working in Windows Terminal in a SSH session to the Ubuntu VM.
First, you will test the kernel setting for "TCP Syn cookies," which are used to prevent certain denial-of-service (DoS) attacks against the TCP stack. You would expect a value of 1, which enables the DoS protection.
sysctl net.ipv4.tcp_syncookies
Sample Results
student@ubuntu-##:$sysctl net.ipv4.tcp_syncookies
net.ipv4.tcp_syncookies = 1
One of the buffer overflow protections in the Linux kernel is address space layout randomization (ASLR), which randomly arranges the address space of key data areas of a process. The settings for ASLR allow three possible values:
- 0 - disables ASLR
- 1 - performs conservative randomization
- 2 - performs full randomization
Use sysctl to check the ASLR setting to see if it is appropriate:
sysctl kernel.randomize_va_space
Sample Results
student@ubuntu-##:$sysctl kernel.randomize_va_space
kernel.randomize_va_space = 2
Another example of an important kernel setting is IP forwarding, which controls whether the host can function as a router. This should only be enabled on hosts that are acting as a router or firewall. Check this setting on your Ubuntu VM. A Setting of 0 would be appropriate on most servers and workstations.
sysctl net.ipv4.ip_forward
Sample Results
student@ubuntu-##:$sysctl net.ipv4.ip_forward
net.ipv4.ip_forward = 1
Final note on kernel settings: Remember that kernel settings can also be queried (and set) using the /sys or /proc/sys pseudo-filesystems. So, the last audit check could also be formed by using the following command. Note the correlation between the dot-separated fields in the sysctl command and the virtual directories in the sys filesystem.
cat /proc/sys/net/ipv4/ip_forward
Sample Results
student@ubuntu-##:$cat /proc/sys/net/ipv4/ip_forward
1
Part 3: Profiling Network Services
Background: We mentioned in class that it's always a good idea to check for open network ports both from the local host and from the network using Nmap. In this section, you will run both tools against the Ubuntu Server and compare the results.
Environment Check
Before proceeding, ensure that you are working in Windows Terminal in a SSH session to the Ubuntu VM.
Instructions: On the Ubuntu Server, get a list of all the listening TCP ports. Take a moment to study the awk command. The regular expression finds lines that start with 'tcp' and end with the word 'LISTEN' followed by zero or more spaces. Field number 4, which is being printed, has the IP:PORT definition for the listening socket.
sudo netstat -ant | awk '/^tcp.*LISTEN[ ]*$/ {print $4}'
Sample Results
student@ubuntu-##:$sudo netstat -ant | awk '/^tcp.*LISTEN[ ]*$/ {print $4}'
127.0.0.1:10256
127.0.0.1:10249
127.0.0.1:10248
10.50.7.23:80
127.0.0.1:6379
127.0.0.1:19001
10.50.7.24:80
10.50.7.20:443
0.0.0.0:507
127.0.0.1:40127
10.50.7.22:80
...
[Results Truncated]
Live Data in Use!
Remember that your data may differ from these results!
To make it easier to review and compare the results, you might want to sort the results numerically:
sudo netstat -ant | awk '/^tcp.*LISTEN[ ]*$/ {print $4}' | sort -n
Sample Results
student@ubuntu-##:$sudo netstat -ant | awk '/^tcp.*LISTEN[ ]*$/ {print $4}' | sort -n
0.0.0.0:25
0.0.0.0:3306
::1:6379
:::10250
:::10257
:::10259
:::16443
:::22
:::25
:::25000
:::8443
10.50.7.20:443
...
[Results Truncated]
Live Data in Use!
Remember that your data may differ from these results!
Some of the ports listed by netstat are listening only on the "loopback" addresses of 127.0.0.1 (ipv4) or ::1 (ipv6). These will not show up in remote scans. Port 6379 used by the Redis cache service is an example of such a service. We've marked it in the screenshot above.
Change to your Alma SSH session if it is still running (or open a new SSH-Alma tab in Windows Terminal if you need to) and run the following command to see the TCP ports that are available from the local network. See if you remember what the -sT and -p -65535 parameters are used for. nmap -h can be used to get Nmap's help file.
sudo nmap -sT -p 1-65535 10.50.7.20-29
Compare the list returned by Nmap to the list returned locally by netstat. Do you notice any differences?
If so, what might explain these differences? As noted above, ports that were listening only on the "loopback" interface will not show up on remote scans.
Sample Results
student@ubuntu-##:$ sudo nmap -sT -p 1-65535 10.50.7.20-29
Starting Nmap 7.95 ( https://nmap.org ) at 2025-07-02 12:29 UTC
Nmap scan report for Ubuntu-99 (10.50.7.20)
Host is up (0.00024s latency).
Not shown: 65519 closed tcp ports (conn-refused)
PORT      STATE SERVICE
22/tcp    open  ssh
25/tcp    open  smtp
80/tcp    open  http
443/tcp   open  https
507/tcp   open  crs
3306/tcp  open  mysql
8443/tcp  open  https-alt
...
[Results Truncated]
Part 4: Profiling Startup Services
Background: Auditing that a server is properly configured will often include checking to see that only authorized and expected services are running on the system. On modern Linux systems that boot using systemd, the systemctl tool is useful for comparing the list of enabled services to the list of services currently running. The procedures you're about to perform would be best done with the administrator of the system running the commands and helping you to understand the output.
Environment Check
Before proceeding, ensure that you are working in Windows Terminal in a SSH session to the Ubuntu VM.
Instructions: Return to your SSH session with the Ubuntu system and run this command to get a list of all the installed systemd services on the server:
systemctl list-unit-files --no-pager
Sample Results
student@ubuntu-##:$ systemctl list-unit-files --no-pager
UNIT FILE                                          STATE           PRESET
proc-sys-fs-binfmt_misc.automount                  static          -
-.mount                                            generated       -
boot-efi.mount                                     generated       -
boot.mount                                         generated       -
dev-hugepages.mount                                static          -
dev-mqueue.mount                                   static          -
proc-sys-fs-binfmt_misc.mount                      disabled        disabled
snap-core20-2496.mount                             enabled         enabled
snap-core20-2599.mount                             enabled         enabled
snap-microk8s-7964.mount                           enabled         enabled
snap-microk8s-8148.mount                           enabled         enabled
snap-snapd-23771.mount                             enabled         enabled
snap-snapd-24718.mount                             enabled         enabled
...
[Results Truncated]
Live Data in Use!
Remember that your data may differ from these results!
The command you ran lists all services, whether they are configured to run at startup or not. To see only the services configured to run at startup, use grep to show only the lines that contain the word "enabled."
systemctl list-unit-files | grep enabled
Sample Results
student@ubuntu-##:$systemctl list-unit-files | grep enabled
snap-core20-2496.mount                       enabled         enabled
snap-core20-2599.mount                       enabled         enabled
snap-microk8s-7964.mount                     enabled         enabled
snap-microk8s-8148.mount                     enabled         enabled
snap-snapd-23771.mount                       enabled         enabled
snap-snapd-24718.mount                       enabled         enabled
apport-autoreport.path                       enabled         enabled
postfix-resolvconf.path                      disabled        enabled
tpm-udev.path                                enabled         enabled
apparmor.service                             enabled         enabled
apport.service                               enabled         enabled
...
[Results Truncated]
Live Data in Use!
Remember that your data may differ from these results!
To gather a list of services that are currently running on the system, use this command:
systemctl list-units --type=service --state=running --no-pager
Sample Results
student@ubuntu-##:$systemctl list-units --type=service --state=running  --no-pager
UNIT                                          LOAD   ACTIVE SUB     DESCRIPTION
auditd.service                                loaded active running Security Auditing Service
chrony.service                                loaded active running chrony, an NTP client/server
containerd.service                            loaded active running containerd container runtime
cron.service                                  loaded active running Regular background program processing daemon
dbus.service                                  loaded active running D-Bus System Message Bus
docker.service                                loaded active running Docker Application Container Engine
dockerNginx.service                           loaded active running nginx demo Docker Container
fleet.service                                 loaded active running Fleet DM
...
[Results Truncated]
Live Data in Use!
Remember that your data may differ from these results!
During an audit, you should go over this list with the system administrator to see if any unauthorized services are running and if any necessary services are missing.
Part 5: Osquery for Services and Ports
Background: If the osquery tool is available during your audit (especially if it is paired with Fleet DM!), you may choose to use it for enterprise-wide audit evidence gathering. In this section of the lab, you will use osquery to gather information about listening ports and services on the Ubuntu host.
Environment Check
Before proceeding, ensure that you are working in Windows Terminal in a SSH session to the Ubuntu VM.
Instructions: Osquery includes a cross-platform table called listening_ports, which has information similar to what you retrieved with netstat earlier. Use this query to get information on all listening TCP (which is IP protocol number 6) ports on the Ubuntu host:
osqueryi "select address,port from listening_ports where protocol=6 order by address,port;"
Sample Results
student@ubuntu-##:$ osqueryi "select address,port from listening_ports where protocol=6 order by address,port;"
+------------+-------+
| address    | port  |
+------------+-------+
| 0.0.0.0    | 25    |
| 0.0.0.0    | 25    |
| 0.0.0.0    | 507   |
| 0.0.0.0    | 507   |
| 0.0.0.0    | 3306  |
| 0.0.0.0    | 3306  |
| 10.50.7.20 | 80    |
| 10.50.7.20 | 80    |
| 10.50.7.20 | 443   |
| 10.50.7.20 | 443   |
| 10.50.7.22 | 80    |
| 10.50.7.22 | 80    |
| 10.50.7.23 | 80    |
| 10.50.7.23 | 80    |
| 10.50.7.24 | 80    |
| 10.50.7.24 | 80    |
...
[Results Truncated]
The osquery table can return the process id (pid) of the executable that is listening on each port. Attempt to view the pids with this query:
osqueryi "select pid,address,port from listening_ports where protocol=6 order by address,port;"
Sample Results
student@ubuntu-##:$ osqueryi "select pid,address,port from listening_ports where protocol=6 order by address,port;"
+-----+------------+-------+
| pid | address    | port  |
+-----+------------+-------+
| -1  | 0.0.0.0    | 25    |
| -1  | 0.0.0.0    | 25    |
| -1  | 0.0.0.0    | 507   |
| -1  | 0.0.0.0    | 507   |
| -1  | 0.0.0.0    | 3306  |
| -1  | 0.0.0.0    | 3306  |
| -1  | 10.50.7.20 | 80    |
| -1  | 10.50.7.20 | 80    |
| -1  | 10.50.7.20 | 443   |
...
[Results Truncated]
In the screenshot above, notice that many of the pids are listed as -1. This impossible pid means that your user is not privileged enough to see the full process information. Rerun the command with root privileges, and you will get more useful results. When you run these queries using Fleet DM in a real environment, the local osquery daemon on each host will have the permissions required to return good data!
sudo osqueryi "select pid,address,port from listening_ports where protocol=6 order by address,port;"
Sample Results
student@ubuntu-##:~/labFiles/tripwire$ sudo osqueryi "select pid,address,port from listening_ports where protocol=6 order by address,port;"
+---------+------------+-------+
| pid     | address    | port  |
+---------+------------+-------+
| 1698    | 0.0.0.0    | 25    |
| 4733    | 0.0.0.0    | 80    |
| 2657356 | 0.0.0.0    | 507   |
| 1882    | 0.0.0.0    | 3306  |
| 21093   | 0.0.0.0    | 3306  |
| 21479   | 0.0.0.0    | 3306  |
| 2657356 | 10.50.7.20 | 80    |
...
[Results Truncated]
Live Data in Use!
Your command output will vary from the screenshot since PIDs are assigned at runtime.
Service information is easy to query, also. Use this query to determine all the services that run at startup on Ubuntu:
osqueryi "Select name,source,status,path from startup_items;"
Sample Results
student@ubuntu-##:$ osqueryi "Select name,source,status,path from startup_items;"
+-------------------+--------------+---------+-------------------------------+
| name              | source       | status  | path                          |
+-------------------+--------------+---------+-------------------------------+
| apparmor          | /etc/init.d/ | enabled | /etc/init.d/apparmor          |
| apport            | /etc/init.d/ | enabled | /etc/init.d/apport            |
| auditd            | /etc/init.d/ | enabled | /etc/init.d/auditd            |
| chrony            | /etc/init.d/ | enabled | /etc/init.d/chrony            |
| console-setup.sh  | /etc/init.d/ | enabled | /etc/init.d/console-setup.sh  |
| cron              | /etc/init.d/ | enabled | /etc/init.d/cron              |
| cryptdisks        | /etc/init.d/ | enabled | /etc/init.d/cryptdisks        |
| cryptdisks-early  | /etc/init.d/ | enabled | /etc/init.d/cryptdisks-early  |
| dbus              | /etc/init.d/ | enabled | /etc/init.d/dbus              |
| docker            | /etc/init.d/ | enabled | /etc/init.d/docker            |
| grub-common       | /etc/init.d/ | enabled | /etc/init.d/grub-common       |
| iscsid            | /etc/init.d/ | enabled | /etc/init.d/iscsid            |
| keyboard-setup.sh | /etc/init.d/ | enabled | /etc/init.d/keyboard-setup.sh |
| kmod              | /etc/init.d/ | enabled | /etc/init.d/kmod              |
| mysql             | /etc/init.d/ | enabled | /etc/init.d/mysql             |
| nginx             | /etc/init.d/ | enabled | /etc/init.d/nginx             |
| open-iscsi        | /etc/init.d/ | enabled | /etc/init.d/open-iscsi        |
| open-vm-tools     | /etc/init.d/ | enabled | /etc/init.d/open-vm-tools     |
| osqueryd          | /etc/init.d/ | enabled | /etc/init.d/osqueryd          |
| plymouth          | /etc/init.d/ | enabled | /etc/init.d/plymouth          |
+-------------------+--------------+---------+-------------------------------+
...
[Results Truncated]
Feel free to explore other tables. The full osquery schema is available at https://www.osquery.io/schema/.
https://www.osquery.io/schema/
Leave your SSH connection to Ubuntu open for later labs.