Lab 4.1: Docker and Kubernetes
VMs Needed
- Windows
- Ubuntu
Lab Video
Objectives
- Perform a manual audit of a Docker engine installation
- Perform an automated audit of Docker
- Perform a manual audit of Kubernetes
- Automate a Kubernetes audit with Kube-Bench
- Practice using audit/compliance tools installed as Docker containers
Lab Preparation
Boot the VMs required for the lab (see the "VMs Needed" section above) and log on to the Windows VM using the username student and the password student.
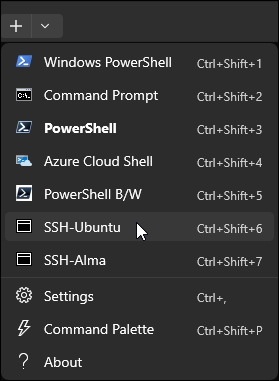
Open an SSH connection to the Ubuntu VM in Windows Terminal. Click the down arrow icon and select SSH-Ubuntu from the drop-down menu.
Part 1: Docker Manual Testing
Environment Check
Before proceeding, ensure that you are working in Windows Terminal in a SSH session to the Ubuntu VM.

Background: It's VERY rare to see applications running in Docker in production environments, but we frequently do find Docker being used to host applications as they are being developed. Since the security of the development pipeline is important to the security of the production environment, it's important to audit the development AND production container environments.
The Center for Internet Security (CIS) benchmark document for Docker contains a number of audit tests which can be performed against a host running Docker to see if it is configured in accordance with the Level 1 or 2 benchmarks. In this section of the lab, you will run manual commands against the Ubuntu VM to see if it is configured correctly according to Level 1 of the CIS Docker Benchmark.
Instructions: Answer the questions below by running manual tests from the CIS benchmark for Docker. We provide the commands just below the questions.
1. Is the docker root directory correctly configured as a mountpoint?
Benchmark section 1.2.1 recommends that the Docker root directory (usually /var/lib/docker) should be mounted to its own partition, to avoid adverse effects if a filesystem fills up. Check the Docker root directory using this command:
docker info -f '{{ .DockerRootDir }}'
Then, test to see if that directory is a mountpoint (has a disk partition or filesystem dedicated to it) using this command:
mountpoint /var/lib/docker
Sample Results
student@ubuntu:$docker info -f '{{ .DockerRootDir }}'
/var/lib/docker
student@ubuntu:$mountpoint /var/lib/docker
/var/lib/docker is not a mountpoint
Discussion of Results
1. Is the docker root directory correctly configured as a mountpoint? No. The directory is not a mountpoint, so the host may be adversely affected if the filesystem containing /var/lib/docker were to fill up.
2. Is the default bridge correctly configured to disallow inter-container traffic?
Benchmark section 2.1 recommends that the default bridge used by Docker should be configured to disallow traffic between containers if it is not explicitly needed. Check this setting by running the following command, which enumerates the Docker networks and then dumps the settings for each:
docker network ls --quiet | xargs docker network inspect --format '{{ .Name}}: {{ .Options }}'
Sample Results
student@ubuntu:$docker network ls --quiet | xargs docker network inspect --format '{{ .Name}}: {{ .Options }}'
bridge: map[com.docker.network.bridge.default_bridge:true com.docker.network.bridge.enable_icc:true com.docker.network.bridge.enable_ip_masquerade:true com.docker.network.bridge.host_binding_ipv4:0.0.0.0 com.docker.network.bridge.name:docker0 com.docker.network.driver.mtu:1500]
host: map[]
none: map[]
Discussion of Results
2. Is the default bridge correctly configured to disallow inter-container traffic? No, because enable_icc is set to true instead of the required false.
3. Is this host using a storage driver other than aufs?
Section 2.5 recommends that "aufs" should not be used as the storage driver for Docker. Verify the storage driver in use with this command, and ensure that some other driver is in use:
docker info --format 'Storage Driver: {{ .Driver }}'
Sample Results
student@ubuntu:$docker info --format 'Storage Driver: {{ .Driver }}'
Storage Driver: overlay2
Discussion of Results
3. Is this host using a storage driver other than aufs? Yes. This host is using overlay2, which is an acceptable modern driver.
4. Is the host correctly configured to limit resources used by Docker containers?
Section 2.7 recommends that the Docker daemon should be run with a default ulimit which will protect the host against resource exhaustion. While no specific values are recommended, the auditor should check to see that the organization has configured reasonable resource limits to protect the host against availability issues. We'll try a few tests to see if the settings are correct. First, check the command-line options on the running docker daemon using the following command and checking the results for the "--default-ulimit" argument:
ps -ef | grep dockerd
Sample Results
student@ubuntu:$ps -ef | grep dockerd
root        1474       1  0 Apr12 ?        00:01:09 /usr/bin/dockerd -H fd:// --containerd=/run/containerd/containerd.sock
student  2879012   17471  0 00:17 pts/0    00:00:00 grep --color=auto dockerd
While there are a couple of command-line options shown by the ps command, none of them are for the default ulimit. Next, check to see the if setting might exist in the /etc/docker/daemon.json file:
grep "ulimit" /etc/docker/daemon.json
Sample Results
student@ubuntu:$grep "ulimit" /etc/docker/daemon.json
grep: /etc/docker/daemon.json: No such file or directory
Interestingly, this file does not exist. Maybe it is in another location on the host. You could ask the administrators to search for the daemon.json file in the entire filesystem using this command:
sudo find / -name "daemon.json" -type f
Sample Results
student@ubuntu:$sudo find / -name "daemon.json" -type f
student@ubuntu:$
Discussion of Results
4. Is the host correctly configured to limit resources used by Docker containers? No. There are no settings for the default ulimit for containers
5. Does the lack of a daemon.json file cause for concern about the risk level of this Docker host? Why or why not?
Discussion of Results
5. Does the lack of a daemon.json file cause for concern about the risk level of this Docker host? Why or why not? It is a cause for concern. The administrators have not actively configured many of the setting required for a secure host. This host is only as secure as the default settings for its Docker daemon and environment.
Continue checking other settings from the Docker Benchmark manually as you have time. In the next section you will use a tool to automate many of these checks and produce a text report for the host.
Part 2: Docker-Bench-Security
Preparation: Since some of the checks will require root access to the docker environment, obtain a root shell on the Ubuntu system using this command:
sudo su -
Environment Check
Before proceeding, ensure that you are working in Windows Terminal in a root SSH session to the Ubuntu VM.

Background Docker has produced a tool to check a docker installation against the CIS benchmark and deliver a report on the host's compliance. In this section of the lab, you will run this tool against the Ubuntu VM and analyze the results.
Instructions Test the Docker daemon on the host by running the following commands.
First, change to the directory where the tool is installed:
cd /home/student/labFiles/docker-bench-security
This tool was downloaded directly from its Github repository, so begin by marking the main script as executable:
chmod +x /home/student/labFiles/docker-bench-security/docker-bench-security.sh
You can get help for the audit script by typing:
./docker-bench-security.sh -h
Docker Bench Security Help Output
Docker Bench for Security - Docker, Inc. (c) 2015-2023
Checks for dozens of common best-practices around deploying Docker containers in production.
Based on the CIS Docker Benchmark 1.6.0.

Usage: docker-bench-security.sh [OPTIONS]

Example:
  - Only run check "2.2 - Ensure the logging level is set to 'info'":
      sh docker-bench-security.sh -c check_2_2
  - Run all available checks except the host_configuration group and "2.8 - Enable user namespace support":
      sh docker-bench-security.sh -e host_configuration,check_2_8
  - Run just the container_images checks except "4.5 - Ensure Content trust for Docker is Enabled":
      sh docker-bench-security.sh -c container_images -e check_4_5

Options:
  -b           optional  Do not print colors
  -h           optional  Print this help message
  -l FILE      optional  Log output in FILE, inside container if run using docker
  -u USERS     optional  Comma delimited list of trusted docker user(s)
  -c CHECK     optional  Comma delimited list of specific check(s) id
  -e CHECK     optional  Comma delimited list of specific check(s) id to exclude
  -i INCLUDE   optional  Comma delimited list of patterns within a container or image name to check
  -x EXCLUDE   optional  Comma delimited list of patterns within a container or image name to exclude from check
  -t LABEL     optional  Comma delimited list of labels within a container or image to check
  -n LIMIT     optional  In JSON output, when reporting lists of items (containers, images, etc.), limit the number of reported items to LIMIT. Default 0 (no limit).
  -p PRINT     optional  Print remediation measures. Default: Don't print remediation measures.

Complete list of checks: <https://github.com/docker/docker-bench-security/blob/master/tests/>
Full documentation: <https://github.com/docker/docker-bench-security>
Released under the Apache-2.0 License.
After you have examined the available options, run the script with the command-line options for no color output and to save the results to a file:
./docker-bench-security.sh -b -l results.txt
Sample Results
root@ubuntu:$./docker-bench-security.sh -b -l results.txt
# --------------------------------------------------------------------------------------------
# Docker Bench for Security v1.6.0
#
# Docker, Inc. (c) 2015-2024
#
# Checks for dozens of common best-practices around deploying Docker containers in production.
# Based on the CIS Docker Benchmark 1.6.0.
# --------------------------------------------------------------------------------------------

Initializing 2024-04-24T00:24:14+00:00


Section A - Check results

[INFO] 1 - Host Configuration
[INFO] 1.1 - Linux Hosts Specific Configuration
[WARN] 1.1.1 - Ensure a separate partition for containers has been created (Automated)
[INFO] 1.1.2 - Ensure only trusted users are allowed to control Docker daemon (Automated)
...
[Results Truncated]
Review the results provided by the script. When I took the screenshot, the Ubuntu host scored a total of 16 points on over 100 checks! This is not a good result. Most of the tests are worth one positive point for passing, and one negative point for failing. The Ubuntu host passed more than 16 tests, but it failed so many that the score is really quite low.
Compare the results with the manual testing you did above and see if the tool reached similar conclusions to yours.
You can get some summarized results using the grep command. To view only the tests which scored a "PASS," try this grep regular expression to find lines in the report which start with [PASS]:
grep "^\[PASS\]" results.txt
Sample Results
root@ubuntu:$grep "^\[PASS\]" results.txt
[PASS] 1.2.2 - Ensure that the version of Docker is up to date (Manual)
[PASS] 2.3 - Ensure the logging level is set to 'info' (Scored)
[PASS] 2.4 - Ensure Docker is allowed to make changes to iptables (Scored)
[PASS] 2.5 - Ensure insecure registries are not used (Scored)
[PASS] 2.6 - Ensure aufs storage driver is not used (Scored)
[PASS] 2.10 - Ensure the default cgroup usage has been confirmed (Scored)
[PASS] 2.11 - Ensure base device size is not changed until needed (Scored)
...
[Results Truncated]
You can do something similar for [INFO] and [WARN] results:
grep "^\[WARN\]" results.txt
grep "^\[INFO\]" results.txt
When you have finished examining your test results, exit the root shell with the command:
exit
You may leave the SSH connection to the Ubuntu VM open for use in later labs.
Part 3: Kubernetes Manual Testing
Environment Check
Before proceeding, ensure that you are working in Windows Terminal in a SSH session to the Ubuntu VM.
Background: Kubernetes is used by many organizations to orchestrate the application containers they use. The CIS benchmark for Kubernetes provides a work program for auditing Kubernetes controls. In this section of the lab, you will run manual tests against the single-mode Kubernetes cluster being hosted on your Ubuntu VM. Your Ubuntu VM uses a Kubernetes distribution called "microk8s," which is optimized for use on a single host, which is ideal for our lab. You'll begin by configuring the kubectl program to work with microk8s.
Instructions: Ensure you have a configuration directory for the kubectl program, which you will use to query your Kubernetes installation.
mkdir -p /home/student/.kube
Change to that directory and copy the configuration from microk8s to a local configuration file.
microk8s config > /home/student/.kube/config
Test that kubectl is working by querying for the versions of your kubectl client and the local server. You should see output describing the client and server versions, and the version of the `kustomize`` configuration management tool.
kubectl version
Sample Results
student@ubuntu:$mkdir -p /home/student/.kube
student@ubuntu:$microk8s config > /home/student/.kube/config
student@ubuntu:$kubectl version
Client Version: v1.32.3
Kustomize Version: v5.5.0
Server Version: v1.32.3
Live Data in Use!
Remember that your data may differ from these results!
Remember from the lecture that namespaces are used to isolate unrelated Kubernetes pods and services. We would expect to see that the administrators have created namespaces for the web applications running on this cluster. Check which namespaces have been created. The default and kube-* are created by Kubernetes by default.
kubectl get namespaces
Sample Results
student@ubuntu:$kubectl get namespaces
NAME              STATUS   AGE
kube-system       Active   159d
kube-public       Active   159d
kube-node-lease   Active   159d
default           Active   159d
Live Data in Use!
Remember that your data may differ from these results!
The CIS benchmark calls for the default namespace not to be used for hosting applications. Use this command to list which pods are running in the default namespace. On an audit, you would expect to see ZERO pods in this namespace.
kubectl get pods --namespace default
Sample Results
student@ubuntu:$kubectl get pods --namespace default
NAME                         READY   STATUS    RESTARTS       AGE
dvwa-5f97999586-fx8m2        1/1     Running   10 (11d ago)   139d
juice-shop-6b47b4c96-gtpb7   1/1     Running   10 (11d ago)   139d
wackopicko-7d95cbf7c-x25f7   1/1     Running   10 (11d ago)   139d
bwapp-5568b846f5-s2btd       1/1     Running   10 (11d ago)   139d
Live Data in Use!
Remember that your data may differ from these results!
The benchmark also calls for no services (IP:port combination for publishing an application to the network) to be running in the default namespace. Again, any services in the default namespace would be a potential audit finding because of the lack of isolation. Check the services in the default namespace with this command:
kubectl get services --namespace default
Sample Results
student@ubuntu:$kubectl get services --namespace default
NAME         TYPE        CLUSTER-IP       EXTERNAL-IP   PORT(S)          AGE
kubernetes   ClusterIP   10.152.183.1     <none>        443/TCP          159d
juice-shop   NodePort    10.152.183.132   <none>        8000:30020/TCP   139d
dvwa         NodePort    10.152.183.25    <none>        8000:30024/TCP   139d
bwapp        NodePort    10.152.183.167   <none>        8000:30022/TCP   139d
wackopicko   NodePort    10.152.183.222   <none>        8000:30023/TCP   139d
Live Data in Use!
Remember that your data may differ from these results!
Kubernetes namespaces can have their own network policies. If a policy exists in a namespace, it will have an implicit default-deny rule at the bottom of the ruleset. If no policy exists, then the default is to allow all network traffic in the namespace. Check the network policies for all namespaces. On an audit, any in-use namespace with no network policy would be a potential finding.
kubectl get networkpolicy --all-namespaces
Sample Results
student@ubuntu:$kubectl get networkpolicy --all-namespaces
No resources found
There are dozens of other controls in the benchmark that you could test. Run all the kubectl commands you would like, and then continue with the lab.
Part 4: Kubernetes Benchmark with Kube-Bench
Environment Check
Before proceeding, ensure that you are working in Windows Terminal in a SSH session to the Ubuntu VM.
Background: Aqua Security has published a Go application to test a Kubernetes cluster against the CIS benchmark. It attempts to identify your Kubernetes version and apply the tests for the matching version of the benchmark. They've built a Docker container that you will use in this section of the lab to test the Kubernetes cluster on the Ubuntu virtual machine.
Instructions: Begin by obtaining the latest version of the container from Docker Hub. You'll see the download and setup of the container as it happens.
docker pull docker.io/aquasec/kube-bench:latest
Sample Results
student@ubuntu:$docker pull docker.io/aquasec/kube-bench:latest
latest: Pulling from aquasec/kube-bench
4abcf2066143: Pull complete
cf0c69a3ae14: Pull complete
a74348d98003: Pull complete
18e2c3a7ddee: Pull complete
dc54b3c7f5f3: Pull complete
96ca5f756c0b: Pull complete
7e12f8575971: Pull complete
77513c6be782: Pull complete
b589dafae9cc: Pull complete
ad70a6c81dc6: Pull complete
95838c2bc38b: Pull complete
Digest: sha256:60734c8bbb4658c46fd28509e575f86c643b8e60529ba6ca82594f2f476b6046
Status: Downloaded newer image for aquasec/kube-bench:latest
docker.io/aquasec/kube-bench:latest
The application container needs to access the Kubernetes setup files and executables from the host Ubuntu system, so whenever you run it, you will mount volumes into the container using the -v flag. Begin by running the testing application with the --help option. The -t flag in the command allows the application to output to a local TTY or terminal.
docker run --pid=host \
-v /etc:/etc:ro \
-v /var:/var:ro \
-t docker.io/aquasec/kube-bench:latest \
--help
Kube-Bench Help Output
This tool runs the CIS Kubernetes Benchmark (https://www.cisecurity.org/benchmark/kubernetes/)

Usage:
kube-bench [flags]
kube-bench [command]

Available Commands:
completion  Generate the autocompletion script for the specified shell
help        Help about any command
run         Run tests
version     Shows the version of kube-bench.

Flags:
    --alsologtostderr                  log to standard error as well as files
    --asff                             Send the results to AWS Security Hub
    --benchmark string                 Manually specify CIS benchmark version. It would be an error to specify both --version and --benchmark flags
-c, --check string                     A comma-delimited list of checks to run as specified in CIS document. Example --check="1.1.1,1.1.2"
    --config string                    config file (default is ./cfg/config.yaml)
-D, --config-dir string                config directory (default "./cfg/")
    --exit-code int                    Specify the exit code for when checks fail
-g, --group string                     Run all the checks under this comma-delimited list of groups. Example --group="1.1"
-h, --help                             help for kube-bench
    --include-test-output              Prints the actual result when test fails
    --json                             Prints the results as JSON
    --junit                            Prints the results as JUnit
    --log_backtrace_at traceLocation   when logging hits line file:N, emit a stack trace (default :0)
    --log_dir string                   If non-empty, write log files in this directory
    --logtostderr                      log to standard error instead of files (default true)
    --noremediations                   Disable printing of remediations section
    --noresults                        Disable printing of results section
    --nosummary                        Disable printing of summary section
    --nototals                         Disable printing of totals for failed, passed, ... checks across all sections
    --outputfile string                Writes the results to output file when run with --json or --junit
    --pgsql                            Save the results to PostgreSQL
    --scored                           Run the scored CIS checks (default true)
    --skip string                      List of comma separated values of checks to be skipped
    --stderrthreshold severity         logs at or above this threshold go to stderr (default 2)
    --unscored                         Run the unscored CIS checks (default true)
-v, --v Level                          log level for V logs
    --version string                   Manually specify Kubernetes version, automatically detected if unset
    --vmodule moduleSpec               comma-separated list of pattern=N settings for file-filtered logging

Use "kube-bench [command] --help" for more information about a command.
Notice in the help output that there is a run command that tells the application to run the benchmark tests. Also, notice that there are several output options, including --asff for output to AWS Security Hub, --junit for XML unit test output (useful in CI/CD pipelines), and --json for machine-readable output. All of these can be useful for automated testing.
Try running a test with standard text output. Remember that the -v flags attach volumes to the container to expose host configuration directories and the kubectl binary. The -e flag creates an environment variable in the container runtime.
docker run --pid=host \
-v /etc:/etc:ro \
-v /var:/var:ro -v $(which kubectl):/usr/local/mount-from-host/bin/kubectl \
-v ~/.kube:/.kube -e KUBECONFIG=/.kube/config \
-t docker.io/aquasec/kube-bench:latest \
run
Sample Results
student@ubuntu:$docker run --pid=host \
-v /etc:/etc:ro \
-v /var:/var:ro -v $(which kubectl):/usr/local/mount-from-host/bin/kubectl \
-v ~/.kube:/.kube -e KUBECONFIG=/.kube/config \
-t docker.io/aquasec/kube-bench:latest \
run
[INFO] 1 Control Plane Security Configuration
[INFO] 1.1 Control Plane Node Configuration Files
[FAIL] 1.1.1 Ensure that the API server pod specification file permissions are set to 600 or more restrictive (Automated)
...
[Results Truncated]
Sample Results
== Summary policies ==
0 checks PASS
0 checks FAIL
24 checks WARN
0 checks INFO

== Summary total ==
3 checks PASS
67 checks FAIL
52 checks WARN
0 checks INFO
...
[Results Truncated]
Live Data in Use!
Remember that your data may differ from these results!
Notice in the output that some policies are scored as PASS or FAIL, indicating that an automated test was run and scored. Many tests will have a status of WARN, which indicates that the test needs to be performed manually.
We find the output to be a little difficult to read, so on audits, we will often save the test output as JSON and then process that JSON to get a useful report. Try rerunning the tests, specifying JSON output, and redirecting that output to a local file.
docker run --pid=host \
-v /etc:/etc:ro \
-v /var:/var:ro -v $(which kubectl):/usr/local/mount-from-host/bin/kubectl \
-v ~/.kube:/.kube -e KUBECONFIG=/.kube/config \
-t docker.io/aquasec/kube-bench:latest \
run --json > k8sbench.json
Sample Results
student@ubuntu:$docker run --pid=host \
-v /etc:/etc:ro \
-v /var:/var:ro -v $(which kubectl):/usr/local/mount-from-host/bin/kubectl \
-v ~/.kube:/.kube -e KUBECONFIG=/.kube/config \
-t docker.io/aquasec/kube-bench:latest \
run --json > k8sbench.json
student@ubuntu:$
You can use the PowerShell ConvertFrom-Json cmdlet to process the JSON, drilling down to the test results and reporting in a simple text table:
pwsh -c "(Get-Content ./k8sbench.json | ConvertFrom-Json).Controls.tests.results | Select-Object test_number, status, test_desc"
Sample Results
student@ubuntu:$pwsh -c "(Get-Content ./k8sbench.json | ConvertFrom-Json).Controls.tests.results | Select-Object test_number, status, test_desc"

test_number status test_desc
----------- ------ ---------
1.1.1       FAIL   Ensure that the API server pod specification file permissions are set to 600 o…
1.1.2       FAIL   Ensure that the API server pod specification file ownership is set to root:roo…
1.1.3       FAIL   Ensure that the controller manager pod specification file permissions are set …
1.1.4       FAIL   Ensure that the controller manager pod specification file ownership is set to …
1.1.5       FAIL   Ensure that the scheduler pod specification file permissions are set to 600 or…
1.1.6       FAIL   Ensure that the scheduler pod specification file ownership is set to root:root…
1.1.7       FAIL   Ensure that the etcd pod specification file permissions are set to 600 or more…
1.1.8       FAIL   Ensure that the etcd pod specification file ownership is set to root:root (Aut…
...
[Results Truncated]
For automated testing, we will often capture summary results into a time series database for use in a dashboard. One way to do that is to report the number of passed, failed, and skipped (WARN status) tests. The PowerShell Group-Object cmdlet is perfect for this. Run the command below. Notice that the results should match the summary given by the default text output you viewed earlier.
pwsh -c "(Get-Content ./k8sbench.json | ConvertFrom-Json).Controls.tests.results | Group-Object status"
Sample Results
student@ubuntu:$pwsh -c "(Get-Content ./k8sbench.json | ConvertFrom-Json).Controls.tests.results | Group-Object status"

Count Name       Group
----- ----       -----
   67 FAIL       {@{test_number=1.1.1; test_desc=Ensure that the API server pod specification644
    3 PASS       {@{test_number=4.1.2; test_desc=Ensure that the kubelet service file ownership
   52 WARN       {@{test_number=1.1.9; test_desc=Ensure that the Container Network Interface file
Close your Ubuntu SSH tab in Windows Terminal when you have finished.