Lab 3.3: Linux Logging
VMs Needed
- Windows
- Ubuntu
Lab Video
Objectives
- Explore the binary and text-based logging facilities in Linux.
- Configure and query kernel-level auditing.
- Review file integrity monitoring results.
Lab Preparation
Boot the VMs required for the lab (see the "VMs Needed" section above) and log on to the Windows VM using the username student and the password student.
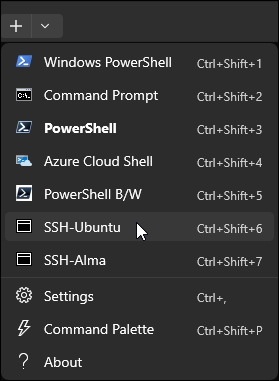
Open an SSH connection to the Ubuntu VM in Windows Terminal. Click the down arrow icon and select SSH-Ubuntu from the drop-down menu.
Part 1: System Logging Facilities
Environment Check
Before proceeding, ensure that you are working in Windows Terminal in a SSH session to the Ubuntu VM.

Background: The syslog (system logging) facility has been around in Linux since the early days. Traditionally, Linux systems have stored logs as text files, which are managed and rotated by the syslog daemon, syslogd, or some equivalent. While many modern Linux distributions also write data to newer binary log files, text-based logs are often still available. In this section of the lab, we will examine the placement of these text logs and explore ways to extract meaningful information from them.
Instructions: Make sure you are connected to SSH on your Ubuntu VM before proceeding. If you are not, then open a new session in Windows Terminal.
Searching Logs
Change to the /var/log directory and obtain a listing of all the log files created by the syslog daemon. The number of files will vary depending on whether the Ubuntu VM has been running long enough to rotate its log files, so you may have more or fewer than the screenshot below:
cd /var/log
ls -l syslog*
The following screenshot was taken on a production Ubuntu server to show you what logs look like on a "real" server.
Sample Results
student@ubuntu-##:$cd /var/log
student@ubuntu-##:$ls -l syslog*
-rw-r----- 1 syslog adm  5232916 Apr 23 23:41 syslog
-rw-r----- 1 syslog adm 12551662 Apr 21 00:00 syslog.1
-rw-r----- 1 syslog adm   286075 Apr 14 00:00 syslog.2.gz
-rw-r----- 1 syslog adm   389711 Apr 10 00:06 syslog.3.gz
-rw-r----- 1 syslog adm   386455 Mar 19 23:29 syslog.4.gz
Live Data in Use!
Remember that your data may differ from these results!
On most systems, the logs are rotated automatically by the logrotate daemon. The rotation frequency is configurable, but often logs will rotate on either a daily or weekly basis. The "syslog" file contains the current log entries, starting from the last time the log was rotated. The "syslog.1" file will contain the entries from before the last rotation, and so on. Notice in the screenshot that files with a suffix of .2 or greater are gzip compressed to save disk space.
Rather than working with your VM's current log files, we have copied some logs from the VM to the /home/student/logs directory. Change into that directory and view the files.
cd /home/student/labFiles/logs
ls -l
Sample Results
student@ubuntu-##:$ cd /home/student/labFiles/logs
student@ubuntu-##:$ls -l
total 1440
-rw-rw-r-- 1 student student 486462 Apr  7 21:57 syslog
-rw-rw-r-- 1 student student 714357 Apr  7 21:57 syslog.1
-rw-rw-r-- 1 student student   4066 Apr  7 21:57 syslog.2.gz
-rw-rw-r-- 1 student student  61646 Apr  7 21:57 syslog.3.gz
-rw-rw-r-- 1 student student   2540 Apr  7 21:57 syslog.4.gz
-rw-rw-r-- 1 student student  31695 Apr  7 21:57 syslog.5.gz
-rw-rw-r-- 1 student student  38496 Apr  7 21:57 syslog.6.gz
-rw-rw-r-- 1 student student 120277 Apr  7 21:57 syslog.7.gz
The text searching and manipulation tools we discussed in class, along with a knowledge of regular expressions, are very useful for searching text-based audit logs. Use the grep command to find lines in the "syslog" file that mention "buggybank," ignoring text case:
grep -i buggybank syslog
Sample Results
student@ubuntu-##:$ grep -i buggybank syslog
Feb 19 08:09:45 debianWebServer docker[874]: /buggyBankContainer
Feb 19 09:48:45 debianWebServer systemd[1]: Configuration file /etc/systemd/system/buggybank.service is marked executable. Please remove executable permission bits. Proceeding anyway.
Feb 19 09:49:18 debianWebServer systemd[1]: Configuration file /etc/systemd/system/buggybank.service is marked executable. Please remove executable permission bits. Proceeding anyway.
Feb 19 09:49:21 debianWebServer systemd[1]: Configuration file /etc/systemd/system/buggybank.service is marked executable. Please remove executable permission bits. Proceeding anyway.
...
[Results Truncated]
You should notice a potential security issue that should be included in your report. The permissions on the "buggybank.service" file used by Systemd are overly permissive. If you wanted to find other services that might have the same issue, you could use grep to find logs which mention both "systemd" and "executable." Use this command to perform that search:
grep "systemd.*executable" syslog
Sample Results
student@ubuntu-##:$ grep "systemd.*executable" syslog
Feb 19 09:48:45 debianWebServer systemd[1]: Configuration file /etc/systemd/system/wackoPicko.service is marked executable. Please remove executable permission bits. Proceeding anyway.
Feb 19 09:48:45 debianWebServer systemd[1]: Configuration file /etc/systemd/system/juice-shop.service is marked executable. Please remove executable permission bits. Proceeding anyway.
Feb 19 09:48:45 debianWebServer systemd[1]: Configuration file /etc/systemd/system/bwapp.service is marked executable. Please remove executable permission bits. Proceeding anyway.
...
[Results Truncated]
To list only the service file paths, add the following to the end of that command:
grep "systemd.*executable" syslog | awk '{print $8}'
Sample Results
student@ubuntu-##:$ grep "systemd.*executable" syslog | awk '{print $8}'
/etc/systemd/system/wackoPicko.service
/etc/systemd/system/juice-shop.service
/etc/systemd/system/bwapp.service
/etc/systemd/system/buggybank.service
/etc/systemd/system/dvwa.service
/etc/systemd/system/wackoPicko.service
/etc/systemd/system/juice-shop.service
...
[Results Truncated]
To remove the duplicates from this list, apply the "sort" and "uniq" tools to the end of the line:
grep "systemd.*executable" syslog | awk '{print $8}' | sort | uniq
Sample Results
student@ubuntu-##:$grep "systemd.*executable" syslog | awk '{print $8}' | sort | uniq
/etc/systemd/system/buggybank.service
/etc/systemd/system/bwapp.service
/etc/systemd/system/dvwa.service
/etc/systemd/system/juice-shop.service
/etc/systemd/system/wackoPicko.service
This list of applications that may be running with excess permission should be included in your audit report.
Working with Zipped Log Files
The 'z' tools can be used to perform similar searches in the compressed log archives. To list the contents of one of the zipped files, you can use the zcat and related commands.
To view the entire contents of one of the logs, use the zcat command, like this:
zcat syslog.2.gz
Sample Results
student@ubuntu-##:$zcat syslog.2.gz
Feb 17 06:26:22 debianWebServer liblogging-stdlog:  [origin software="rsyslogd" swVersion="8.24.0" x-pid="425" x-info="http://www.rsyslog.com"] rsyslogd was HUPed
Feb 17 06:26:22 debianWebServer liblogging-stdlog:  [origin software="rsyslogd" swVersion="8.24.0" x-pid="425" x-info="http://www.rsyslog.com"] rsyslogd was HUPed
Feb 17 06:26:51 debianWebServer tripwire[55295]: Integrity Check Complete: /var/lib/tripwire/debianWebServer.twd TWReport debianWebServer 20190217062622 V:314 S:100 A:192 R:7 C:115
Feb 17 06:26:51 debianWebServer sendmail[55296]: x1HCQp9x055296: from=root, size=16483, class=0, nrcpts=1, msgid=<201902171226.x1HCQp9x055296@debianWebServer.aud507.local>, bodytype=8BITMIME, relay=root@localhost
...
[Results Truncated]
To view the contents using a paginator, use the zless command:
zless syslog.2.gz
Remember that the spacebar and up/down arrows can be used to navigate the results, and the 'q' key will let you "quit" the zless command
Finally, to search the compressed files, you can use the zgrep command:
zgrep "systemd" syslog.2.gz
Sample Results
student@ubuntu-##:$zgrep "systemd" syslog.2.gz
Feb 17 06:45:49 debianWebServer systemd[1]: Starting Daily apt upgrade and clean activities...
Feb 17 06:45:52 debianWebServer systemd[1]: Started Daily apt upgrade and clean activities.
Feb 17 06:45:52 debianWebServer systemd[1]: apt-daily-upgrade.timer: Adding 22min 52.146198s random time.
Feb 17 06:45:52 debianWebServer systemd[1]: apt-daily-upgrade.timer: Adding 57min 57.810782s random time.
Feb 17 06:55:10 debianWebServer systemd[1]: Starting Daily apt download activities...
Feb 17 06:59:12 debianWebServer systemd[1]: Started Daily apt download activities.
Feb 17 06:59:12 debianWebServer systemd[1]: apt-daily.timer: Adding 4h 39min 50.278011s random time.
...
[Results Truncated]
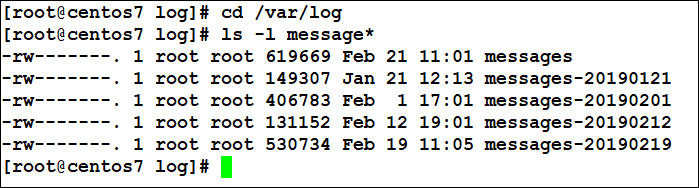
Please note: on many (especially Redhat-based) Linux distributions, the main syslog file will be named "messages" instead of syslog, and older logs may be saved with the rotation date in the filename. Your techniques for searching for them will be the same. In the screenshot below, we have listed the logs on a Redhat-based system for your reference.
Part 2: Systemd Logging
Background: Newer Linux distributions that make use of systemd for startup and management write logs in a binary log file format to journal files. These files are normally stored in either the /var/log/journal or /run/log/journal directory.
Environment Check
Before proceeding, ensure that you are working in Windows Terminal in a SSH session to the Ubuntu VM.
Instructions: Explore the contents of the journal file using the journalctl command. Please note that the command shows data using the "more" tool to display the data one page at a time. Use the spacebar to move to the next page, and the up and down arrows to move one line at a time. Use the q key to quit viewing the current results. The pager can be turned off by adding --no-pager to the command line.
Type this command to view all the log entries in the journal:
sudo journalctl
Sample Results
student@ubuntu-##:$ sudo journalctl
Apr 07 12:35:48 ubuntu kernel: Linux version 6.8.0-1021-azure (buildd@lcy02-amd64-022) (x86_64-linux-gnu-gcc-13 (Ubuntu 13.3.0-6ubuntu2~24.04) 13.3.0, GNU ld (GNU Binutils for Ubuntu) 2.42) #25-Ubuntu SMP Wed>
Apr 07 12:35:48 ubuntu kernel: Command line: BOOT_IMAGE=/vmlinuz-6.8.0-1021-azure root=PARTUUID=28ea9c09-219f-4a7a-8170-59ff4e2a1ce8 ro console=tty1 console=ttyS0 earlyprintk=ttyS0 nvme_core.io_timeout=240 pa>
Apr 07 12:35:48 ubuntu kernel: KERNEL supported cpus:
Apr 07 12:35:48 ubuntu kernel:   Intel GenuineIntel
Apr 07 12:35:48 ubuntu kernel:   AMD AuthenticAMD
Apr 07 12:35:48 ubuntu kernel:   Hygon HygonGenuine
Apr 07 12:35:48 ubuntu kernel:   Centaur CentaurHauls
Apr 07 12:35:48 ubuntu kernel:   zhaoxin   Shanghai
Apr 07 12:35:48 ubuntu kernel: BIOS-provided physical RAM map:
...
[Results Truncated]
Live Data in Use!
Remember that your data will differ from the screenshots!
Use the space bar and arrow keys to explore the entries returned, and then type "q" to leave the paginated results.
To see only log entries created since the last system boot, use the following command:
sudo journalctl -b
Sample Results
student@ubuntu-##:$ sudo journalctl -b
Apr 07 12:35:48 ubuntu kernel: Linux version 6.8.0-1021-azure (buildd@lcy02-amd64-022) (x86_64-linux-gnu-gcc-13 (Ubuntu 13.3.0-6ubuntu2~24.04) 13.3.0, GNU ld (GNU Binutils for Ubuntu) 2.42) #25-Ubuntu SMP Wed>
Apr 07 12:35:48 ubuntu kernel: Command line: BOOT_IMAGE=/vmlinuz-6.8.0-1021-azure root=PARTUUID=28ea9c09-219f-4a7a-8170-59ff4e2a1ce8 ro console=tty1 console=ttyS0 earlyprintk=ttyS0 nvme_core.io_timeout=240 pa>
Apr 07 12:35:48 ubuntu kernel: KERNEL supported cpus:
Apr 07 12:35:48 ubuntu kernel:   Intel GenuineIntel
Apr 07 12:35:48 ubuntu kernel:   AMD AuthenticAMD
Apr 07 12:35:48 ubuntu kernel:   Hygon HygonGenuine
Apr 07 12:35:48 ubuntu kernel:   Centaur CentaurHauls
Apr 07 12:35:48 ubuntu kernel:   zhaoxin   Shanghai
Apr 07 12:35:48 ubuntu kernel: BIOS-provided physical RAM map:
...
[Results Truncated]
Live Data in Use!
Note that your results will vary from this screenshot since these are logs from a live VM.
To see a list of all the separate boots logged in the journal, type the following:
sudo journalctl --list-boots
Sample Results
student@ubuntu-##:$ sudo journalctl --list-boots
-12 307aa774cbbb4e7ba414da71121fbc9e Wed 20##-01-04 13:17:32 UTC—Wed 20##-01-04 19:17:49 UTC
-11 50d2c94502f540c090e4d840a06ddb5c Thu 20##-11-16 14:41:33 UTC—Thu 20##-11-16 14:49:49 UTC
-10 69f378ec9b414a0fa540216aece9439b Wed 20##-12-06 21:53:49 UTC—Wed 20##-12-06 21:59:17 UTC
 -9 3411d5e1e45b44b281c431b973813e9d Tue 20##-12-12 07:16:17 UTC—Wed 20##-12-13 03:14:20 UTC
 -8 eb18cdcc67544147a2dc42e5f95f12f7 Wed 20##-12-13 12:26:01 UTC—Wed 20##-12-13 13:18:24 UTC
 -7 976a2d855d7e4a80bb6422e66adfa310 Wed 20##-01-03 00:00:41 UTC—Wed 20##-01-10 00:34:07 UTC
 -6 01abcbdaa70240df8d32f7a39a2d7e2c Wed 20##-01-10 00:38:23 UTC—Wed 20##-01-10 03:29:08 UTC
 -5 7e16062bd0f84f1698be378ce8a86290 Wed 20##-01-24 00:37:23 UTC—Wed 20##-02-14 03:45:01 UTC
 -4 bc61156ab4814c748582aa146ed86855 Wed 20##-03-06 01:02:52 UTC—Wed 20##-03-13 03:43:13 UTC
 -3 1ca66ca9c0394c3aa3dc8660a0876c75 Tue 20##-03-19 23:28:56 UTC—Wed 20##-03-20 00:41:56 UTC
 -2 d51b24d5b06e46fab04bfa73cf2edd60 Wed 20##-03-20 00:45:05 UTC—Fri 20##-03-22 02:28:46 UTC
 -1 1546a740c87e40719634579a1edd2b76 Wed 20##-04-10 00:06:34 UTC—Wed 20##-04-10 02:43:40 UTC
  0 f58f0784b03c4d0fa58045b5c0c1688a Fri 20##-04-12 19:25:54 UTC—Tue 20##-04-23 23:53:48 UTC
Live Data in Use!
Note that your results will vary from this screenshot since unique boot IDs are assigned every time a systemd system boots.
The bottom of the list is the most recent. The numbers in the left-hand column are an offset from the current boot. "-5" represents the log information gathered five boots ago. The second column is a boot ID, which can be used to query logs from only that boot session. To retrieve logs from two boots ago, you would enter the following (use the q key to quit the paginator):
sudo journalctl -b -2
Or specify the boot ID value, using the one of the UUIDs from the journalctl --list-boots command, like this:
journalctl -b xxxxxxxxxxxxxxxxxxxxxxxxxxxxxxxx
You can also query the journal for events during a particular time frame, like this:
sudo journalctl --since yesterday
or
sudo journalctl --since yesterday --until "1 hour ago"
Sample Results
student@ubuntu-##:$ sudo journalctl --since yesterday
Apr 22 00:00:00 ubuntu fleet[1051]: {"cron":"automations","instanceID":"2qDaZn6Z2xFae+Z1Ta+twc>
Apr 22 00:00:00 ubuntu fleet[1051]: {"cron":"automations","instanceID":"2qDaZn6Z2xFae+Z1Ta+twc>
Apr 22 00:00:00 ubuntu fleet[1051]: {"cron":"automations","instanceID":"2qDaZn6Z2xFae+Z1Ta+twc>
Apr 22 00:00:01 ubuntu microk8s.daemon-kubelite[428261]: E0422 00:00:01.430022  428261 dns.go:>
Apr 22 00:00:01 ubuntu systemd[1]: Starting Daily dpkg database backup service...
Apr 22 00:00:01 ubuntu audit: BPF prog-id=364 op=LOAD
Apr 22 00:00:01 ubuntu systemd[1]: Starting Rotate log files...
...
[Results Truncated]
Live Data in Use!
Note that your results will vary from this screenshot since unique boot IDs are assigned every time a systemd system boots.
To query for events created by a particular unit name, you could enter a command like this:
sudo journalctl -u snap.microk8s.daemon-containerd.service
To search for entries related to a specific binary, you can use one of these formats:
sudo journalctl /usr/sbin/sshd
or
sudo journalctl -t sshd
Sample Results
student@ubuntu-##:$ sudo journalctl -u snap.microk8s.daemon-containerd.service
Nov 16 14:46:26 ubuntu systemd[1]: Starting Service for snap application microk8s.daemon-conta>
Nov 16 14:46:26 ubuntu microk8s.daemon-containerd[63119]: + source /snap/microk8s/6089/actions>
Nov 16 14:46:26 ubuntu microk8s.daemon-containerd[63119]: ++ [[ /snap/microk8s/6089/run-contai>
Nov 16 14:46:26 ubuntu microk8s.daemon-containerd[63119]: + is_strict
Nov 16 14:46:26 ubuntu microk8s.daemon-containerd[63218]: + cat /snap/microk8s/6089/meta/snap.>
...
[Results Truncated]
Live Data in Use!
Note that your results will vary from this screenshot since unique boot IDs are assigned every time a systemd system boots.
On your own, try to show entries for when the sudo command was run.
Part 3: Auditd
Background: Most newer Linux distributions include the audit daemon, auditd, for performing kernel-level auditing of object access, process management, and other aspects of system operation. Auditd can also be used to monitor important directories for changes. In this section of the lab, you will use auditctl to configure a rule to watch root's home directory. After making some changes to the directory, you will run queries to see what changes were made.
Environment Check
Before proceeding, ensure that you are working in Windows Terminal in a SSH session to the Ubuntu VM.
Instructions: Make sure you are connected to SSH on your Ubuntu Server and proceed with the commands below.
To check that auditd is installed, you can use aureport to view a summary of auditd activity. If it returns results with no errors, then it is installed and working.
sudo aureport
Sample Results
student@ubuntu-##:$sudo aureport

Summary Report
======================
Range of time in logs: 01/10/20## 01:40:06.791 - 04/23/20## 23:55:45.900
Selected time for report: 01/10/20## 01:40:06 - 04/23/20## 23:55:45.900
Number of changes in configuration: 4885
Number of changes to accounts, groups, or roles: 0
Number of logins: 6
Number of failed logins: 0
Number of authentications: 1
Number of failed authentications: 0
Number of users: 3
Number of terminals: 10
Number of host names: 2
Number of executables: 20
Number of commands: 15
Number of files: 0
Number of AVC's: 0
Number of MAC events: 0
Number of failed syscalls: 0
Number of anomaly events: 39
Number of responses to anomaly events: 0
Number of crypto events: 0
Number of integrity events: 0
Number of virt events: 0
Number of keys: 0
Number of process IDs: 10423
Number of events: 63018
Live Data in Use!
Remember that your data may differ from these results!
Next, use the auditctl command to list the current set of auditd rules. Since you just installed auditd, the rule set will be empty:
sudo auditctl -l
Finally, add rules to watch the home directories of both the student and root users. The keywords "rootHome" and "studentHome" will be attached to log entries created by the rules, respectively. You will be able to search for these keywords later to see events logged by each rule:
sudo auditctl -w /root -k rootHome
sudo auditctl -w /home/student -k studentHome
When you list the rules again, you should see your new rules included:
sudo auditctl -l
Sample Results
student@ubuntu-##:$ sudo auditctl -l
No rules
student@ubuntu-##:$ sudo auditctl -w /root -k rootHome
student@ubuntu-##:$ sudo auditctl -w /home/student -k studentHome
student@ubuntu-##:$ sudo auditctl -l
-w /root -p rwxa -k rootHome
-w /home/student -p rwxa -k studentHome
Now, you will make some changes to root's home directory. In another lab, you will use a tool called lynis to audit the configuration of the Ubuntu host. It is currently saved in the lab files repository, but you'll run it from root's home directory. You'll copy the tool directory now as a test of auditd. Run these commands to copy the files:
sudo cp -vR /home/student/labFiles/lynis /root
sudo chown -R root:root /root/lynis
sudo chmod +x /root/lynis/lynis
Finally, run the ausearch and aureport tools to see if auditd correctly logged the changes to root's home directory. First, run ausearch, looking for the keyword "rootHome," which you created for the rule to watch root's home directory:
sudo ausearch -k rootHome
Sample Results
student@ubuntu-##:$sudo ausearch -k rootHome
----
time->Tue Apr 23 23:56:17 20##
type=PROCTITLE msg=audit(1713916577.250:15042): proctitle=617564697463746C002D77002F726F6F74002D6B00726F6F74486F6D65
type=SYSCALL msg=audit(1713916577.250:15042): arch=c000003e syscall=44 success=yes exit=1072 a0=4 a1=7fff046d1120 a2=430 a3=0 items=0 ppid=2786160 pid=2786161 auid=1000 uid=0 gid=0 euid=0 suid=0 fsuid=0 egid=0 sgid=0 fsgid=0 tty=pts1 ses=1 comm="auditctl" exe="/usr/sbin/auditctl" subj=unconfined key=(null)
type=CONFIG_CHANGE msg=audit(1713916577.250:15042): auid=1000 ses=1 subj=unconfined op=add_rule key="rootHome" list=4 res=1
...
[Results Truncated]
Live Data in Use!
Remember that your data may differ from these results!
While this utility seems to output a lot of information, it's not very human-readable just yet. Next, run the output of ausearch through the aureport tool to see the data in a more readable format:
sudo ausearch -k rootHome | sudo aureport -f -i
Sample Results
student@ubuntu-##:$sudo ausearch -k rootHome | sudo aureport -f -i

File Report
===============================================
# date time file syscall success exe auid event
===============================================
1. 04/23/20## 23:56:51 /root/lynis mkdir yes /usr/bin/cp student 15064
2. 04/23/20## 23:56:51 /root/lynis/CHANGELOG.md openat yes /usr/bin/cp student 15067
3. 04/23/20## 23:56:51 /root/lynis/CODE_OF_CONDUCT.md openat yes /usr/bin/cp student 15069
4. 04/23/20## 23:56:51 /root/lynis/CONTRIBUTING.md openat yes /usr/bin/cp student 15071
5. 04/23/20## 23:56:51 /root/lynis/CONTRIBUTORS.md openat yes /usr/bin/cp student 15073
...
[Results Truncated]
Live Data in Use!
Remember that your data may differ from these results!
The report should show you hundreds of Linux system calls made to create, open, and change ownership of files and directories under the /root directory.
Leave your SSH connection open for the next lab.